Analytics User Guide: Nightingale

Sections that have changed with Nightingale are noted here:
- In Account Details, updated screenshots to reflect that “Claim Type” is now “Debt Type” and “Gate Status” is now “Record Status”.
- In My Activities, added information about how Senders can see summary file information for their Receivers in the File Status table.
- In Account Search, updated screenshot of Available Filters to show the new Re-opened status filter.
- In Reports > General Reports > Legal Lifecycle Report, updated the screenshot to show three new columns in the drill down screen: Placement Date, Suit Date, and Judgment Date.
How to advance to the top of this User Guide:
- When you start scrolling, you’ll see the Up Arrow button at the bottom right.
![]()
- When you hover over the button, it will turn blue.
![]()
- Press the button to advance to the top of the page.
Log In
Once a Vertican staff member has created an Analytics account for you, you will receive an email invitation to set up your password and multi-factor authentication method.
NOTE: All users are required to use multi-factor authentication to access the vExchange Analytics Dashboard.
Multi-Firm Login
If your user account has been approved to access data from multiple Firm IDs, then you will be asked to select which firm you wish to access. Users may only access data from one Firm ID per session. To switch which firm’s data to access, please logout and select the desired firm when you login.

Log Out
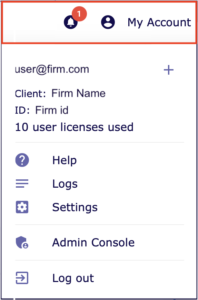
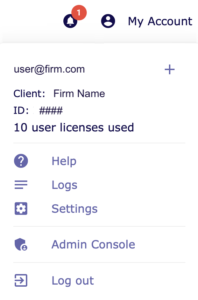
- Click My Account in the top right corner of the page.
- Click Log out.
Multifactor Authentication
Initial Setup
- Visit: https://analytics.vertican.com.
- Enter username & password.
- You will be prompted to set up multifactor authentication.
- Select one of the available methods:
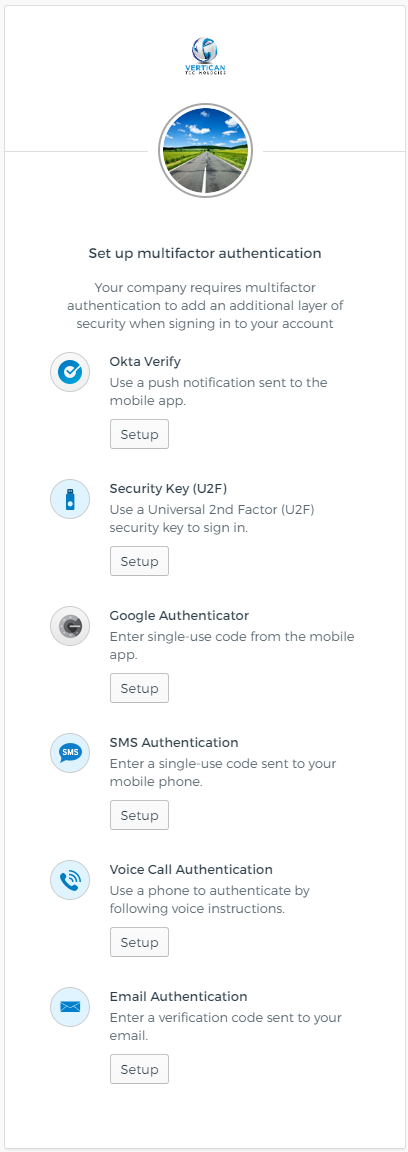
- Follow the on-screen instructions to complete the verification process.
- Once verified, you will be able to use your chosen method.
NOTE: Using email for multi-factor authentication is less reliable than other methods.
- Messages may arrive in your spam or junk folder. Make sure to check these folders if your email authentication message doesn’t arrive.
- Networking issues may delay email messages. If the email authentication message arrives after the code expires, you must request another email authentication message.
Reset MFA
If you get a new phone or no longer have access to your method of multi-factor authentication, your firm admin can reset your MFA for you. You will be prompted to set up a new method the next time you login before you can access company data.
Ongoing Login
- Visit https://analytics.vertican.com or save a bookmark to your most-used pages.
- Enter username and password.
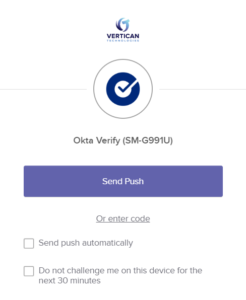
- Complete the multifactor authentication prompt.
- You will be taken to the Analytics landing page or redirected to a specific page that you were trying to access.
Account Lockout
Users will be temporarily locked out of their accounts if they enter the wrong password multiple times. To avoid this, please follow the instructions to reset your password before your account is locked.
NOTE: Do not contact Client Support to reset your password if your account is locked. You must wait approximately 60 minutes for the system to automatically unlock your account.
Password Reset
- Navigate to the Login page.
- [Need help logging in].
- [Forgot password].
- Enter your email.
- Click the link in the resulting email
- NOTE: The email will come from [email protected]. Be sure to check your Junk folder or whitelist this email address.
- Enter a new password in both fields and press [ENTER].
Users can access Analytics from 8:00 a.m. ET to 5:30 p.m. ET.
All users will be logged out after 30 minutes of inactivity. A countdown warning will appear before the user is logged off. For compliance reasons, this timeout cannot be changed.
Supported browsers are the latest versions of Chrome and Edge.
My Account
Notifications

Occasionally, the system will notify you of important information. When a notification arrives, you will see a numbered badge appear on the Notification icon in the top menu. You can also access notifications from the My Activities page.
Click on the Notification icon to view available notifications and, when possible, to dismiss or respond to them. Examples of notifications include:
- Product feedback requests
- New release announcements
- System Maintenance alerts
User Licenses
A valid license is required for all users who wish to access the Analytics website.
- Your Firm’s vExchange mailbox / support plan includes up to 10 active Analytics accounts.
- Each active user account is a license that contributes to your count.
- Additional accounts are charged an extra monthly fee.
- You can check the number of licenses your firm is using under the My Account menu.
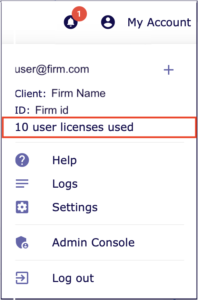
- The Firm Admin is able to deactivate or modify accounts so your firm stays within its 10 free licenses.
Note: A user account is for a single user. It is not permitted to share user accounts by allowing more than one person to log in with the same email address.
Switching Receiver/Sender Views
If your firm sends and receives claims under the same Firm ID, then you can use the Receiver-Sender toggle switch in the “My Account” menu to change how you want to view your claims. When you switch views, all reports and charts will automatically refresh to reflect the change.
- As a Sender, you will see claims where your Firm ID was designated as the Sender.
- As a Receiver, you will see claims where your Firm ID was designated as the Receiver.

Help
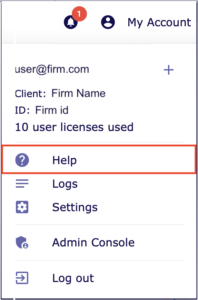
To access the Vertican Help Center from the Analytics website, click the Help link under the My Account menu. vPortal login is required.
You can also access the Vertican Help Center directly, even when you are not logged in to the Analytics website.
- You will need to log in to the vPortal to access the Help Center.
- If you do not have access to vPortal, please ask your firm’s Administrator to grant you access using these instructions.
- Client Success is not able to grant users access to vPortal. Access is controlled by the firm.
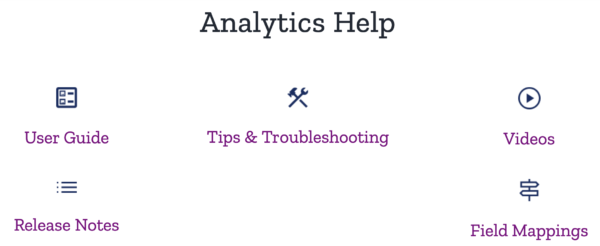
- Once logged in to the Help Center on vPortal, hover over Self-Help Resources and select ANALYTICS to go to the Analytics Help page.
Logs
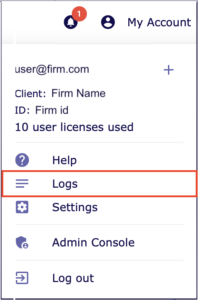
The Logs Report is a comprehensive view of all log data available in Analytics. Use this report to see when files were processed by vExchange, including how many records were processed from each file. Pick one or more required categories to search. You will receive an error message if you do not pick at least one category. Click the collapse icon to hide the filter area.
![]()
Settings
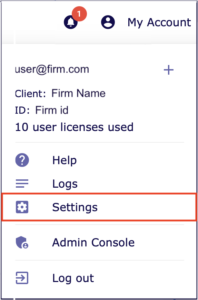
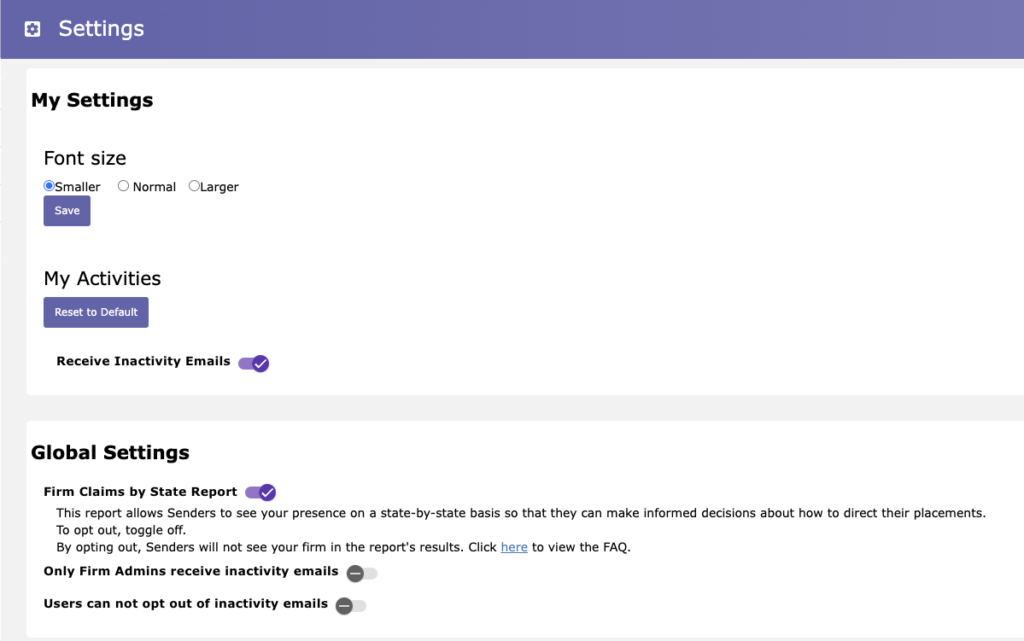
- Font Size:
- To improve accessibility, you can permanently change your font size settings by choosing My Account > Settings, selecting the desired font size, and clicking [Save].
- You can also temporarily change the size of the text throughout the website in order to make it easier to read on your particular screen.
- My Activities
- Use the [Reset to Default] button to revert any changes you’ve made back to the default view.
- Receive Inactivity Emails:
- A monthly email reminder will be sent to users who have unremediated rejections in Analytics but have not logged in for more than two weeks. This is to ensure that rejections are being addressed in a timely manner.
- Users can opt themselves out by turning off the “Receive inactivity emails” toggle.
- Your Firm Admin may prevent users from opting out of these emails.
- Firm Admins are not allowed to opt out of these emails and will always receive a summarized version of the email reminder.
- Global Settings (visible to Firm Admins):
- Firm Claims by State Report:
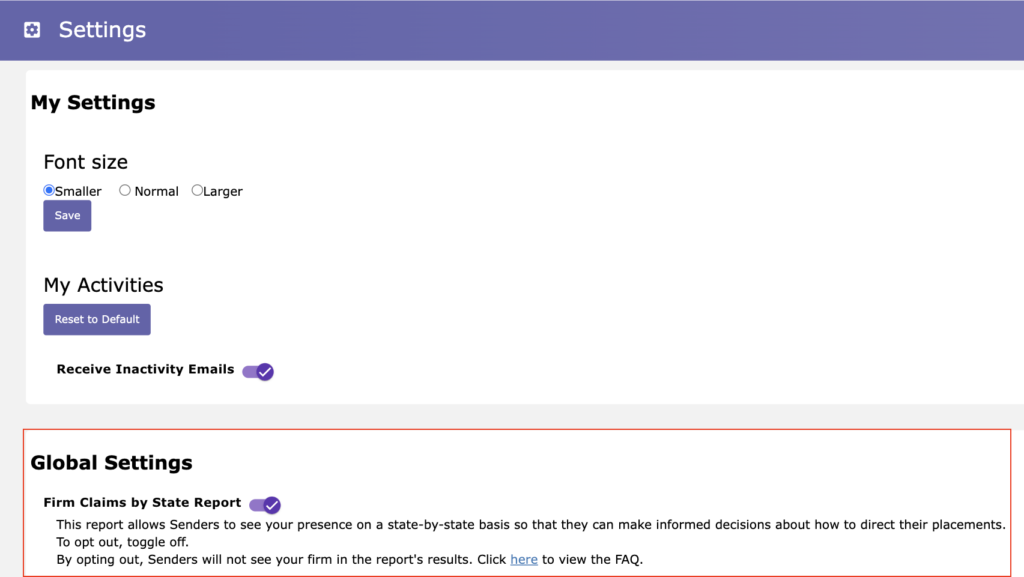
- Keep this toggle on to ensure your firm is displayed to Senders in the Firm Claims by State report.
- Turning this toggle off means your firm will not show to Senders looking to place business with firms in specific states.
- Only Firm Admins receive inactivity emails:
- You can prevent your firm’s users from receiving inactivity emails by turning this toggle on.
- If this toggle is on, you will be the only person that receives inactivity emails.
- Users cannot opt out of inactivity emails:
- By default, users can turn the Receive Inactivity Emails toggle to off in their Settings.
- Firm Admins can prevent users from opting out of Inactivity Emails by turning this toggle on.
- Firm Claims by State Report:
Admin Console
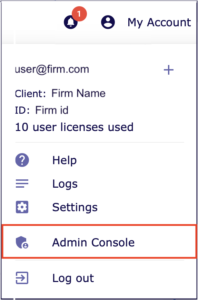
You will only see the Admin Console link under My Account if you are a Firm Admin.
Dashboard
Search Account Numbers
The Dashboard landing page allows you to Search Account Numbers (formerly called Basic Search). The Account Number search is also under the left navigation menu under Search.
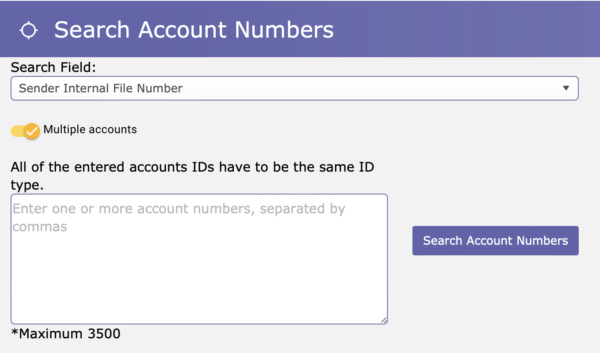
- In the Search Field, use the dropdown menu to select the type of account number you wish to search for.
- If you want to search for a single account, enter the account ID number and click [Search Account Numbers].
- If you want to search for multiple accounts:
- Slide the toggle so that the “Multiple accounts” toggle is in the ON position with a check mark.
- Enter up to 3,500 account ID numbers, separated by commas. Whitespace is ignored.
- Click [Search Account Numbers].
- If a single account is found, the Account Details page will open in a new tab.
- If multiple accounts are found, a table will show the results. Otherwise, a message will indicate that no accounts were found.
CCAM
CCAM is Vertican’s Client Communication In-App Messaging tool. When you click the CCAM image, you’ll be directed to important information about releases, vConnect, the Mastermind series, or other Vertican news.

My Activities
From the main screen, click My Activities. The My Activities page displays important information, including rejection summaries and analytical charts, in a single view. This makes it easier for you to see linkages and act on your data. Use My Activities as your go-to page after login.
Notifications
- The My Activities page will display reminders of any active notifications that require your attention.
- These are the same notifications that you will see if you click on the notifications icon in the top menu.
File Status Table
-
“The File Status table shows the status of each of your uploaded files from the past three days. You can see how many files vExchange received, whether they passed validation, and how many were successfully imported into vExchange. Senders are able to see the status of their Receivers’ files as well.
-
A yellow warning icon will appear next to known processing problems.
-
Click any item in the list to open details in the File Status Report.
- Senders can see summary file information for their receivers but not drill-down to details. Select a FirmID from the drop-down to only see files from that firm.
-
NOTE: Blank fields indicate that the file has not reached that step of the process. The table is updated periodically throughout the day.

Rejections Table
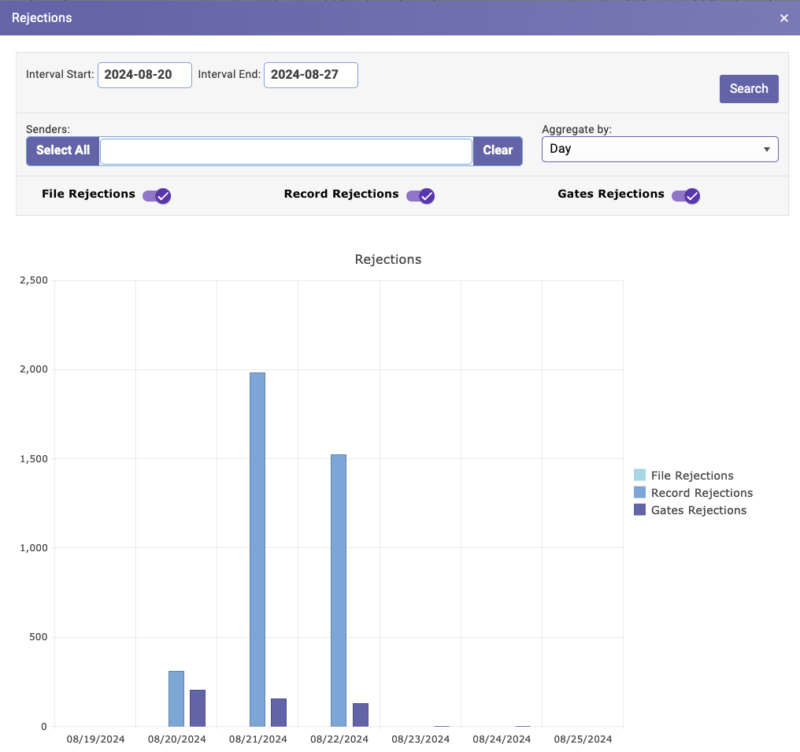
The Rejections table below shows you a count of the last week of each rejection type: File, Record, and Gates rejections. This consolidated count of all rejections acts as an alert that can save you time. Instead of starting your day searching for rejections, check the widget and then drill down to the items of interest.
Example: Let’s say your Rejections table shows you have Record rejections on July 11. You can then go to Search > Records and use July 11 as the date filter.

From the Rejections table, click the [Zoom In] button to quickly visualize File, Record, and Gates Rejections for specific firms and time periods.
This makes it easy to see if a firm’s quality is improving over time.
The example here shows the File and Record Rejections for one selected firm. You can toggle to view or hide File Rejections, Record Rejections, and Gates Rejections for the firms you’ve selected.
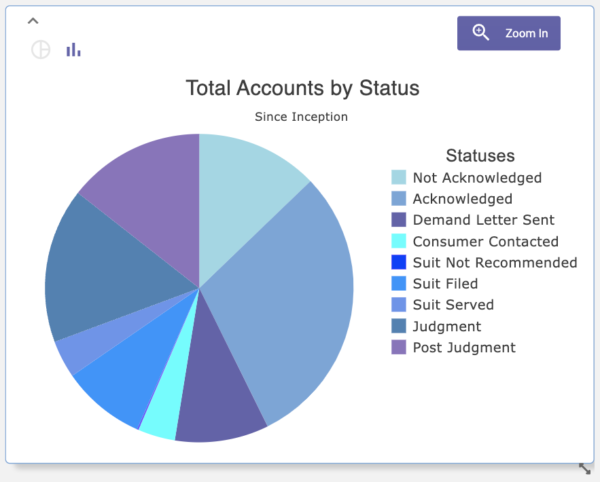
My Activities has a growing library of widgets, which are charts that provide quick insights into claims inventory and rejections.
- Hover Text: Hovering over any part of the chart will display more detailed information for that part.
- Drill Down: Clicking any part of the chart will open a related report where you can further explore the underlying data.
- Filter: Clicking on any item in the legend will filter it out of the chart. Clicking it again will add it back.
- Date Range: Pie charts will display the date range of the underlying data.
Zoom In View
Click the “Zoom In” button to see a larger version of each widget.
For line and bar charts, you can also switch between Year, Month, Week, and Day aggregation so you can see the level of detail you prefer.
The Zoom view provides more tools for interacting with the chart data. On many charts, you are able to expand the date range and level of detail. You can also export data directly from the Zoom In view to save you from opening separate reports. Click the [Export] button from within the Zoom In view.
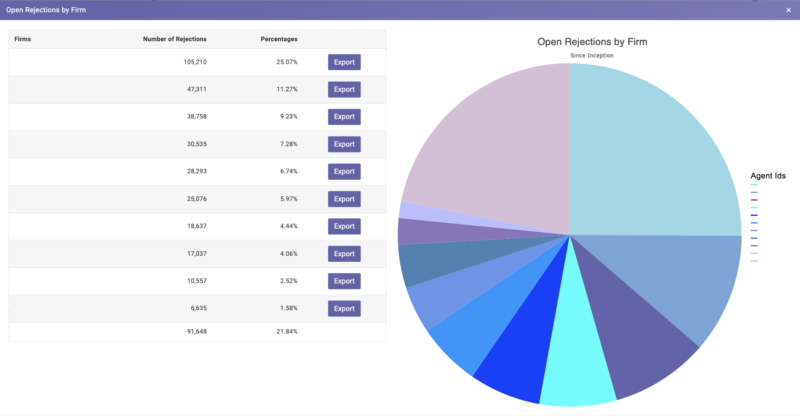
Copy Table Data
Click on the [Copy Table] button to put the table data on the clipboard for use in other applications such as PowerPoint or Excel.
Drill Down
In most cases, clicking on any part of the widget will open a report listing individual records that make up that part of the widget. For example, clicking on any part of the Accounts by Status widget will open Search with the chosen status pre-selected.
Personalization
It’s easy for you to organize charts by collapsing, resizing, and arranging, them as you see fit. Analytics will remember how you’ve organized the page each time you log in.
Collapse
- Click on the arrow toggle in the top left of a widget to collapse it so you only see the widgets that are most useful to you. You can also drag collapsed charts to the bottom of the page.
- Data will not load for collapsed charts, so the My Activities page will load faster.
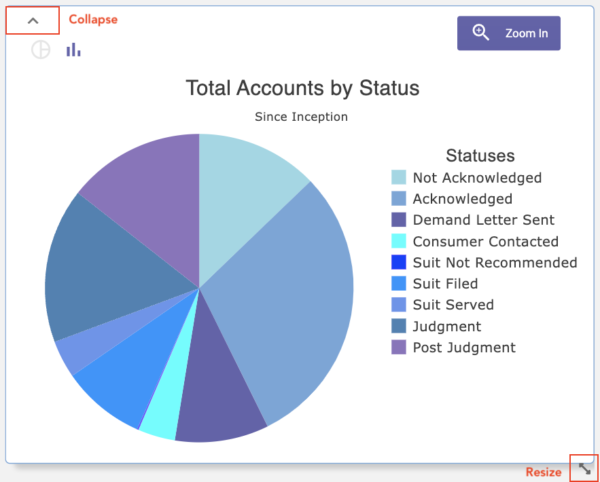
Resize
- Resize charts using the bottom right double arrow shown in the screenshot above.
- The default layout is two columns 50/50.
- Resizing allows you to fit more than two charts horizontally or to place one chart across the full width of the screen.
- Limitations are only defined by your preference and monitor size.
Rearrange
- To move charts to your preferred location, simply drag and drop them.
Chart Type
On some charts, you can switch between pie chart and bar chart format.
- Pie charts are a good way to see the relative size of each category while bar charts make it easier to see small categories (i.e. the long tail).
- The bar chart view eliminates the need to distinguish colors or zoom in to see small values.
- This feature is available on the following My Activities charts: Open Rejections by Firm/Rule; Placement Balance by Receiver/Sender; Total Accounts by Status; and Total Accounts Statuses by Receiver/Sender.
- To use this feature on available charts, click the upper left icon.
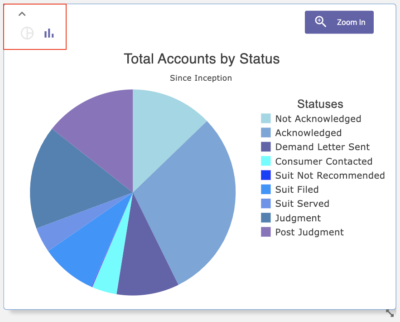 Switch to Bar Chart by Clicking Top Left Icon
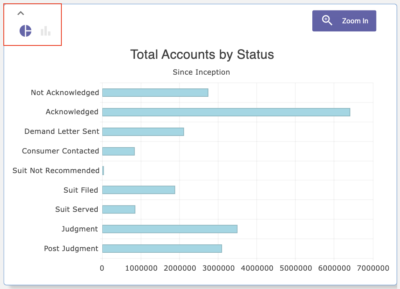 Switch to Pie Chart by Clicking Top Left Icon
Search Menu
Click on Search in the main left menu to search by Account Numbers, Accounts, Records, and Gates Rejections. Gates Rejections will only be visible if one of your Senders subscribes to Universal Gates or Custom Gates. The Search menu consolidates items and was formerly called Advanced Search.
Account Numbers
Search > Account Numbers is the same search that can be found on the Dashboard landing page. It has been placed in the Search menu to consolidate it with other searches.

- Select the type of account number to search for.
- If you want to search for a single account, enter the account number and click [Search].
- If you want to search for multiple accounts:
- Slide the “Multiple accounts” slider to the ON position.
- Enter up to 3,500 account numbers, separated by commas. Whitespace is ignored.
- Click [Search].
- If a single account is found, the Account Details page will open in a new tab. If multiple accounts are found, a table will show the results. Otherwise, an error message will indicate that no accounts were found.
Accounts
Search > Accounts allows you to find accounts that match a variety of criteria like status, placement date, debtor name or FirmID.
![]()
On the right side of the Search screen, you will see two icons as shown in the above screenshot.
- Click this icon to display the filters popup window, which allows you to select filters.

- When search results are displayed, click this icon to see results without them being obscured by the filters.

When you click the icon to display the filters, you will see a popup box with 2 tabs:
- The Available filters tab will show all available filters for the type of search you are performing.
- The Saved searches tab is covered in the next section.
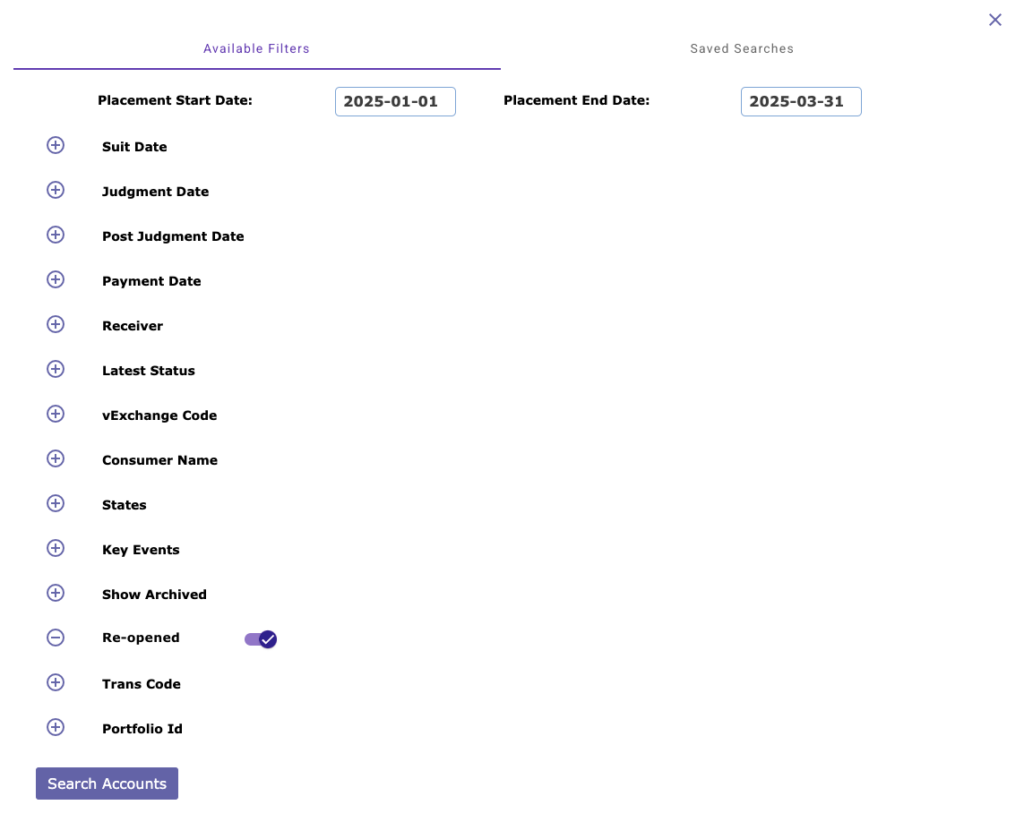
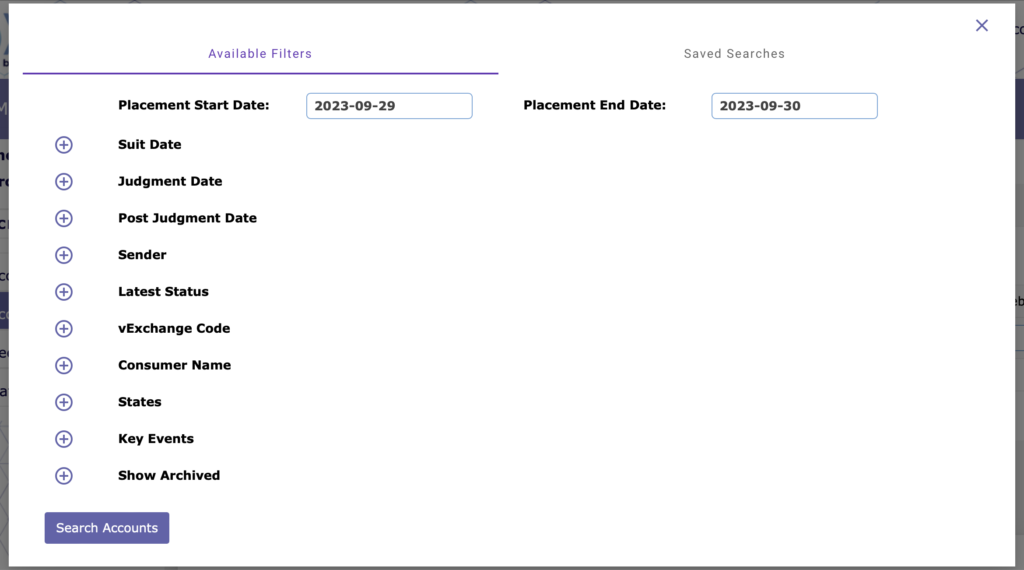
- Pick a required Placement Start and End Date to search for accounts that were placed within a specific range.
- Other Available Filters shown above are optional. Refer to the Field Mappings page for details on what filters map to.
- Enter an optional Suit Date range. The First and Last Suit Date columns will automatically appear in the grid results.
- Enter an optional Judgment Date range. The First and Last Judgment Date columns will automatically appear in the grid results.
- Enter an optional Post Judgment Date range. The First and Last Post Judgment Date columns will automatically appear in the grid results.
- Enter an optional Payment Date range. This filter looks at vExchange 2303 and 2304 records.
- Enter one or more optional firm names/IDs to search for accounts associated with that firm.
- Senders will see a list of Receivers and vice versa.
- Receivers have the additional option to narrow the search by Sender sub ID. If no sub ID is selected, all sub IDs will be included in the results.
- Select an optional Latest Status to narrow the search to accounts with the selected status.
- Select an optional vExchange Code to narrow the search to accounts with the selected code.
- Select an optional Consumer Name (First and/or Last) to narrow the search to accounts with the selected name as the primary debtor.
- Select one or more optional States to narrow the search to accounts with the selected debtor state(s).
- Select one or more optional Key Events to narrow the search to accounts that have ever gone through the selected event(s).
- Expand and set the Show Archived filter to limit your search to archived or unarchived accounts. Leave the filter collapsed to see both archived and unarchived accounts. When this filter is used, you will be able to export the results in a format that can be used in the Bulk Unarchiving tool if you are a Sender with unarchive permissions.
- Select an optional Trans Code to narrow the search to accounts with the specified transaction code in a Financial record.
- Enter an optional Portfolio Id, to narrow the search to accounts with the specified portfolio_id in the placement record. The Portfolio Id allows you to create and label custom groups for your accounts.
- Results will be displayed in the Grid panel. An icon will be displayed next to archived accounts:


- There are three export buttons in the results grid: Export, Export Records, and Export for Unarchive. Export for Unarchive is only available to Senders for use with the Bulk Unarchiving tool.
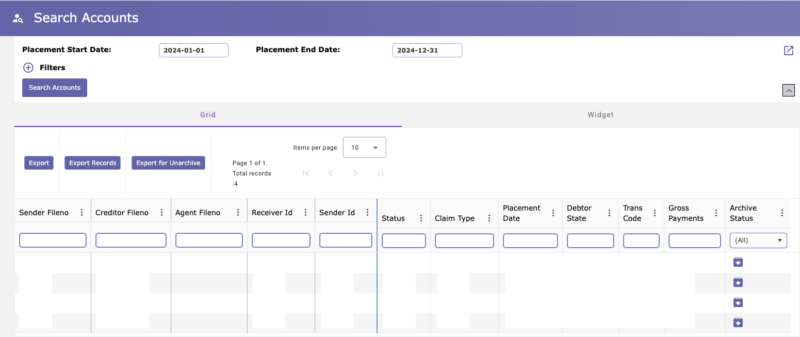
- To visualize your search results, select the Widget panel.
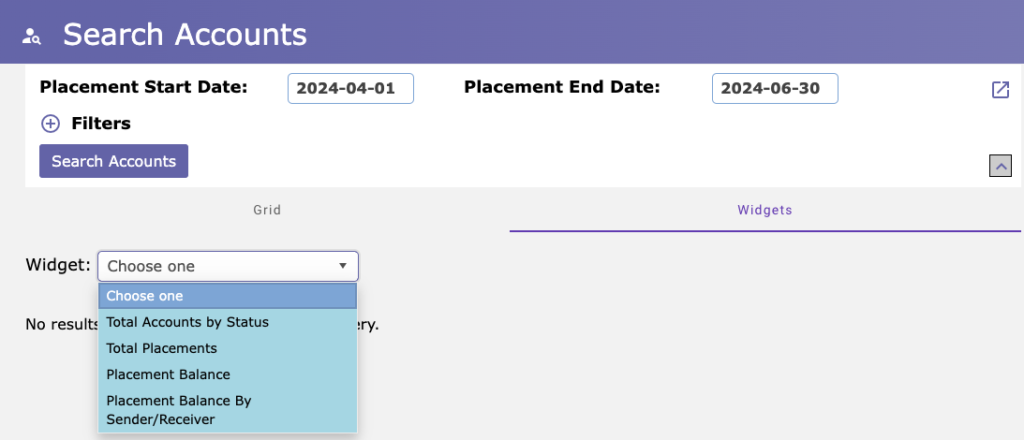
NOTE: Filters are combined during the search, so only accounts that match all of the given filters will be displayed. There is currently no way to search for accounts that match ANY of the given filters.
Records
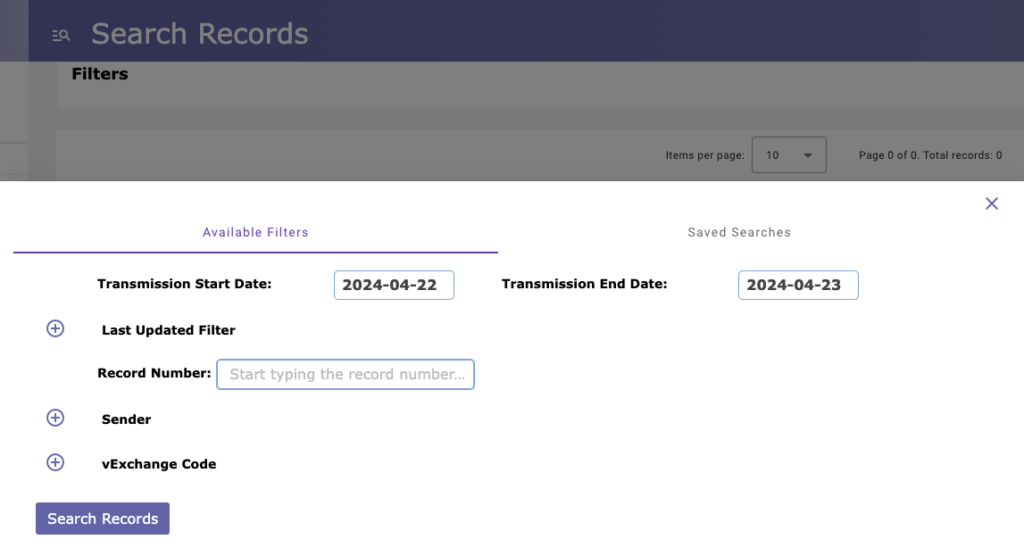
Search > Records allows you to find accounts that have selected vExchange record types. You can use filters to narrow in on what you are looking for. The main use of the records search is to quickly investigate what vExchange contains for a specific record without having to directly access the DB (e.g. using SSMS).
-
- Select a required Transmission Start/End Date and Record Number.
- Select optional filters.
- Click [Search Records].
- Click on any row to open Account Details for the associated account.
- Note that the table columns will dynamically update based on the selected vExchange record.
- Note that the data shown here is identical to the data shown in Raw Data.
- Note: Records for archived accounts will not be exported. Contact your Sender to unarchive any accounts that require exported records.
Gates Rejections
Search > Gates Rejections allows you to find accounts with gate rejections associated with them based on criteria like remediation status and rejection date.
- Gates Rejections are only visible to those firms whose Senders have Gates.
- The Gates Rejections provides the same data that used to be in the All Rejections/Exceptions Report.
On the right side of the Search screen, you will see this icon to display the filters popup window. Click this icon to open the Available Filters tab.![]()

- Pick a required Rejection Start and End Date to search for rejections/exceptions that first occurred within a specific range.
- Other Available Filters shown above are optional. Refer to the Field Mappings page for details on what filters map to.
- Pick an optional Remediation Start and End Date to search for rejections/exceptions that were remediated within a specific range.
- Enter one or more optional rule numbers to search for rejections/exceptions associated with that rule. Note that inactive rules are available and clearly flagged.
- Enter an optional Remediation Type to narrow the search to accounts with the specified type (i.e., “System”, “Auto”, or “Manual”).
- Pick an optional Gate Type. Custom gates are unique to a specific sender while Universal gates are available to all senders.
- Enter one or more optional firm names/IDs to search for accounts associated with that firm.
- Senders will see a list of receivers and vice versa.
- Receivers have the additional option to narrow the search by sender sub ID.
- Pick a required remediation status. By default, only unremediated items are displayed. Change the radio button selection to display only remediated items or all items together.
- Enter an optional Portfolio Id, to narrow the search to accounts with the specified portfolio_id in the placement record. The Portfolio Id allows you to create and label custom groups for your accounts.
Results will be displayed in the table. The same columns are available as other rejection reports.

- To visualize your search results, select the Widget panel. Select any of the available widgets from the drop-down.
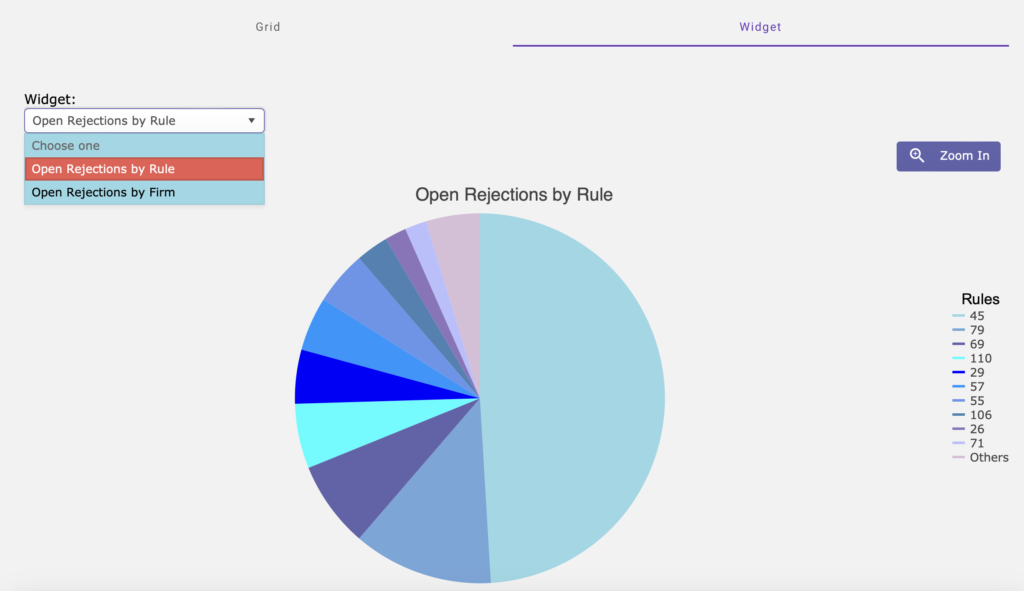
- Click on any slice to drill-down into your results.
- Click “Zoom In” to see more details about your results.
Manual Remediations in Shared Searches
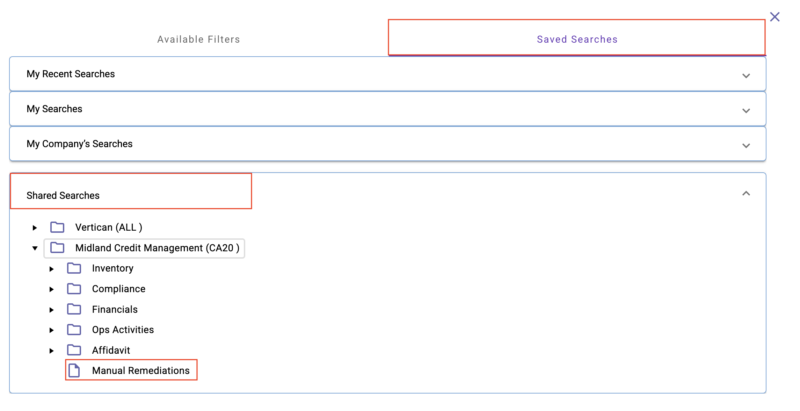
- The Manual Remediation saved search includes all rules that can be manually remediated so that it is easy to find them all in one place.
- Some rules can only be remediated through an offline, manual process. At the conclusion of that process, Senders have the ability to mark such rejections as manually remediated.
- From the home page, go to Search > Gates Rejections > Saved Searches tab > Shared Searches toggle, where you will see Manual Remediations.
- This is the same as what you would see in Search > Gates Rejections with the Remediation Type filter to “only show Manual”.
- By saving the Shared Search as a Saved Search, you can save your particular parameters (e.g., column order, sort order).
- Rejections can be exported and remediated in bulk via the Bulk Remediation upload tool.
Remediation of Specific Gates Rejections (Senders)
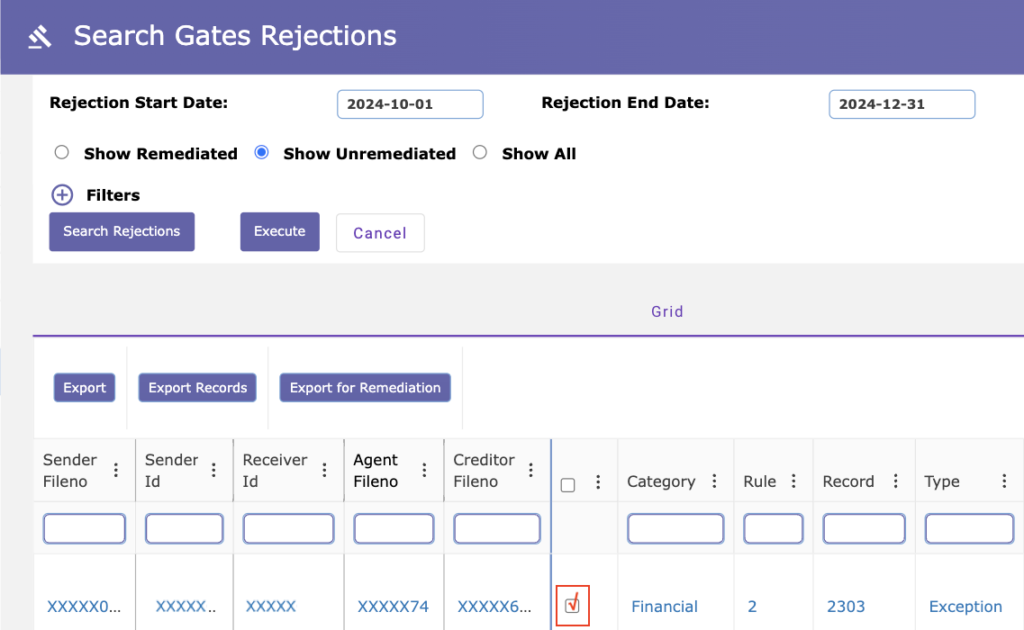
- Senders can use the [Manual Remediation] and [Forced Remediation] buttons to remediate specific rejections, as an alternative to the Bulk Remediation tool. These buttons allow you to remediate only select rejections.

- Once you click either button, you will see a checkbox that allows you to select the individual rejections you wish to remediate.
- Note that the checkbox is in the left most unlocked column. In the screenshot below, there is a delineator line between locked columns on the left and unlocked columns on the right.
- Once you place a checkmark next to the rejection(s) you wish to remediate, click the [Execute] button.
Export for Bulk Remediation (Senders)
- On the Search Gates Rejections screen, you will see the [Export for Remediation] button. This will help you quickly remediate a large number of rejections via the Bulk Remediation tool.

- When you click the [Export for Remediation] button, select the type of remediation you want to perform from the resulting submenu: Forced or Manual.

- This will export an Excel file that includes all rejections from the results grid that are eligible for the type of remediation you chose (e.g. only rejections that can be manually remediated will be included in the Excel file if you choose Manual from the sub-menu).
- A maximum of 100K rejections can be exported in to the Bulk Remediation Tool in this way.
- To handle more rejections, use the [Export All] button and manually edit the resulting file to match the format required for the Bulk Remediation tool. You can also edit the file to ensure only the items you want to remediate are included.
- Choose the type of Bulk Remediation that matches the type of remediation of your Excel file.

Saved Searches
Overview of Saved Searches
Saved Searches are a convenient way for you to save the searches and grid layouts that you and your firm use most. Saved Searches remembers your specific search filters and enables you to organize searches related by role, type, or process. You can even have it save columns and sorting.

When you run a Saved Search, the Filters area of the Search screen will display a breadcrumb that shows you which Saved Search you just ran.

Four types of Saved Searches
- My Recent Searches is automatically populated with the most recent saved searches that you have performed. This makes it easy for you to quickly find and run your most frequent searches.
- My Searches are only available to you and cannot be shared with other users in your firm. You do not need any special permissions to save user searches.
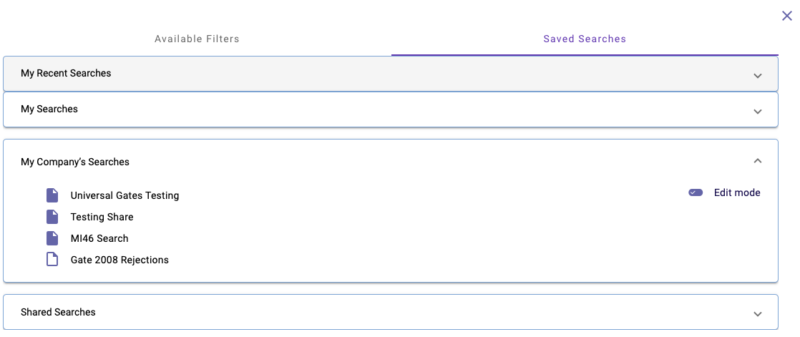
- My Company’s Searches are available to all users in your firm. This is helpful when multiple staff members need to run the same search. My Company’s searches also allow the firm to ensure consistency in how searches and exports are performed. Your Firm Admin must provide you with permissions in order to create My Company’s searches.
- Shared Searches are available when another firm creates a search in My Company’s Searches and shares it with you as a Receiver. Shared Searches allow different firms to see the same search results laid out in the same way on their screens. This makes it easy to collaborate remotely.
Saved Searches apply to the type of search
- Your Saved Searches only apply to the type of search you are performing.
- In other words, if you save a Records Search, it will only be available on the Search Records page.
- This allows you to save specific types of searches without having to remember what kind it was.
- This is especially helpful when saving a search that is available to all users in your firm.
View or Create Saved Searches
- To view existing Saved Searches or create a new one, click on the
 icon to open the filters pop-up.
 - The “Saved Searches” tab will show all available saved searches for the type of search you are performing.
- After closing the pop-up, a summary of the filters associated with your saved search are available when you click the “+” sign next to “Filters” on the main page.”
Run a Saved Search
- Navigate to the Saved Searches tab.
- Expand the Recent, User, Company, or System Searches section to see the desired list.
- Double-click on the search you want to run. The pop-up will close and the results of your Saved Search will appear in the Grid tab.”
Managing Saved Searches
- Navigate to the Saved Searches tab.
- Expand the panel for My Recent Searches, My Searches, My Company’s Searches, or Shared Searches to see the desired list.
- Click on the [Edit mode] toggle:

- To create a new folder at the current level, click “New Folder”. New folders can only be created as the top level or under existing folders.
- To save a new search, click “Save Search”. New searches can be saved at the top level or under an existing folder. All filters selected in the “Edit Filters” tab as well as the current column settings and sort order will be saved.
- To edit an existing folder or search, click the pencil icon next to the name of the item. Available options will be displayed below the item. Options include creating a new sub-folder, saving a new search, renaming the item, or deleting the item.
Shared Searches
Senders
Sender users can share My Company’s Searches with their Receivers. Your Firm Admin will have to grant you the required permissions before you are able to share searches.
- Find any of My Company’s Searches under the Accounts, Records, or Gate Rejections Search screens.
- From the Saved Searches tab, open My Company’s Searches.
- Click the [Edit mode] toggle to enter edit mode.
- Click the pencil icon next to the search you would like to share.
- In the blue popup box, confirm the search you wish to share.
- If a search has been shared previously, you will be able to unshare it by clicking the Unshare icon.
Receivers
- Receivers will see the shared search under Shared Searches.
Locked Columns in Search
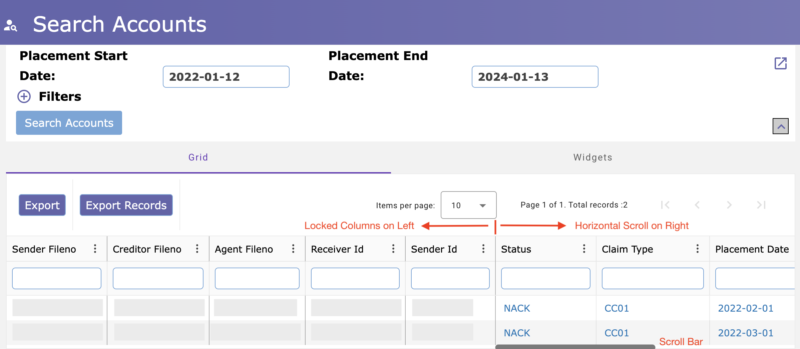
Locked columns keep your preferred columns from moving while you scroll horizontally.
- Columns on the left remain anchored on the screen, while columns on the right move with the scroll bar.
- By dragging and dropping column headers, you can move columns from the locked zone on the left to the unlocked zone on the right or vice versa.
- There must be at least one locked column so that you do not lose the left zone, so the Sender Fileno column will always remain locked.
- Saved Searches will remember which columns you’ve locked.
In most cases, it is possible to drill down into the underlying data that is displayed on the screen. When the Raw Data is available, the cursor will change to a finger pointer, indicating that you can click on a row or field to see the Raw Data. Raw Data can be exported for further analysis, but Raw Data for archived accounts cannot be exported. Contact your Sender to unarchive any accounts that require exported records. All Personal Identifiable Information (PII) is masked in Raw Data.

Search Export
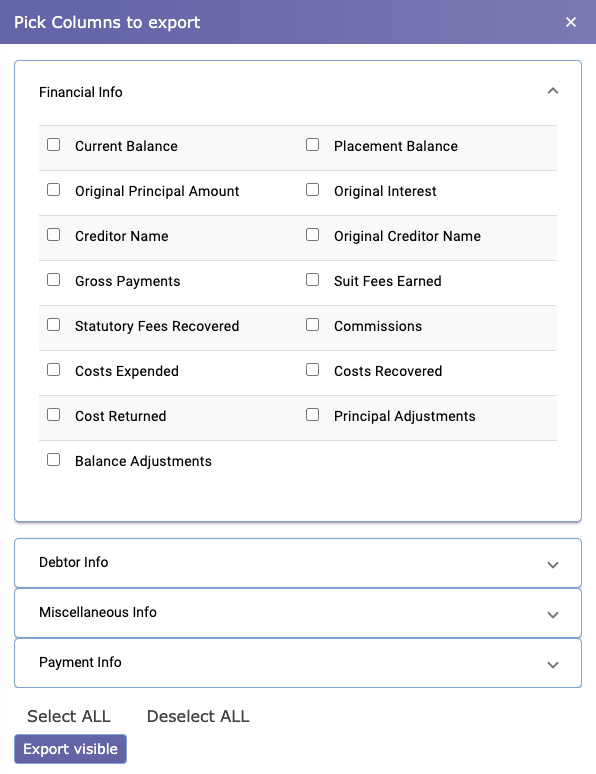
When you click [Export] on the Search screen, a popup window will open to display additional fields that can be exported. Select the desired fields and click Export. You have the following selection options in the “Pick Columns to export” pop-up window.
- Click the down arrow toggle to open sections (e.g., the Financial Info section in the screenshot below).
- Check boxes for specific fields.
- Click [Select ALL] to select all fields.
- Click [Deselect ALL] to clear all fields.
Don’t show this window again
- The toggle switch next to “Don’t show this window again” allows you to keep your field selections the next time you perform an export.
- To hide the pop-up window: Click the toggle switch to the right. Your current selections will be used in all future exports.
- To show the pop-up window: Hold the [CTRL] key while clicking the [Export] button to show the pop-up window again, after it has been hidden. You can then select different fields.
Export Records
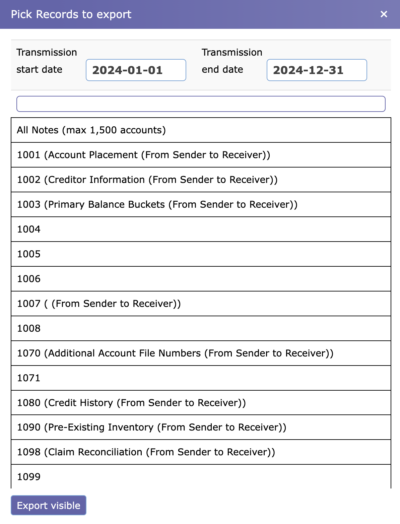
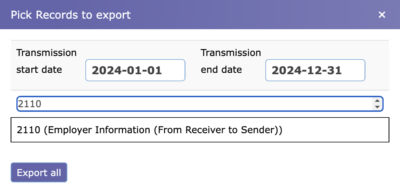
When you click [Export Records] on the Search screen, a pop-up window will open to display a list of vExchange records available to export. All records of the chosen type will be exported for each account in the results grid. If there are no available records, you will be alerted and no file will be downloaded.
- By default, the Transmission Date range is set to the same range as the Placement Date range you originally searched for. Change the Transmission Date range if you want to find records sent during a different range.
- Select “All Notes” to export all Note-related record types (e.g. 1405, 1410, 2405).
- Note: If there are more than 1,500 accounts in the result list, the resulting set of Note records may be too large to download.
- You can start typing in the text field to narrow search results and jump to the record you want. You can also scroll down the list and click on the desired record.
- Note: Records for archived accounts will not be exported. Contact your Sender to unarchive any accounts that require exported records.
Account Details Overview
The Account Details page is useful for viewing specific details of an account. Access the Account Details page by clicking on an account in any report.
- The top area of Account Details defaults to a collapsed view to display more information when navigating between the panels (Debtors, Key Events, etc.).

- To expand the top information, click the caret icon in the top right, as shown above. Doing so will expand the top as shown below.

The Account Details page has several panels with more detailed information. Click on any section name to jump directly to that panel.
- General Account Information: Appears at the top of the page.
- Debtors: Lists information for all debtors on the account.
- Key Events: Shows when each event took place with handy aging information.
- Notes: Includes all notes that are associated with the account.
- Calls: Lists all incoming and outgoing phone calls logged against this account.
- Legal: Shows fields relevant to legal activities.
- Financials: Includes a list of balance, cost, and payment fields.
- Disputes: This panel displays a list of disputes associated with the account.
- Account Numbers: Lists additional account identifiers other than Creditor/Sender/Agent numbers, as well as linked accounts.
- Records: Displays a count of all records associated with this account. Clicking any row will display the Raw Data pop-up window.
- Rejections: A list of all rejections/exceptions associated with the account.
Account Details Panels
NOTE: Panels are not visible for archived accounts.
Some of the panels have sub-panels that display very specific fields. You can choose between sub-panels or select the one labeled “All” and see all sub-panels listed together.
Notes Panel
The Notes panel displays all 1000-series and 2000-series notes records (e.g. 1405, 2405, 2410, 1407). You can also see which notes are associated with a Key Event.

Calls Panel
The Calls panel provides multiple views of phone calls for the account. You can view All phone calls, just RPCs or just outgoing Attempts. This panel is useful when researching potential regulatory violations.

Legal Panel
The Legal Panel has a number of sub-panels with details about suits, judgments, and attorneys.

Legal → SOL Sub-Panel
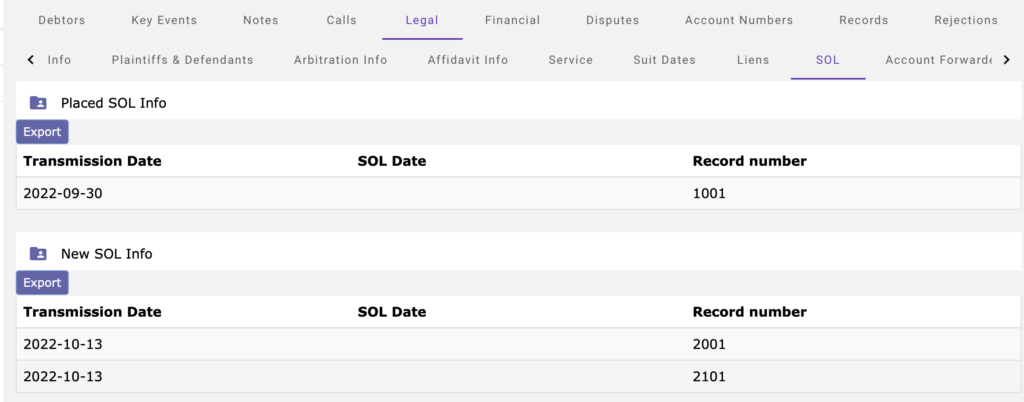
The “Placed SOL Date” field, located at the top of the Account Details page displays the date provided in the original placement. All additional SOL dates are shown on the Legal → SOL Sub-Panel. Any dates that do not match the “Placed SOL Date” are highlighted to make it easy to see.
Financial Panel
The Financial panel includes several sub-panels related to payments, remittances, and balance updates.

Dynamic Financial Totals
The Financials sub-panels show dynamically-calculated totals in the bottom row. When you filter columns, the totals update to reflect the rows that are displayed. This is helpful for filtering our rejected transactions and totaling the valid ones.

Historical Remittance
The Historical Remittance sub-panel displays record 2303 information. By default, the table does not include file name information, which makes the data load more quickly. When you change the toggle button to “File Name On” filenames will load into the table.

Account Numbers Panel
Additional Account Numbers Subpanel

Linked Accounts Subpanel
Any linked accounts will be listed in the Linked Accounts sub-panel. Clicking the hyperlinked values will open Account Details for the linked account.

Records Panel
The Records Panel lists a count of all 1000 and 2000-series records associated with an account. You can see the underlying data by clicking any row to see the Raw Data pop-up window.

Rejections Panel
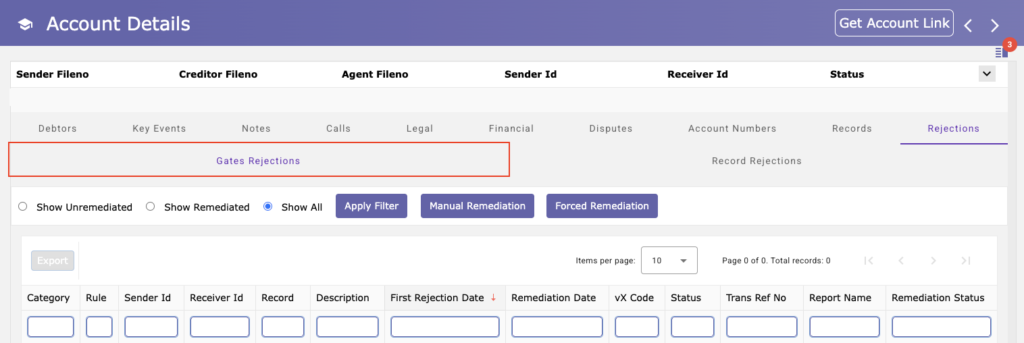
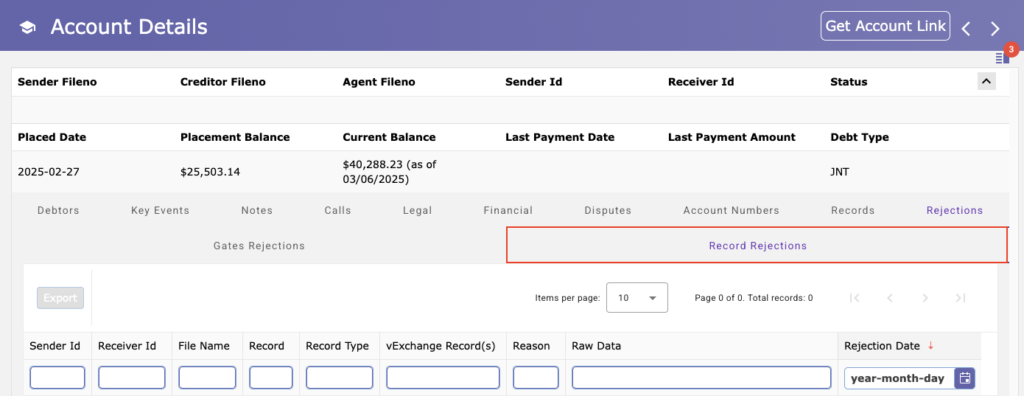
The Rejections Panel shows all of the rejections and exceptions that have been created against this account. This panel has a Gates Rejections subpanel and a Record Rejections subpanel. The Gates Rejections subpanel shows the [Manual Remediation] and [Forced Remediation] buttons, which are only visible to Senders.
Account Information Panel
The Account Information Panel is located on the right side of the Account Details screen. Within this collapsible panel, there is a notification icon, with a badge alerting you to information that will display on various cards.
Click the alert icon badge to expand the panel and open various cards.

Orphan Account Warning Card
- Under certain circumstances, a single account can become “orphaned”, meaning that vExchange is unsure which account to associate with new, incoming records. This can result in missing records, duplicate accounts or other anomalies. In these instances, you will see a warning along with a link to a help page on Inventory Exceptions.

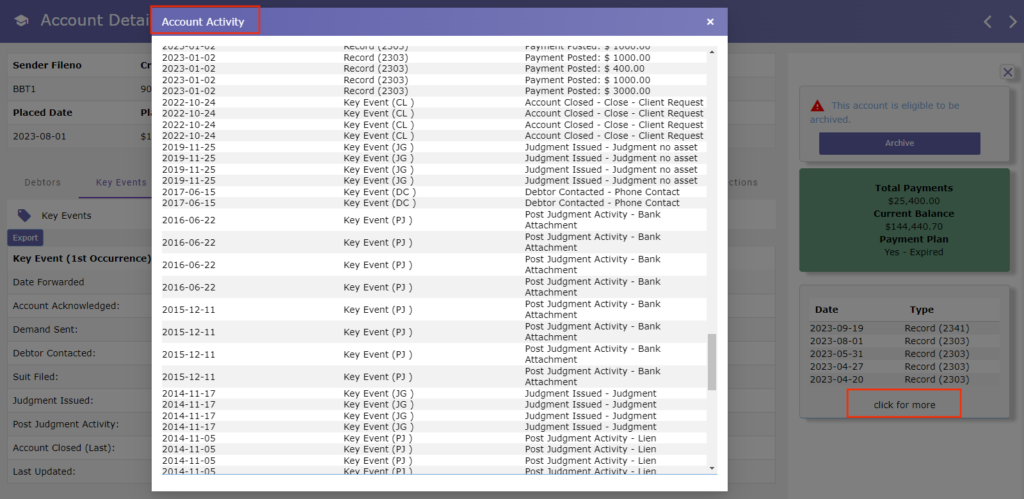
Account Activity Card
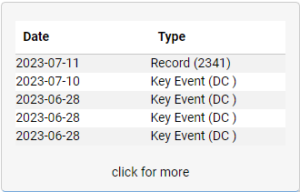
- The Account Activity card can save you from having to click on separate tabs because it shows a unified list of the five most recent key events, rejections, remediations, and archive actions.
- You can currently see the following records: 1001s/2001 placement records, 1201/2201 suit and judgment records, and 2303/2304 payment records. More records will be added in the future.
- Click anywhere on the card to open a detailed view of listed activities. This will help you align the different events over time and research problems.
If you follow instructions to “click for more”, you will see an expanded view of Account Activity.
Archive Card
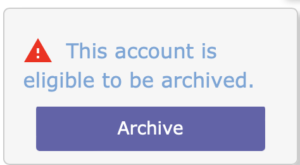
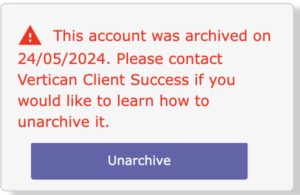
- Archive information shows you the archive status of the account with a link to archive or unarchive accounts.
- Archives and unarchives are processed overnight and put in the standard process (7 days for archive and 2 days for unarchive).
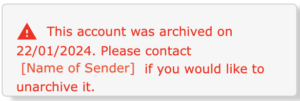
- The Archive Card will also display in the middle of the screen on archived accounts so it is clear that the account is archived and the date it was archived.
- The card that displays depends on the role and permissions of the user:
- Senders with permission can archive accounts.
-
- Senders with permission can unarchive accounts.
-
- Receivers will always see this card.
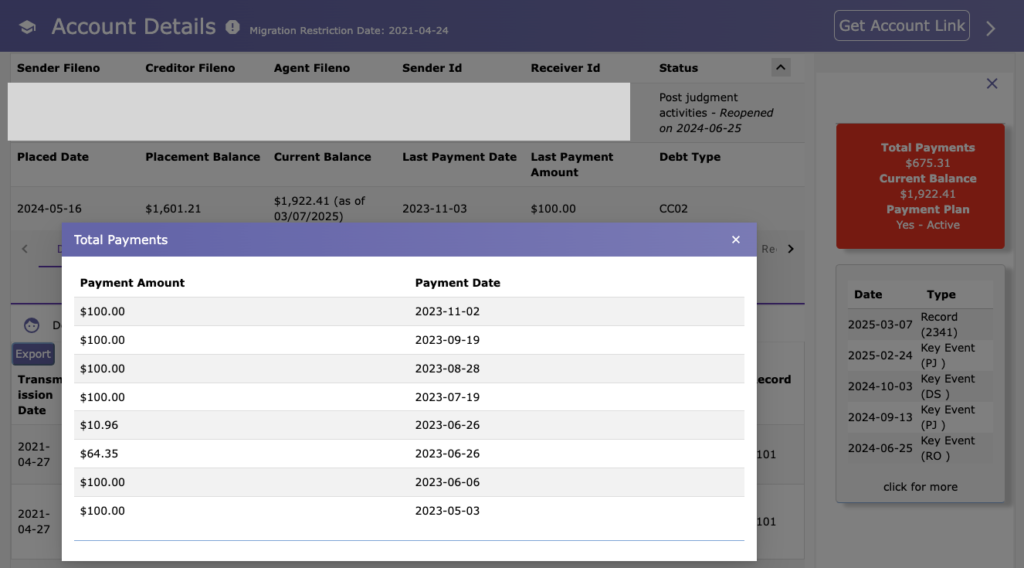
Total Payments Card
- The Total Payments card will show a history of 2303 and 2304 payments received on the account.
- Note that 2302 records are not currently included.
- Records with $0 payments will not be displayed.
- The card will be colored based on the following criteria:
- Green: There was a payment in the last 60 days.
- Red: No payment was made in the last 60 days.
- Yellow: No judgment or payment was received.
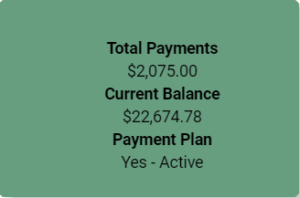
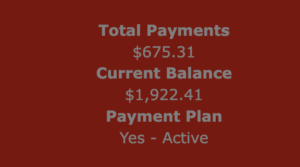
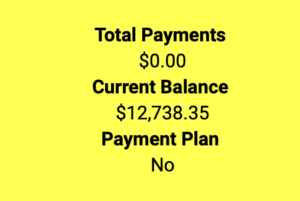
- When you click the card, you will see a popup window with details:
Open Gates Rejections Card
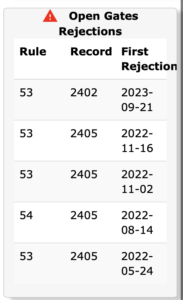
- The Open Gates Rejections card will list any open gates rejections that require remediation.
Linked Accounts Card
- The Linked Account card will list any other accounts linked to this one.
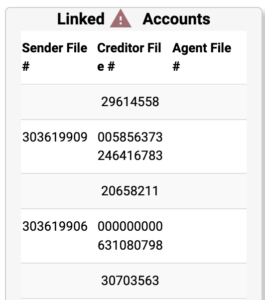
- This is the same information you would see in Account Details under the Account Numbers tab > Linked Accounts sub-tab. The notifications simply make it easier for you to get information that could be on separate tabs.

Archived Data Not Available
Archived accounts are by definition dormant. In Analytics, Receivers can see accounts that have been archived, but will not be able to see any record updates they make to an account that has been archived.Records on Archived accounts will not display and you can no longer export Archived data using the [Export Records] button. Archived data will also not show in Account Details.If you try to display or export data for Archived accounts, you will see one of these messages, either at the top of the Account Details page or on the Archive card in the Account Information panel.
- Account Details message: “The account is archived and the raw data is no longer available.”
- Archive Card message: “This account was archived on [date]. Please contact [name of Sender] if you would like to unarchive it.”


Reports
Report Overview
Click on Reports in the main left menu to find Operations Reports, General Reports, Financials Reports, Servicer Reports, and Gates Reports.
- Servicer Reports are only visible to Senders.
- Gates Reports are only visible if your Sender(s) subscribe to one or more Gates (business rules).
Named Views
You can now persist your view preferences using Named Views on the following reports:
- Judgments Report
- Key Events Report
- Legal Lifecycle Report
- Payments and Costs Report
Named Views allows you to create a customized view where you can apply filters, change the column order, and the sort order. Named Views in Reports is similar to Saved Searches in the Search pages.
On the top right of the page, click the expand icon .
You will then see the three expandable sections below.

Report Layout
Most reports look and operate similarly. Below is an overview of the layout and content of reports.
- Start/End Dates
- Reports will display records that fall between the start and end dates.
- Choose calendar date ranges using buttons, instead of selecting exact dates on the calendar. For example, click the Last Month button to automatically select the appropriate Placement Start and End dates in the calendar. There are eight date range buttons to choose from: This Week – Month – Quarter – Year and Last Week – Month – Quarter – Year.
- The [Export] button will generate a file with the accounts in the results grid. Choose either [Export All] or [Export Visible].
- [Export All] will export all available columns and all rows in a pipe-delimited TXT file. For details on opening the file, see How to Open Exported Pipe-Delimited Files in Excel.
- [Export Visible] will export columns and rows that are on the screen to an XLS file. You can increase the number of visible rows with the “Items per page” drop-down at the bottom of the results grid..

- After choosing a type of export, the [Export] button turns into a [Cancel] button that will show your download progress. You can cancel a download at any time by clicking the [Cancel] button.
.

- The Export Records button will display a list of vExchange records available to export. All records of the chosen type will be exported for each account in the results grid. If there are no available records, you will be alerted and no file will be downloaded. Choose either [Export All] or [Export Visible].
- [Export All] will export all available columns and all rows in a pipe-delimited TXT file. For details on opening the file, see How to Open Exported Pipe-Delimited Files in Excel.
- [Export Visible] will export columns and rows that are on the screen to an XLS file. You can increase the number of visible rows with the “Items per page” drop-down at the bottom of the results grid.
- After choosing a type of export, the [Export] button turns into a [Cancel] button that will show your download progress. You can cancel a download at any time by clicking the [Cancel] button.
- Sorting – an arrow will appear next to the column heading to indicate column sort.
- Click any column header to sort in ascending order.
- Click a different column header to sort by multiple columns.
- Click the same column header again to sort in descending order.
- Click the same column header a third time to turn off sorting for that column.
- Filtering – there are two distinct types of filters available on most pages.
- Pre-filtering results:
- Most reports have a set of filters that can be set before generating the report.
- Optional filters can be expanded to include them in the search. In the example below, the “Latest Status” filter is collapsed and will not be included in the search filters.

- The advantage of this approach is that it reduces the number of results, which makes exporting faster.
- Filtering within the grid after results are returned:
- Select options for filtering by clicking the three vertical dots next to each column header and selecting “Filter.”
- You can also type any text in the field below the column header to perform a “Contains” filter.
- Pre-filtering results:
- Hiding columns
- Click on the three vertical dots next to the column header and select “Columns” to hide or to display specific columns.
- Reordering columns
- Click and drag a column header to the left or right until it appears where you want it on the report.
- Searching a column
- You can search any field by typing text into the text field below the column header.
- Drill-down
- Click on any hyperlinked field to view that account’s details on the Account Details page.
- Paging
- At the top of each result grid, you can change the number of visible results and navigate to different results pages.

- You can display up to 1000 results per page. Changing this value affects how many results are included when you select [Export Visible].

- At the top of each result grid, you can change the number of visible results and navigate to different results pages.
Locked Columns in Reports
Locked columns keep your preferred columns from moving while you scroll horizontally.
- Columns on the left remain anchored on the screen, while columns on the right move with the scroll bar.
- By dragging and dropping column headers, you can move columns from the locked zone on the left to the unlocked zone on the right or vice versa.
- There must be at least one locked column so that you do not lose the left zone, so the Sender Fileno column will always remain locked.
- Saved Searches will remember which columns you’ve locked.
Column Headers
Column headers vary between reports. Below is a comprehensive list of columns.
wpDataTable with provided ID not found!Work List Navigation
If the record was sent to another party, the name of the file is listed here.
When opening Account Details in Search, you can now navigate within the search results using the arrows to go to the next or previous result. This can be done directly from Account Details without going back to the main results page. Previously, you had to open Account Details one by one from the search results page.
Dates and Times
It is important to note that dates and times are displayed exactly as we receive them, without time zone information or transformation. Much of the data provided does not specify a time zone, so the reports include the raw dates and times received.
Rejections Overview
vExchange and Analytics support three different types of rejections:
- File Rejections occur when there are formatting problems that prevent the file from being properly processed.
- These rejections can be found under Reports > Operations Reports > File Rejections.
- Record Rejections are generated when an individual record, within an uploaded file, are improperly formatted or have problems with the data.
- These rejections can be found under Reports > Operations Reports > Record Rejections.
- Gates Rejections are created when one or more related records fail a validation test defined by the Sender that placed the associated account.
- These rejections can be found under Search > Gates Rejections.
Operations Reports
File Status Report
- The File Status Report allows you to research file and record-level issues with uploaded files.
- Select a required Upload Start/End date range.
- Switch on the optional Pre-validated toggle to limit the results to files that have already been through the pre-validation step.
- Switch on the optional Imported toggle to limit the results to files that have already been imported into vExchange.
- Click Apply Filter to see a list of matching files.
- Click on any item that failed pre-validation to see a detailed reason.
- Click Export to download the results to a file.

File Rejections
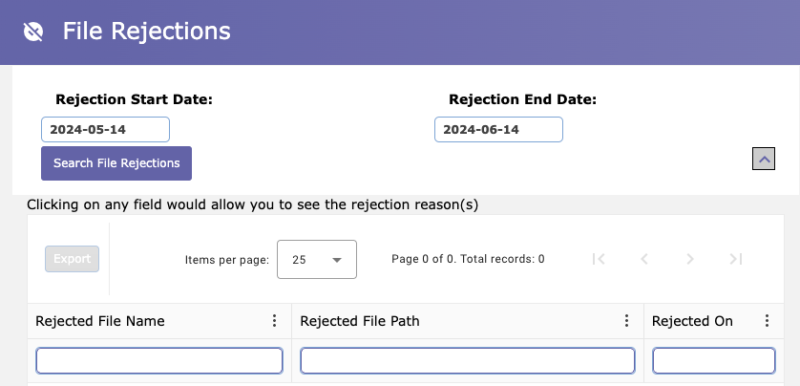
From the home screen, go to Reports > Operations Reports > File Rejections. Every file processed by vExchange is checked for proper formatting. If any problems are found, vExchange creates a file with details about each problem it found. Rejected files are not imported into vExchange and none of the records inside the file are sent to other parties. The problem(s) reported on the file must be resolved and re-uploaded.” to the text of the section.
This page lists all File Rejections created by vExchange.
- Enter a required Rejection start and end date to narrow your results to that period.
- Click on any row to download the file to your local computer.
Click on any row to open Account Details for the associated account. Note that this will only work if the account exists in vExchange. For records that are rejected because of a non-existent account, drill-down will not work.
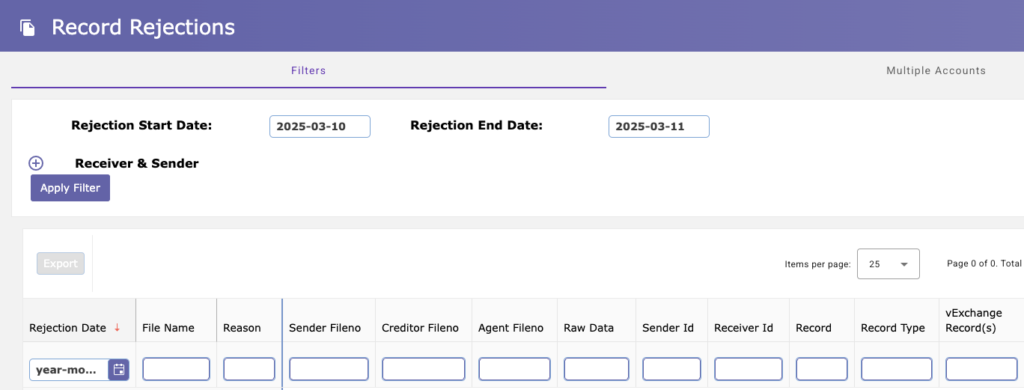
Record Rejections
From the home screen, go to Reports > Operations Reports > Record Rejections.
Record-level rejections are created when an individual record, in an upload file, is improperly formatted or missing required fields. These records will not be imported into vExchange or sent to any other parties. You must resolve the underlying issue and re-upload the rejected record in order for it to be imported and sent to other parties.
You can limit the report to run against a specific set of accounts on the Multiple Accounts tab. Just like the Account Numbers Search screen, you can enter a comma-separated list of up to 3,500 account numbers.
Click on any row to open Account Details for the associated account. Note that this will only work if the account exists in vExchange. For records that are rejected because of a non-existent account, drill-down will not work.
Key Events Report
From the home screen, go to Reports > Operations Reports > Key Events Report. The Key Events Report provides a break-down of your full inventory by year, Sender/Receiver, and debtor state.
You can limit the report to run against a specific set of accounts on the Multiple Accounts tab. Just like the Account Numbers Search screen, you can enter a comma-separated list of up to 3,500 account numbers.
![]()
- Select a required placement start and end year to narrow results to accounts placed during those years.
- Enter one or more optional firm names/IDs to search for accounts associated with that firm.
- Senders will see a list of Receivers and vice versa.
- Receivers have the additional option to narrow the search by Sender sub ID.
- Enter optional debtor state(s).
- Click [Apply Filter] to see your results.
- You are able to click on any report element to drill-down to the clicked data.
Here are the field columns for the report.
| Field Name | Description | ||
|---|---|---|---|
| Sender Id | The account sender’s vExchange identification code. It is typically a 2-character state code followed by a 1-3 digit number (for example NJ1). It may also end with a subaccount extension to distinguish accounts by type or portfolio (for example, NJ1.MED and NJ1.AUTO). This field is one of the 4 keys used to determine a unique account on vExchange. | ||
| Receiver Id | This field is one of the 4 keys used with sender_int_file, creditor_fileno, and forwarder_id to determine if the account exists in vExchange. If the 4 key combination does not already exist in vExchange, the record will be rejected. | ||
| Year | This is the year the account was placed. | ||
| Total Count | The total number of accounts placed in the given year. | ||
| Total Value | The total placed value of accounts. | ||
| State | The debtor state(s) related to the accounts. | ||
| Status Counts | The last several columns show the number of accounts in each status. | ||
General Reports
The General Reports menu includes the following reports:
- Archive Activity Report
- Activity on Archived Accounts
- Judgments Report
- Legal Lifecycle Report
- 7 in 7 Call Report (for Collection-Master users only)
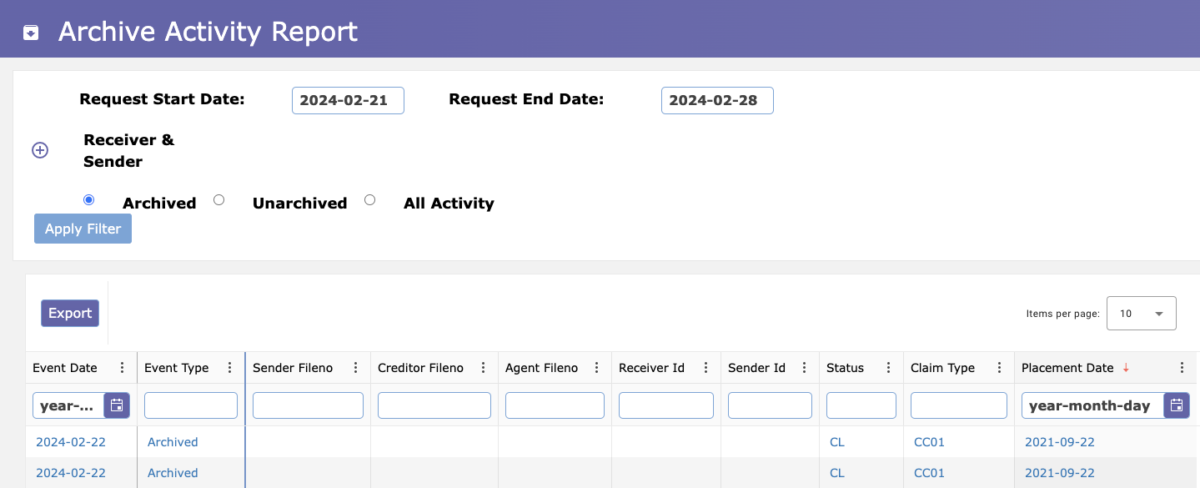
Archive Activity Report
The Archive Activity Report allows you to search across all archive and unarchive events. This allows you to check the history of a given account or find all events over a given period.
You will also be able to look ahead to see if any accounts are scheduled to be archived or unarchived in the near future. You will see scheduled archive events up to 7 days in the future. Unarchive events are up to 2 days in the future.
NOTE: If you want to find accounts that are currently archived or unarchived status, use Search with the Archive Status filter.
Activity on Archived Accounts
- The Activity on Archived Accounts report allows you to identify records that were sent to vExchange for accounts that are archived. This is important because records sent on archived accounts are NOT passed on to 3rd parties. This creates the potential for parties to fall out of sync.
- By default, this report looks for incoming payment (2303, 2304) and note (2401, 2402, 2405, 2410) records. You can focus solely on payment records by selecting the “Payments Only” toggle.
- Select a required Start and End date to narrow the search results to a specific timeframe and click the [Apply Filter] button.
- The results are grouped by firm. Depending on the length of your specified date range, you will see columns grouping the records by day, week or month.
- Hover over any cell to see a breakdown of how many of each type of record was received.
- Click on any row to drill-down to the list of archived accounts that the records are attached to. Note that some accounts may have multiple records attached, so you will see a count of how many records were received on each account.
- Click on any account to open Account Details. Note that only limited information is available on archived accounts. Senders can unarchived any of the accounts to see full details, including all of the records that were received after the account was archived.
- Click the [Export for Unarchive] button to export an Excel file of accounts you wish to unarchive. You can then upload the exported file to the Bulk Unarchiving tool.

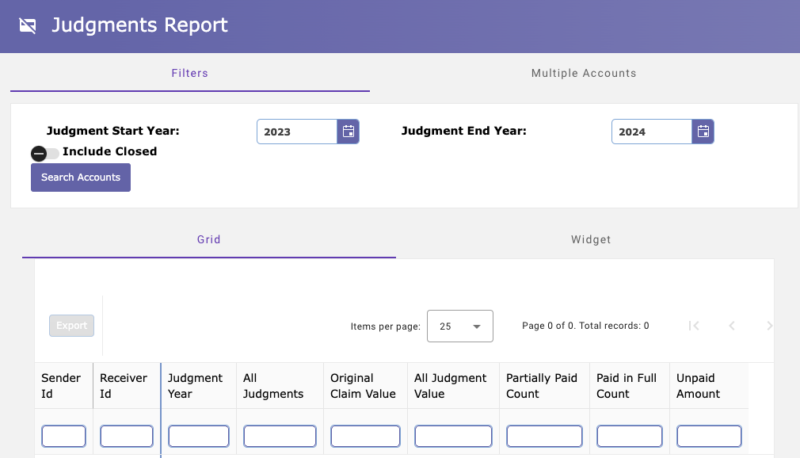
Judgments Report
The Judgments Report allows you to quickly see historical trends in judgment counts, value, and amounts paid.
- You can limit the report to run against a specific set of accounts on the Multiple Accounts tab. Just like the Account Numbers Search screen, you can enter a comma-separated list of up to 3,500 account numbers.
- Select a required start and end year to narrow results to accounts with judgments during that period.
- Switch the toggle button if you do not want to include accounts in closed status.
- Click [Search Accounts] to see your results.
- You are able to click on any report element to drill-down to the clicked data.
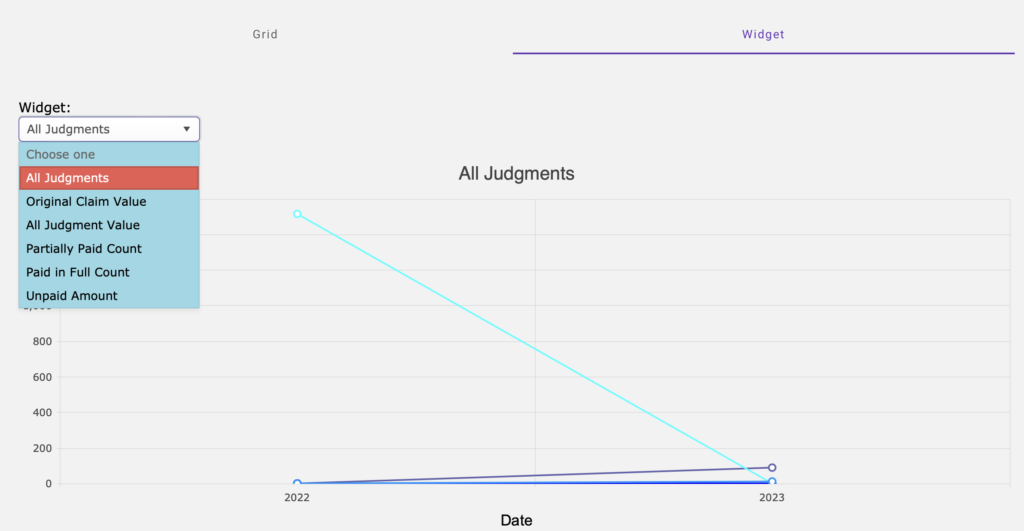
- The Widget panel gives you the ability to slice six ways as shown in the Widget panel drop down menu below.
- Here are the field columns for the Judgments Report.
| Field Name | Description | ||
|---|---|---|---|
| Sender Id | The account sender’s vExchange identification code. It is typically a 2-character state code followed by a 1-3 digit number (for example NJ1). It may also end with a subaccount extension to distinguish accounts by type or portfolio (for example, NJ1.MED and NJ1.AUTO). This field is one of the 4 keys used to determine a unique account on vExchange. | ||
| Receiver Id | This field is one of the 4 keys used with sender_int_file, creditor_fileno, and forwarder_id to determine if the account exists in vExchange. If the 4 key combination does not already exist in vExchange, the record will be rejected. | ||
| Judgment Year | This is the year the judgment was granted. We check for the date in the latest 2201. If no 2201 is available, we use Note records with judgment codes. | ||
| All Judgments | The total number of accounts with judgments placed in the given year. | ||
| Original Claim Value | The total placed value of accounts. | ||
| All Judgment Value | The total value of judgments on the accounts. | ||
| Partially Paid Count | The total number of judgments that are partially paid (i.e. paid amount is less than judgment amount). | ||
| Paid in Full Count | The total number of judgments that are fully paid (i.e. paid amount is greater than or equal to judgment amount). | ||
| Unpaid Amount | The difference between judgment amount and paid amount. | ||
Legal Lifecycle Report
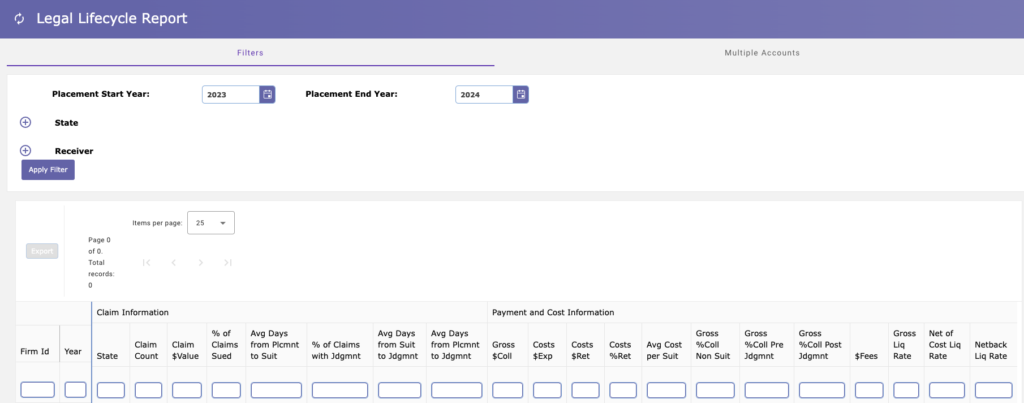

- Receivers: Compare the profitability of placements by Sender.
- Senders: Compare the liquidation rate by Receiver.
Various performance factors are included in this report, such as:
- Claim Information: Avg Days from Placement to Suit, % of Claims with Judgment, and six other factors.
- Payment and Cost Information: Gross $ Collected, Net of Cost Liq Rate, and ten other factors.
You can limit the report to run against a specific set of accounts on the Multiple Accounts tab. Just like the Account Numbers Search screen, you can enter a comma-separated list of up to 3,500 account numbers
You will see a subtotal row for each firm. The bottom row updates dynamically to show the total of all visible rows except subtotal rows.
Here are the field columns for the Legal Lifecycle report. The table below is searchable.
| wdt_ID | DISPLAY ORDER | CATEGORY | FIELD COLUMN | DESCRIPTION / LOGIC |
|---|---|---|---|---|
| 1 | 1 of 4 | General | Sender Id | The account Sender’s vExchange identification code. It is typically a 2-character state code followed by a 1-3 digit number (for example NJ1). It may also end with a subaccount extension to distinguish accounts by type or portfolio (for example, NJ1.MED and NJ1.AUTO). This field is one of the 4 keys used to determine a unique account on vExchange. |
| 2 | 2 of 4 | General | Receiver Id | This field is one of the 4 keys used with sender_int_file, creditor_fileno, and forwarder_id to determine if the account exists in vExchange. If the 4 key combination does not already exist in vExchange, the record will be rejected. |
| 3 | 3 of 4 | General | Year | This is the year the account was placed. |
| 4 | 4 of 4 | General | State | This is the state the account is being processed in. |
| 5 | 1 of 7 | Claim Info | Claim Count | Total number of claims in the system (comes from record master tables). |
| 6 | 2 of 7 | Claim Info | Claim $ Value | Placement balance, based on value in 1001/2001 tables (see the Top Section of Account Details in the row for Placement Balance). The total placed value of accounts placed in the given year. |
| 7 | 3 of 7 | Claim Info | % of Claims Sued | Count of Claims Sued divided by Claim Count. Claims Sued: Claims with a key event note for suit filed, suit served, judgment, or post judgment (based on notes records 14xx/24xx) or a record 1201/2201 suit/judgment date. |
| 8 | 4 of 7 | Claim Info | Average Days from Placement to Suit | Average duration in days between the placement date (date_forw from 1001/2001 records) and the suit date (based on notes records 14xx/24xx) or a record 1201/2201 suit date. |
| 9 | 5 of 7 | Claim Info | % of Claims with Judgment | Count of Claims with Judgment divided by Claim Count. Claims with Judgment: Claims with a key event notes for judgment or post judgment (based on notes records 14xx/24xx) or a record 1201/2201 judgment date. |
| 10 | 6 of 7 | Claim Info | Average Days from Suit to Judgment | Average duration in days between the suit date (based on notes records 14xx/24xx) or a record 1201/2201 suit date and the judgment date (based on notes records 14xx/24xx) or a record 1201/2201 judgment date. |
| 11 | 7 of 7 | Claim Info | Average Days from Placement to Judgment | Average duration in days between the placement date (date_forw from 1001/2001 records) and the judgment date (based on notes records 14xx/24xx) or a record 1201/2201 judgment date. |
| 12 | 1 of 12 | Payment & Cost Info | Gross $ Collected | Total Dollars collected Logic: Sum of gross_pmt_amt from 2303/2304 records (where trans_ref_no = '0' and gate_pass = 9). |
| 13 | 2 of 12 | Payment & Cost Info | Costs $ Expended | Total costs expended Logic: Sum of ta_cost_disb from 2303/2304 records (where trans_ref_no = '0' and gate_pass = 9). |
| 14 | 3 of 12 | Payment & Cost Info | Costs $ Returned | Total costs returned Logic: Sum of cost_returned from 2303/2304 records (where trans_ref_no = '0' and gate_pass = 9). |
| 15 | 4 of 12 | Payment & Cost Info | Costs % Returned | Percentage of costs expended that were returned. Logic: Costs $ Returned divided by Costs $ Expended. |
| 16 | 5 of 12 | Payment & Cost Info | Average Cost per Suit | Costs $ Expended divided by Count of claims with a key event note for suit filed, suit served, judgment, or post judgment (based on notes records 14xx/24xx) or a record 1201/2201 suit/judgment date. |
| 17 | 6 of 12 | Payment & Cost Info | Gross % Collected Non Suit | Percent of claim value collected on claims currently in pre-suit status. Logic: Gross $ Collected divided by Claim $ Value for claims that do not have a key event note for suit filed, suit served, judgment, or post judgment (based on notes records 14xx/24xx) or a record 1201/2201 suit/judgment date. |
| 18 | 7 of 12 | Payment & Cost Info | Gross % Collected Pre Judgment | Percent of claim value collected on claims currently in post-suit, pre-judgment status. Logic: Gross $ Collected divided by Claim $ Value for claims that have a key event note for suit filed or suit served or a record 1201/2201 suit date but do not have a key event note for judgment or post judgment (based on notes records 14xx/24xx) or a record 1201/2201 judgment date. |
| 19 | 8 of 12 | Payment & Cost Info | Gross % Collected Post Judgment | Percent of claim value collected on claims currently in judgment or post-judgment status. Logic: Gross $ Collected divided by Claim $ Value for claims that have a key event note for judgment or post judgment (based on notes records 14xx/24xx) or a record 1201/2201 judgment date. |
| 20 | 9 of 12 | Payment & Cost Info | $ Fees | Total fees and commissions paid. Logic: Sum of ta_sfee_earned, ta_comm_earned, and ta_stat_fee_rec from 2303/2304 records (where trans_ref_no = '0' and gate_pass = 9). |
| 21 | 10 of 12 | Payment & Cost Info | Gross Liquidation Rate | Percentage of total claim amount collected across all claims. Logic: Gross $ Collected divided by Claim $ Value for all claims. |
| 22 | 11 of 12 | Payment & Cost Info | Net of Cost Liquidation Rate | Percentage of total claim amount collected, less costs not returned, across all claims. Logic: (Gross $ Collected + Costs $ Returned - Costs $ Expended) divided by Claim $ Value. |
| 23 | 12 of 12 | Payment & Cost Info | Netback Liquidation Rate | Percentage of total claim amount collected, less costs not returned and fees paid, across all claims. Logic: (Gross $ Collected + Costs $ Returned - Costs $ Expended - $ Fees) divided by Claim $ Value. |
7-in-7 Call Report
This report is only visible to Collection-Master users, who can access the 7-in-7 Call Report to see a list of potential right-party contact (RPC) and Attempts violations. Drill down to the phone calls made on each individual account to determine if a violation occurred.
- Enter one or more optional firm names/IDs to search for accounts associated with that firm.
- Senders will see a list of Receivers and vice versa.
- Receivers have the additional option to narrow the search by sender sub ID.
- Select whether to search for RPC violations, Attempts violations or both.
Firm Level
When you first run the report, you will see a summary of potential violations grouped by firm. Click on any row to see the individual accounts included in the summary.

Account Level
When you click on a row in the Firm level, you will be presented with a list of accounts having potential violations from that firm. You can switch between Firm and account levels to continue your research.
In any row, click on the RPCs or Attempts field to open the Calls panel on the Account Details page so that you can review the potential violations and each phone call logged against the clicked account.
Financials Reports
The Financials Reports menu includes the following report:
- Payments and Costs Report
Payments and Costs Report
You can limit the report to run against a specific set of accounts on the Multiple Accounts tab. Just like the Account Numbers Search screen, you can enter a comma-separated list of up to 3,500 account numbers.
You click on any cell to view the underlying account-level details.
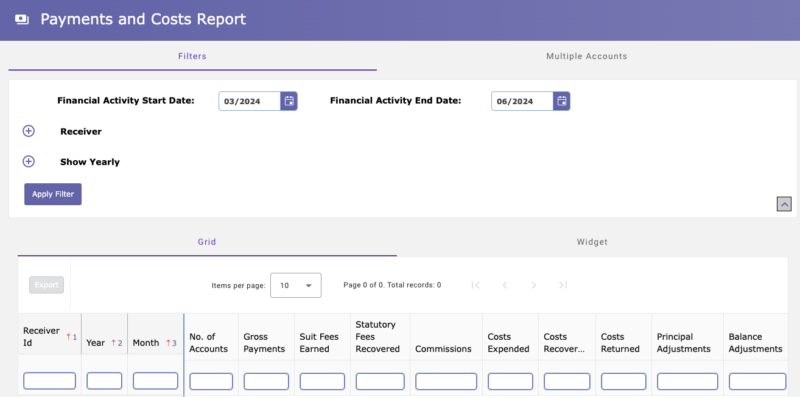
This report includes a dynamic Widget tab for visualizing up to four charts on the same page. On the Widget panel, the drop down provies nine available widgets: Gross Payments by Senders/Receivers, Total Commissions by Senders/Receivers, Suit Fees Earned, Statutory Fees Recovered, Costs Expended, Costs Recovery, Costs Returned, Principal Adjustments, and Balance Adjustments.
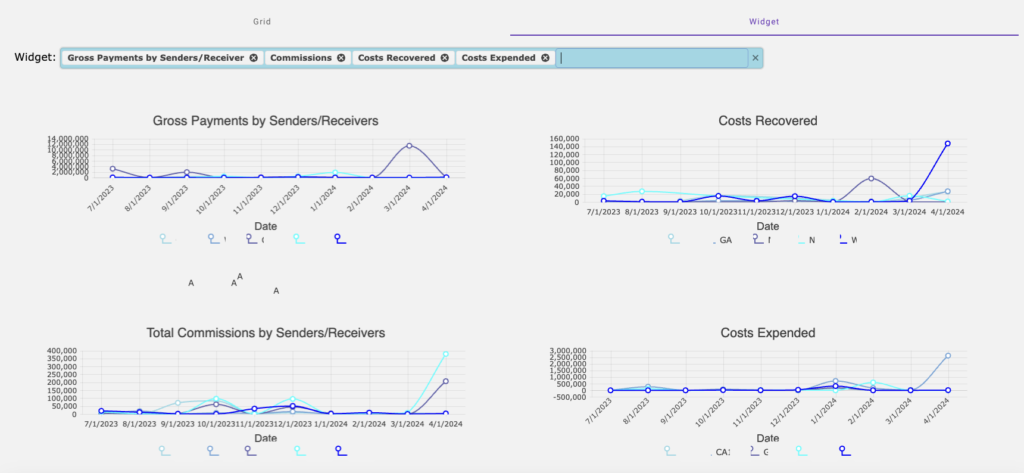
Here are the field columns for the Payments and Costs report.
| Field Name | Description | ||
|---|---|---|---|
| Year | The year related to this row of data. | ||
| Month | The month related to this row of data. | ||
| Receiver Id | The firm ID of the Receiver. | ||
| Sender Id | The firm ID of the Sender. | ||
| No. of Accounts | The total number of accounts for that year, month, Receiver, and Sender combination. | ||
| Record 2303/2304 Fields |
All of the following fields are from a merged, unique set of 2303 and 2304 records. • Gross Payments: gross_pmt_amt • Suit Fees Earned: ta_sfee_earned • Statutory Fees Recovered: ta_stat_fee_rec • Commissions: ta_comm_earned • Costs Expended: ta_cost_disb • Costs Recovered: cost_recovered • Costs Returned: cost_returned • Principal Adjustments: adjust_to_prin • Balance Adjustments: ta_adjustment |
||
Servicer Reports
The Servicer (Sender) Reports are only visible if you log in as a Sender. These reports available from the main menu > Reports > Servicer Reports:
Servicer Information Report

If you are also a Receiver, you have to switch to a Sender Id or log in as a Sender user to see results in the grid.
- Agent Id – ID of the Receiver.
- Support Plan – Which support plan the Receiver is subscribed to.
- Firm Name – Name of Receiver.
- Product – Vertican business adapter the Receiver uses to communicate with vExchange.
- Software – Software used by the Receiver, including non-Vertican products.
- Vertican may only have information for some Receivers, so this field may be blank.
- Version – Latest software version the Receiver has installed.
- Last Updated On – most recent date that Vertican updated the information.
- Vertican may only have information for some Receivers, so this field may be blank.
Servicer Inactivity Report
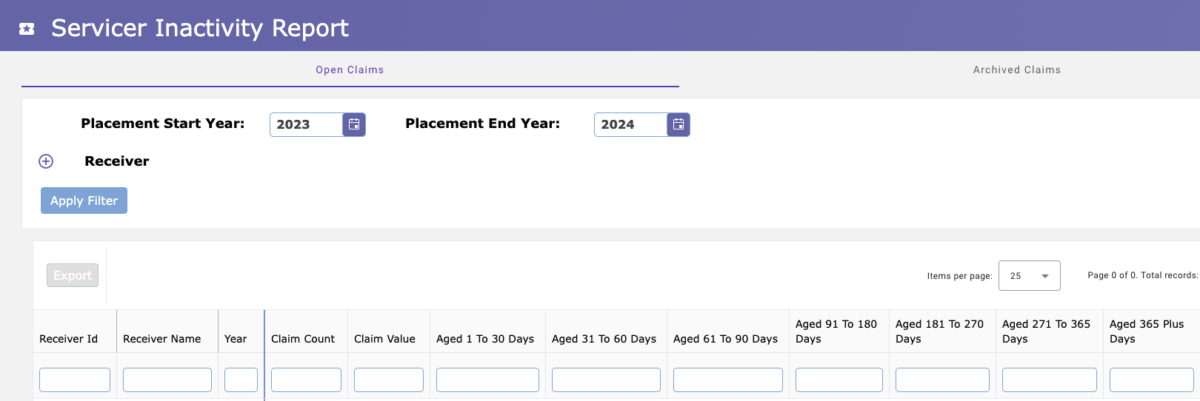
- If you are a Sender who is also a Receiver, you have to use the firm switcher to switch to your Sender Id to see results in the grid. Only Sender users can see the report.
- This report groups a Sender’s entire inventory into buckets based on the last time activity was reported by the Receiver.
- There are 3 panels that have the same filters and grid:
- Open: This panel shows inventory in an “Open” status
- Archived: This panel only shows archived inventory. This is useful to see if any recent activity has occurred on archived accounts. Note that data is not processed for archived accounts, which may cause reconciliation problems between parties.
- Closed: This panel only shows closed inventory. This is useful to see if any recent activity has occurred on closed accounts, which may signal that the receiver considers the account open.
- There are multiple types of drill-down:
- Clicking on any Firm ID or Name will show a drill-down of accounts by state for the selected year and Receiver. Clicking on any row will show individual accounts for the selected year, Receiver and state. Clicking on any row will open Account Details for the selected account.
- Clicking on any Claim Count or Value will show individual accounts for the selected year and Receiver. Clicking on any row will open Account Details for the selected account.
- Clicking on any year will show a monthly drill-down for the selected year and Receiver. Clicking on any row will show individual accounts for the selected year, month, and receiver. Clicking on any row will open Account Details for the selected account.
- Clicking on any value in the bucket columns (e.g. “Aged 31 To 60 Days”) will show individual accounts for the selected year, receiver, and bucket. Clicking on any row will open Account Details for the selected account.
User Inactivity Report

- This report shows how active a firm’s users are in the Analytics website.
- A user is considered active if they have logged in within the past two weeks.
- Login count: The total number of logins over the past two weeks.
- All users: Total licensed users (minus any accounts that have been disabled).
- Active users: Number of users who have logged in at least once in the past two weeks.
- % of “active” users: Percent of all users who were active in the past two weeks.
Firm Claims by State Report
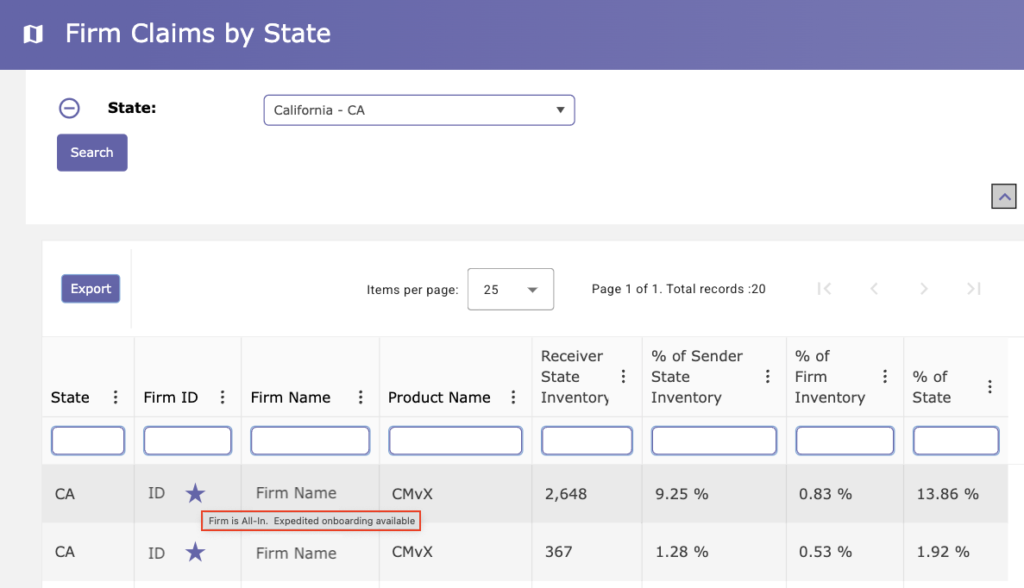
- Senders use the Firm Claims by State report to assess firms that would be a good partner in specific states.
- Go to Reports > Servicer Reports.
- The report provides useful metrics for deciding who to place business with:
- Receiver State Inventory: Total open, unarchived accounts the Receiver has in the state
- % of Sender State Inventory: Receiver’s accounts in the state / Sender’s accounts in the state
- % of Firm Inventory: The Receiver’s accounts in the state / the Receiver’s total number of accounts
- % of State: The Receiver’s accounts in the state / number of all vExchange accounts in the state
- Select an optional State to narrow the results to just that state.
- Firms are ranked based on the following factors:
- A purple star next to the Firm Name means the “Firm is All In” and sends all claims to vExchange.
- “All In” firms are ranked at the top of results.
- The “All In” option is only available to CMvX Receivers at this time. CMvX firms can reference How to Go All In on vExchange.
- Firms that are not All In will be ranked after All In firms, according to the volume of data sent to vExchange.
- A purple star next to the Firm Name means the “Firm is All In” and sends all claims to vExchange.
- Receivers can promote their firm by having more volume on vExchange and by being active in states where Senders wish to place new accounts.
- Refer to the Firm Claims by State Report FAQs for Receivers for more information.
Gates Reports
If your Sender(s) subscribe to one or more Gates (business rules), go to Reports > Gates Reports. From the Gates Reports menu, you can access the following reports:
- Gate Logic Report
- Status Code Validity Report
- Transaction Code Validity Report
- Rejections Reports
Gate Logic Report
The Gate Logic Report provides details on each rule, including how to remediate each one and which reports they appear on. We display inactive rules so that you can research historical rejections. Universal Gates will show “Vertican” in the Sender Id column and the Rule column will contain 4-digits.

Status Code Validity Report
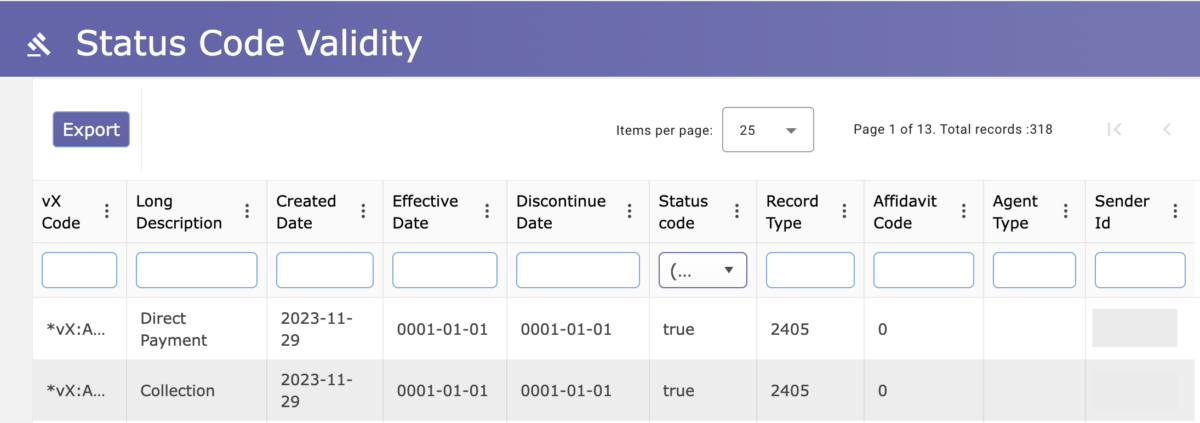
The Status Code Validity Report lists all vExchange status codes accepted by each Sender subscribed to related gates. Receivers will only see this report if they receive placements from a subscribing Sender.
Transaction Code Validity Report
The Transaction Code Validity Report lists all vExchange transaction codes accepted by each sender subscribed to related gates. Receivers will only see this report if they receive placements from a subscribing sender.

Senders can now perform both Manual Remediation and Forced Remediation on large numbers of rejections by uploading a file, selecting the type of remediation to perform and clicking the [Proceed] button. Go to Tools > Bulk Remediation.
- A message will be displayed with information about the number of rejections that were uploaded.
- The file will be processed in the background so you can navigate to other screens or even logout of the website.
- You will receive a notification once your file has been completely processed.
- You can click on the notification to open the Bulk Remediation History page where you can see detailed information about your uploaded file.
- Click on any file in the list to drill-down and see results for each rejection that was included in your uploaded file.
- To assist you with generating the file for Bulk Remediation, you can go to Search > Gates Rejections and use the [Export for Remediation] button.
- Any user who has permission to perform bulk remediation will be able to access the Bulk Remediation feature. Your Firm Admin can grant you permission, if necessary.
- A Bulk Remediation Template for the xlsx file is next to the [Proceed] button.

Bulk Unarchiving
This report is only visible to Senders.
.
- Data is no longer forwarded to Senders on archived accounts. If you go to Account Details for an archived account, it will show that the account is archived.
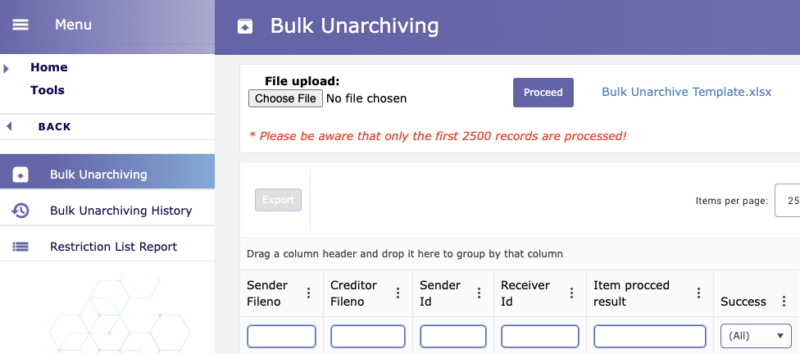
- Senders can now unarchive accounts in bulk by uploading a file and clicking the [Proceed] button. The next day, you will be able to reconcile your accounts with your Receiver(s) in case of a dispute about whether or not an account should be archived.
- A Bulk Unarchive Template is provided on screen and the upload works in the same manner as Bulk Remediation. Another screen displays Bulk Unarchiving History.
- To assist you with generating the file for Bulk Unarchiving, you can go to Search > Accounts and run the search with the “Show Archived” filter toggle on. You can then export those archived accounts directly by using the [Export for Unarchive] button.
- Any user who has permission to unarchive will also have permission to use the Bulk Unarchiving feature. Your firm admin can grant you permission if necessary.
Restriction List Report
This report is only visible to CA20 and their Receiver firms. It lists Sender File Numbers that are on the Sender’s restriction list. Data received for any account on this list will not be sent to the Sender.
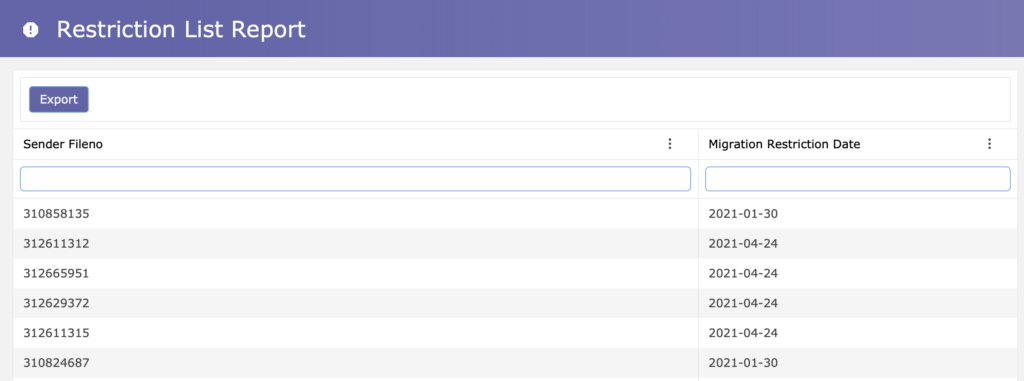
We also display an alert icon and date in the header of Account Details for any account that is on the restriction list.
Firm Admins have special privileges that allow them to manage various aspects of the system that are not accessible to other users. For example, Firm Admins can manage users, create roles, and create other Firm Admins. You can assign any user to be a Firm Admin via the user screen (see below). Every firm is required to have at least one active Firm Admin. For new firms, the first user that is created will be configured as the Firm Admin.
Admin Console
Users that have any permission associated with tabs on the Admin Console will be able to see the Admin Console page and relevant tab(s) from My Account > Admin Console.
Manage Users Tab
Users with User.ViewUsers permission can access the Manage Users tab.
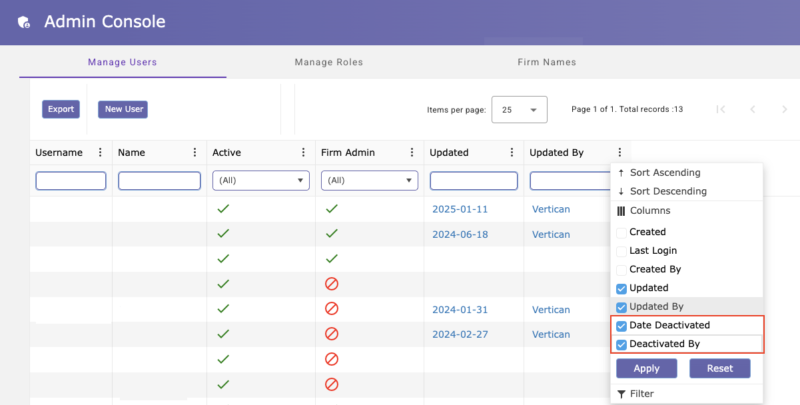
- Click “Export” to open the sub-menu.
- Export Visible or Export All will download the entire raw list of users.
- Click the New User button to create a new user.
- Click any row row to edit a user.
- The “Date Deactivated” and “Deactivated By” fields are hidden by default, but your firm can display these fields to better monitor changes in access.
- Date Deactivated shows the date a user was most recently deactivated. If the user is active, this field is blank.
- Deactivated by shows the username (email) of the individual that deactivated the user.
- To make these fields visible in the column results, use the column picker.
- In any column, click the 3 dots.
- Select “Columns” to display additional columns.
- Check “Date Deactivated” and “Deactivated By” to display a column for those fields.
User CRUD
CRUD: Create, Read, Update and Delete data.
Users with User.EditUsers permission can create or edit users.
Create User
- From the Admin Console, click the [New User] button. A popup box will display.
- Fill out all fields and click Save.
- Username is the person’s email address.
- Select ONE or MORE existing companies (go back and create it if it doesn’t exist yet). You must receive prior approval before assigning a single user to multiple firms.
- If this is a test account, set the “Test user state” toggle so this user is excluded from billing and other operations.
- If you want to make this user a Firm Admin, set the “Firm Admin” toggle to the on position.
- If there is any problem, a error message will briefly display.
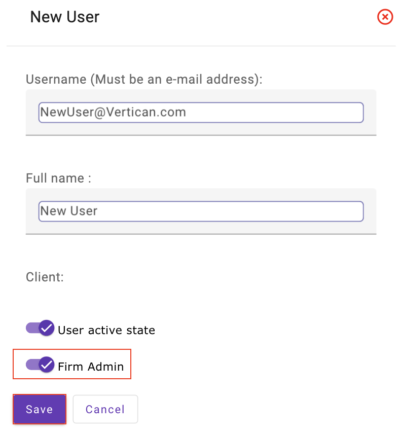
Update User
- Log in.
- Navigate to Manage Users.
- Click on the desired user in the table.
- Update User Information: Update the fields and click Update.
- Make a User a Firm Admin: You can also set the Firm Admin toggle to the on position to assign a user as a Firm Admin.
- Reset User MFA: You can reset the multi-factor authentication method for your company’s users by clicking the [Reset MFA] button when in Edit mode. This is useful when a user gets a new phone or no longer has access to an old phone number. The user will be prompted to set up a new method the next time they login. Note that the affected user must configure a new method before they can access company data.
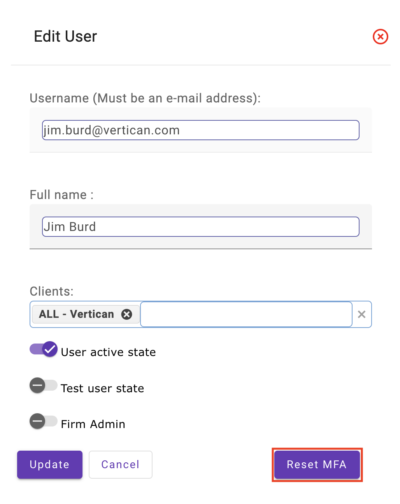
Deactivate User
NOTE: Users can only be deactivated, not deleted.
- Log in.
- Navigate to Manage Users.
- Click on the desired user in the table.
- Change the “User active state” toggle to OFF and click Update.
Reactivate User
- Follow the same steps as Deactivating a user, except change the “User active state” toggle to ON.
Manage Roles Tab
Users with Role.ViewRoles permission can access the Manage Roles tab.
Roles are used for creating groups of users with specific permissions. For example, some users can perform bulk remediation while other users can manage users and still other users can perform manual remediations. The first step is to create a role that will have a set of permissions to assign to a group of users.

Available User Permissions
- Roles and Permissions – this set of permissions control access to Create/Update/View/Delete roles and permissions for their firm. In the simplest case, all of these permissions would be granted in a group unless a client wants very strict control over who can perform specific tasks (usually for compliance reasons).
- Role.ViewRoles controls access to the “Manage Roles” part of the Admin Console.
- Role.CreateRole controls who can create new roles.
- Role.UpdateRole controls who can edit existing roles.
- Role.EditUsers controls who can add/remove users from a role.
- Role.EditPermissions controls who can add/remove permissions from a role.
- Users – this set of permissions determine who can Create/Update/View/Deactivate users for their firm.
- NOTE: Creating additional users may incur monthly charges.
- User.ViewUsers controls access to the “Manage Users” part of the Admin Console.
- User.EditUsers controls who can Create/Edit/Deactivate users
- Rejections – this set of permissions controls access to rejection-related permissions
- Sender.BulkRemediation controls access to the XLSX upload page and ensures only Sender users can see it.
- Sender.ForcedRemediation controls access to the Forced Remediation button/feature and ensures only Sender users can see it.
- Sender.ManualRemediation controls access to the Manual Remediation button/feature and ensures only Sender users can see it.
- Miscellaneous
- AccountDetail.Disputes – make the Disputes panel visible to specific users.
- CompanyFilter – allows a user to create and manage company-level Saved Searches
- Sender.Archive – allows a sender user to request an account to be archived and only allow Sender users to see permissions named “Sender.x”.
- Sender.Unarchive – allows a sender user to request an account to be unarchived and ensure only sender users can see it.
Managing Roles
To add a role:
- Users with Role.CreateRole permission can add a new role
- Click [New Role].
- Enter the Role name.
- The Agent Id field defaults to All, but you can specify a specific firm.
- Click [Save].
To delete a role:
- Users with Role.UpdateRole permission can modify or delete an existing role.
- Click on the desired role to open the Role Details screen.
- Click the “Delete this role” button.
To edit a role:
- Users with Role.UpdateRole permission can edit an existing role.
- Click on the desired role to open the Role Details screen.
- Change the name of the role or follow the steps below to modify users and/or permissions.
To manage permissions in role:
- Users with Role.EditPermissions permission can alter permissions associated with a role.
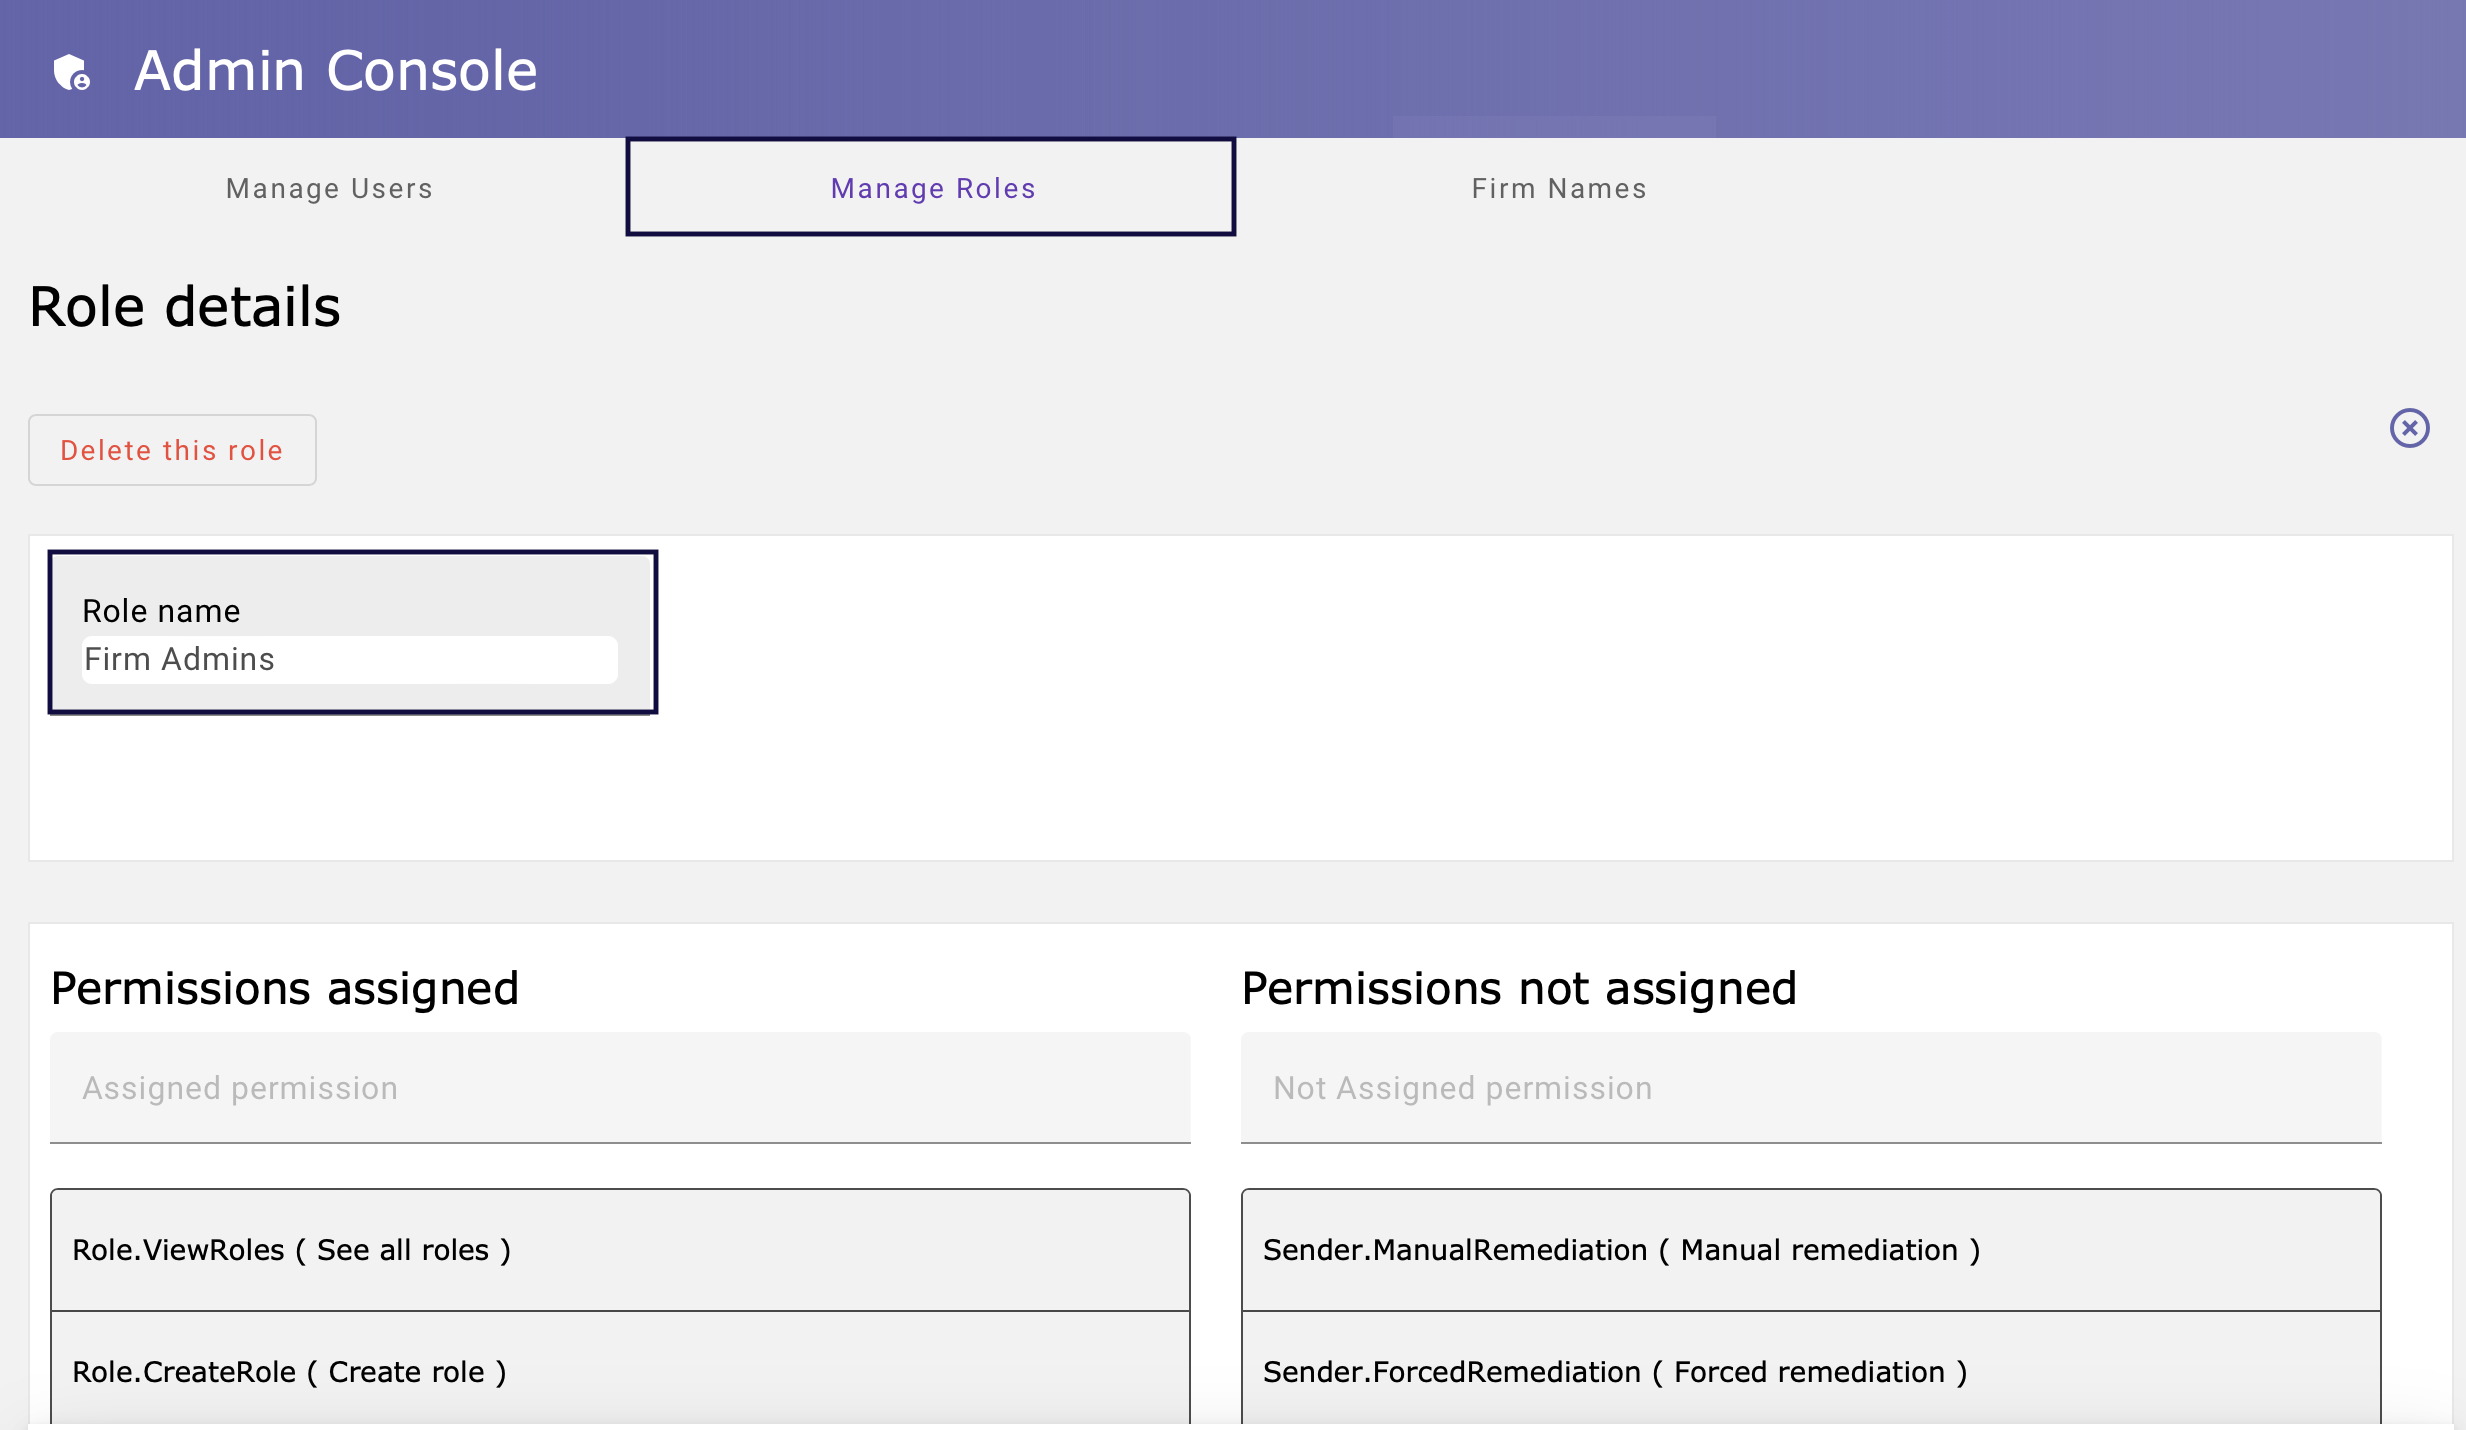
- Click on the desired role to open the Role Details screen.
- To add a permission to the role, drag-n-drop it from the right-hand “Permissions not assigned” panel into the “Permissions assigned” panel on the left.
- To remove a permission from the role, drag-n-drop it from the “Permissions assigned” panel into the “Permissions not assigned” panel
- You can start typing in the filter area to find the permission you are looking for quickly.
To manage users in a role:
- Users with Role.EditUsers permission can alter users associated with a role.

- Click on the desired role to open the Role Details screen.
- To add a user to the role, drag-n-drop them from the right-hand “Users not assigned” panel into the “Users assigned” panel on the left.
- To remove a permission from the role, drag-n-drop it from the “Users assigned” panel into the “Users not assigned” panel.
- You can start typing in the filter area to find the user you are looking for quickly.
- NOTE: There must be at least one Firm Admin for your firm. You are not permitted to remove the final one. To change who is the Firm Admin, first designate an additional Firm Admin and then remove the previous one.
Firm Names Tab
While every entity in Analytics has an associated ID (e.g. NH96, 00076), we are not always able to discern the name of the entity.
- Users with ManageFirmNames permission can define names for other firms that you work with.
- The names are only visible to users of your firm, so you are free to use internal names that might not make sense to anyone else.
- All users in your firm will see the names you define.
- The defined names will appear in search results, export files, filters, and widgets.
- Only Firm Admins can edit Firm Names.

To create a new firm name:
- Click [New Firm Name].
- Enter the Firm ID that you want to associate the new name with.
- Enter the desired firm name.
- Click [Save].
To delete a new firm name:
- Click the trash can icon next to the firm name.
To edit an existing firm name:
- NOTE: You cannot change the Firm ID associated with the name. Delete the existing firm name and create a new one with the correct Firm ID.
- Click the firm name or ID.
- Edit the firm name.
- Click [Save].
The [Export] button works in the same way as it does on other pages.

