How to Troubleshoot vExchange / CMvX
Running Open & Close Claims separately for performance reasons
Importing Related Parties from the Forwarder
Trigger CMvx Records (Resend Information)
Trigger vExchange Records (Resend Information)
Resend PCODE / Paperless File Information
Re-Export CMvX Financial Information (CMvXUpdt) (210/250)
Re-Export CMvX Remittance Information (CMvXBack) (253)
Re-Export CMvX Claim Information (CMvXUpdt) (Coming Soon)
Call Screen (F:\CLSINC\COMMON\CALL_LOG.ini)
Goal
The goal of this document is to explain to the user how to use various tools to better understand how CMvX and vExchange work together.
CMvX
CMvX is the Data Standard used by Collection-Master to communicate with vExchange. Long-term, CMvX will replace all data transformation processes (DTPs) within the software. Currently, there are several interfaces that are supported.
- Citibank Convoke
- Chase Convoke
- Chase CACS
- vExchange Native used by MCM
- Synchrony (under development)
CMvX Paradigm
The CMvX Paradigm is different than previous DTPs. In the past, Paperless File codes were assigned EDI Codes and Action Codes through the matrix, and the Action Codes triggered sending the data to the client. Each DTP was a distinct interface custom programmed for the data standard. Each DTP would read through the Paperless File for a given date range and create records based on the Action Codes. The problem with this design is that firms quickly ran out of time to run the interface for all of their clients. Reading the entire Paperless File for each DTP, sometimes 20 times each day, has a big impact on time and resources.
In the new CMvX Paradigm, one single update will include “All Claims” and updates are triggered by “The Changes” table. Each firm still needs to set up a Matrix, but the only required value is a *VX: Code. These codes have been standardized. Other fields are automatically uploaded simply by entering the values. There is no additional setup required.
CMVX log file
When you run a CMvX Update, a file will be created in your “N:” folder. It will be called something like CMvX_LOG.LOG.
The log file contains quite a few details about the export process. The primary purpose of the log file is to identify the totals for records created and the time it took to create the various sections.
Compare the log file against prior runs to look for significant changes.
Vertican has significantly optimized the process, in part due to this log file, but you can identify specific sections that took longer to create.
Pre-Closed Claims
Collection-Master supports a setup file called Custom\PreClosedQueue.ini.
The setup of this file is outside the scope of this document, but the purpose of this file is to list queues that should be treated as “Pre-Closed.”
Early on, we separated the database into “DATA & HISTORY.” Over time, it became clear that history is really an “Archive” database that does contain closed claims, but there are many claims in the DATA folder that have a status of Closed. We recommend leaving a claim “Pre-Closed’ for 180 days or more.
To define a claim as “Pre-Closed,” you set up the INI file and add a diary code with one of the listed Queues. Note that wildcards are assumed, so QCLOSE will include any queue that starts with QCLOSE. Think QCLOSE*.*
CMvX will use the Pre-Close feature to find the “Closing Date” for R271 on Pre-Closed Claims. Claims located in history pull the date out of the “CLOSED” date field.
[Pre-Closed]
! Queue listed will have assumed wildcards (“*”) at the end.
! Queue can either be a tab or comma-delimited
Pre-Closed Queues=QCLOSE QMYCLOSE
Running Open & Close Claims separately for performance reasons
As CMvX is designed to send new information on “All the Claims”, it can take a long time to run. One of the techniques to improve performance is to run Open and Closed in separate sessions at the same time.
CMvX supports the automation of the process.
Things to remember:
- The user must start the routine after Midnight. Setting the start time to “00:00:05” is fine. Depending on the maintenance window, the user might pick a time in the morning.
- Upload files as early as possible. The CMvX Import process runs at 06:00, 08:00, 10:00 or 12:00 EST. Uploading files before 6 AM will ensure that files are completed as early as possible.
- Upload files at different times. If open claims are completed by 6:00 AM, but Closed claims take longer, upload the Open Claims first.
- Visit the Dashboard, and look at the “CMvX Record 0” logs to see the time the export began and the time that vExchange started processing the file.
Backdating Collection-Master
Collection-Master allows users to change the “effective or system date.”
When posting a financial transaction, the “Posting_Date” is always the “Real Date” and is used by CMvX to report the information. When the user backdates the system and posts a payment will be sent tomorrow, even though the transaction will appear to have happened in the past.
The Changes database behaves similarly. Backdate the system and update a field, and the entry in changes will report the “Posting_Date” or today.
CMvX Financial Transactions
Financial Transactions are broken into three separate records. While there is overlap, these records help to identify problems where firms would “forget to upload” their Remittance Reports.
| CMvX Record | vExchange Record | Delivered On | Special Action | Description |
| 210 | 2302 | The day after posting | Automatic |
This record is created by Transactions from the FINAN table. Any time there is an “Accounting Transaction,” this record will be automatically created the day after the transaction is posted. These may be caused by changes made to a claim, Financial Transactions or any other action that updates the accounting on a claim. From within the Claim, you can view these transactions in the “F2 Financial Transactions.” It is important to create *VX: mappings in the CMvX Matrix to ensure that all transactions are properly reported to vExchange. |
| 250 | 2303 | The day after remitting | Automatic |
This record is created by transactions from the COLBILLS table. This is automatically created the day after you make a remittance permanent. If you reverse a remittance report, it will create a From within the “F2 Financial Transactions,” there is a reference to the I# or Invoice on a transaction. Similar to the FINAN table, it is important to create *VX: mappings in the CMvX Matrix (these are the same codes). |
| 253 | 2304 | Same day as remittance | Upload remittance export |
This record is created by running a remittance report. Each remittance will create a separate file. There may be hundreds of separate remittance files. Running a cost bill or remittance report will create a file with this record. It is created immediately when running the remittance report. Similar to COLBILLS, you can identify these transactions by viewing the “F2 Financial Transactions.” The I# or Invoice will identify the remittance. You must also set up *vX: Mappings in the CMvX Matrix as with the other records. It is important to note that a specific code only requires one matrix entry, not one per financial record. |
*VX: Codes
*VX: Codes perform many functions in vExchange. In addition to defining the “Key Events” for analytics and reporting. They are also used by many DTPs to trigger sending specific reports or records.
It is important to understand that while CMvX uploaded data fields when they are updated, many DTPs require a *VX: Code to trigger sending the information to the client. This process is similar to a traditional “Action Code” except the logic is built in the DTP and requires no configuration from the firm.
The list of *vX: Codes can be accessed via the vPortal by going to Help > Help Manuals > vExchange > vExchange Status Codes or using this link: https://vportal.vertican.com/Help/VexchangeStatusCodes.aspx.
Changes in Collection-Master
- (Claim Information–> Changes – Alt-Z)
Most of the information sent via CMvX to vExchange is triggered by simply updating a field in the application. As an example, if you update the Debtor Demographics, it will trigger a CMvX record 211. No further action is required; the day after the field is updated, a CMvX record will be created.
With previous DTPs such as YGC, you needed to create a Paperless File code that triggered an Action Code to send the information. As Collection-Master and CMvX evolve, the relation between the database fields and CMvX records is maintained automatically.
The Changes table has a field called ‘CMvX #.’ This column will display the CMvX record associated with the CM field. In the picture below, the DEBTOR.PHONE triggers a CMvX 215, and DEBTOR.STREET triggers a CMvX 211.
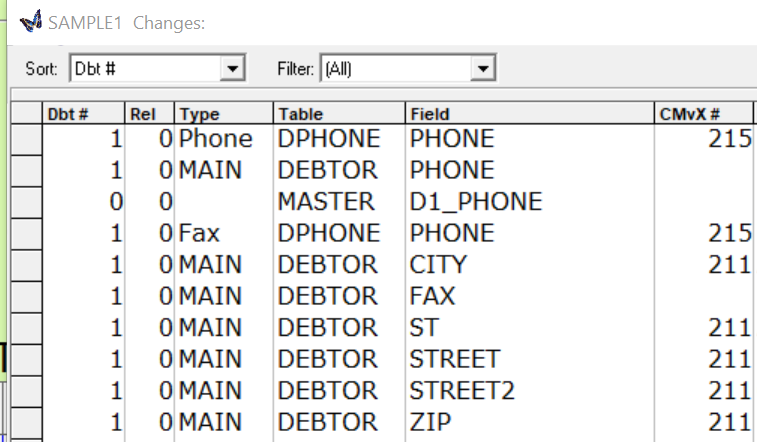
When investigating missing CMvX information, always provide a screenshot of the Changes table for the affected fields. Note that “MASTER.D1_PHONE” stores a copy of the information in DPHONE.PHONE. CMvX correctly sends the 215 based on the DPHONE table.
Importing Related Parties from the Forwarder
There are two ways to add a related party to a claim.
- Using Infinity Override: This method stores the related party’s information (Employer, Bank, Adversary Attorney, etc.) as Screen Infinity fields.
- Using Related Party tables: This method uses a Lookup table to store the related party information.
When a Forwarder sends related party information, the system will perform some magic, doing the best it can to import the related parties using a combination of Infinity Override and Related Party tables. Employers, Banks and Adversary Attorneys will follow the “Smart Match” process when importing information.
- The routine looks at Name, Firm_Name, Addr, City, State, Zip, Phone, Bar, and Fax.
- If possible, it finds a matching entry from the Related Party table.
- If a match is not found, and an Infinity Override is not already assigned, it will update the Infinity Fields.
- If no match is found, and an Infinity Override is already used, and there is “Enough Information,” a new related party will be automatically created as assigned to the claim.
- If all other efforts are exhausted, a Paperless File note will be added.
Changes to a Related Party
When assigning or changing a related party on a claim, the Changes table will note that the related party. INTERNAL.RELATION defines the type of related party. An INTERNAL.NO defines the specific related party added.
When using Infinity Override, the claim Infinity fields will be updated, and this information will be sent.
When using the Related Party File, adding or changing a related party on a claim will send the information.
There is a special category if an entry is modified in the Related Party file (1-2). CMvX will scan all open claims that are related to that related party, and send the appropriate CMvX records on every matching claim. This is a new behavior that CMvX introduced. Other DTPs require the user to perform an action on all affected claims to resend the information.
Take an example [1-2-3-1] – Inhouse Attorney File
- Pull up an attorney, and update a field such as a Name, Firm Name, Bar #, etc.
- Within the Related Party, “View Changes or F8” will show the information that changed.
- Individual claims do not show any activity.
- The following day, when you create the CMvX file, all claims that include the modified related party will send an updated CMvX record.
View the definitions for the ICHANGES mapping in F:\CLSINC\EDI\CMVX-Ichanges.EDI.
CMVX_LOG.LOG will document the number of claims that created CMvX records as a result of these changes.
CMvX Matrix
From within the claim, use “Claim > CMvX Matrix” to pull up a list of the Paperless File codes, along with the associated *vX: code that has been mapped through the Matrix [4-2-1-6-6]. This screen will show the activity on a claim with the *vX: Code associated with it. Keep in mind, setting up the CMvX Matrix is up to the firm and must be maintained.
When opening a Client Success ticket regarding a DTP, make sure to include a screenshot of the affected time period. Of course, if the problem is noticeable, then the user can just fix the matrix.
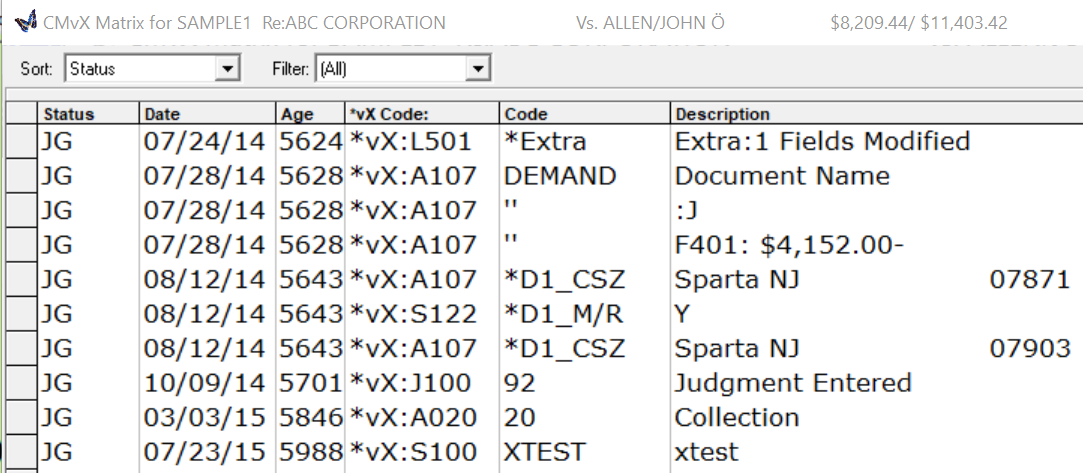
There is a similar report called “CMvX Key Events.” This report shows the first of each of the “Key Events.”
This is a helpful “Snapshot View” of a claim. It shows the first of each Status code, and then the last entry. In addition, there is a line for TODAY (regardless of activity) and finally, the future is defined with Diary Codes.
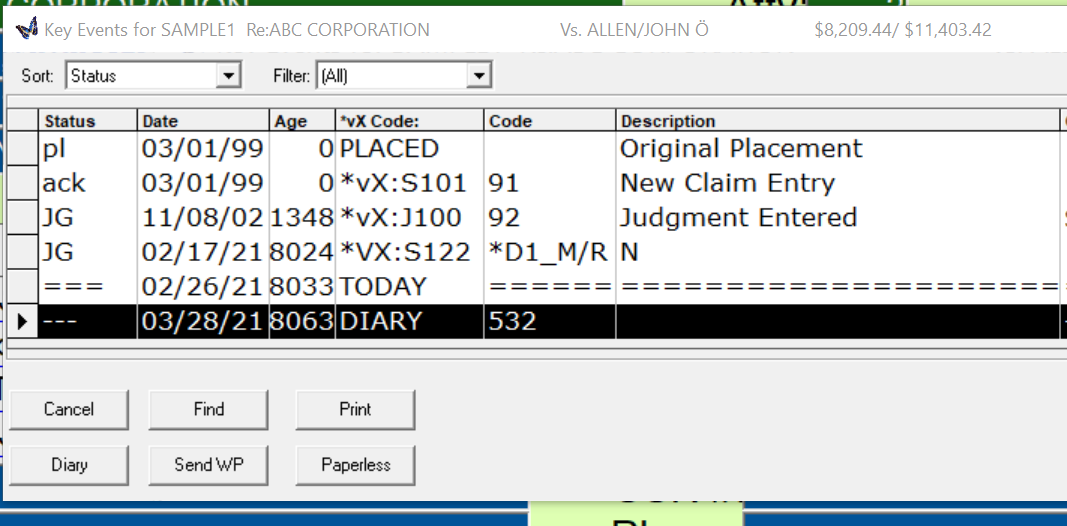
Key events:
- ACK – Acknowledge Claim
- ARC – Archive Claim
- CL – Close Claim
- DC – Debtor Contact
- DS – Debtor Served
- JG – Judgment
- PJ – Post Judgment Activity
- PL – Placed
- RAR – Unarchive Claim
- RO – Claim Re-Opened
- SF – Suit Filed
- SNR – Suit Not Recommended
- SV – Served
Trigger CMvX Records (Resend Information)
There are several reasons why a particular field or record may not have reached vExchange. There are rejected records due to format or missing keys, operation errors where the data wasn’t uploaded, and functional deficiencies.
Leverage the Show All page on the Analytics dashboard to show the information that is stored in vExchange.
If the claim information needs to be fixed, just update the field, and it will be sent.
To resend a CMvX Record(s), update fields in MASTER, DEBTOR, or PROPERTY. The fields are named “CMVX_R###_DATE.” Update the field with Today’s Date, even though the only reason for updating the field is to create an entry in CHANGES which in turn triggers a new CMvX Record to be sent.
Update the field using several methods:
- WPSCRIPT – The document shows a single WPSCRIPT with many (every) records defined. The user would then type “0” for the desired record, which would change the date to today. Note, if the field has already been changed today, then that change will trigger a record, so if you change it to “Today” more than once, it will not create a “Fresh Changes” entry.
- MergePop – Similar to WPScript, MergePop can be used to merge an “XDocument” and populate the desired fields. MergePop Field 193 (Today’s Date) into the desired field.
- FNScript & Formulas:
- FNSQL_POP_N – This function pushes a value to a SQL field like MASTER.CMVX_R201_DATE.
- NOTE: FNScript & Formulas using FNSQL_POP_N requires advanced knowledge and is beyond the scope of this document.
- CMvX – vExchange can send a CMvX Record 196. This record is for use by vExchange and should not be implemented at the firm level.
- CM EDI – CM EDI is intended to be used by the firm. To use this record, populate the desired “CMVX_R###_DATE” fields with today’s date. The tables will be updated, and changes populated.
- Remember that Debtor Records require that NUMBER be populated with the consumer that you want to re-send.
- Also, remember that Property Records require that Property_NO be populated with the asset # that you want to re-send.
- CM EDI is the fastest way to request records on a large volume of claims.
The following is a list of the available Triggers for CMvX:
- MASTER- Claim Level
- CMVX_R201_DATE, CMVX_R202_DATE, CMVX_R203_DATE, CMVX_R204_DATE, CMVX_R205_DATE, CMVX_R231_DATE, CMVX_R241_DATE
- DEBTOR – Consumer Level – Specify Debtor #
- CMVX_R211_DATE, CMVX_R212_DATE, CMVX_R213_DATE, CMVX_R214_DATE, CMVX_R215_DATE, CMVX_R244_DATE, CMVX_R245_DATE, CMVX_R246_DATE, CMVX_R247_DATE
- PROPERTY – Asset – Specify Property #.
- CMVX_R221_DATE
Trigger vExchange Records (Resend Information)
Most of the information from Trigger CMvX Records applies. Refer to that section beforehand.
In addition to sending the related CMvX Records, the associated Infinity fields will be sent.
Sending CMvX records allows users to be granular about the information that is re-sent while resending vExchange records will make it easy. As an example, resending 2207 will include the CMvX Record 212, 213, 246, 248 as well as any related Infinity fields.
The following vExchange Records may be triggered:
- Claim Fields: (MASTER)
- VEX_R2001_DATE, VEX_R2002_DATE,
- Consumer Fields: (DEBTOR) – Specify Debtor #
- VEX_R2101_DATE, VEX_R2102_DATE, VEX_R2110_DATE, VEX_R2111_DATE, VEX_R2115_DATE, VEX_R2120_DATE, VEX_R2130_DATE, VEX_R2202_DATE, VEX_R2203_DATE, VEX_R2204_DATE, VEX_R2207_DATE, VEX_R2209_DATE, VEX_R2210_DATE
- Property Fields (Asset) – Specify Property #.
- VEX_R2125_DATE
See F:\CLSINC\EDI\CMvX_vEX_Inf.ini for a complete list of the Infinity fields that will be re-sent with each vExchange Record.
See F:\CLSINC\EDI\vEx_CMvX_Records.ini for a list of CMvX records associated with vExchange records (listed below).
- 2001 201|204|
- 2002 203|204|
- 2003 201|271|
- 2101 211|
- 2102 215|
- 2110 244|
- 2111 211|244|
- 2115 245|
- 2120 246|
- 2121 221|
- 2130 247|
- 2125 221|
- 2190 231|
- 2201 205|213|241|
- 2202 203|214|
- 2203 205|206|213|
- 2204 205|213|244|
- 2205 211|241|
- 2207 212|213|246|248|
- 2209 205|213|
- 2299 205|
- 2210 209|213|
- 2221 213|
WPScript Example to resend vExchange Record 2201:
Setup X2201 in [1-7-1] with Description “Send vExchange Record 2201.”
In [F17] WPScript, add the two fields from MASTER table CMVX_R205_DATE and CMVXR241_DATE.
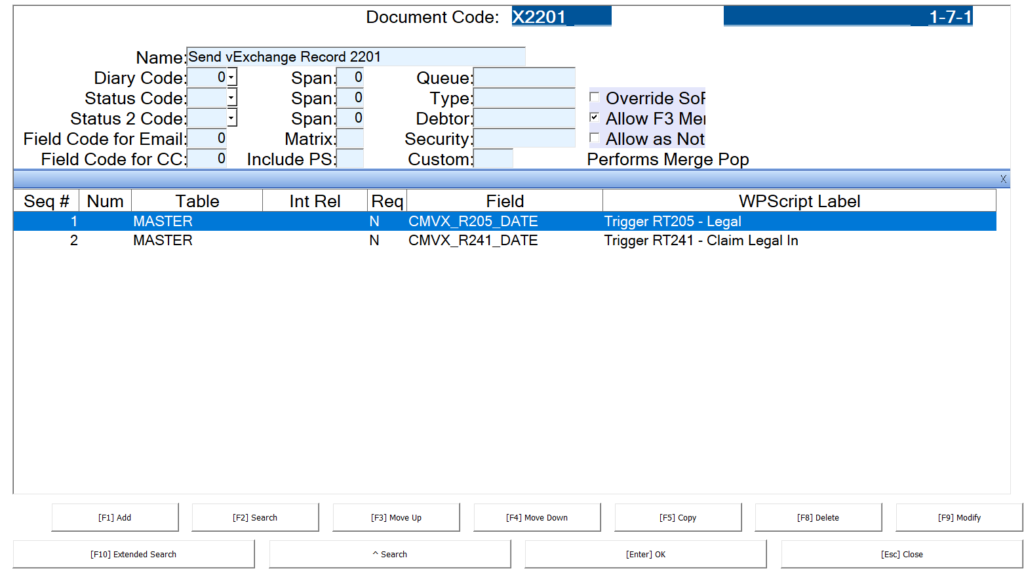
Navigate to the claim and then request X2201 as a Note (F1-F1) or F3 merge. Enter Today’s date in the field.

Merge Pop Example to resend vExchange Record 2201:
Setup X2201 in [1-7-1] with Description “Send vExchange Record 2201.”
In [F16] Merge Pop, add Source 193 and then the two fields from MASTER table CMVX_R205_DATE and CMVXR241_DATE.
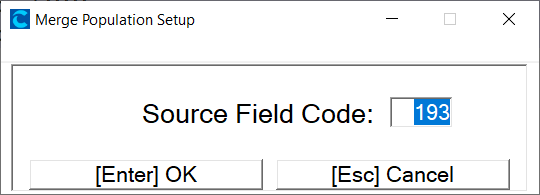
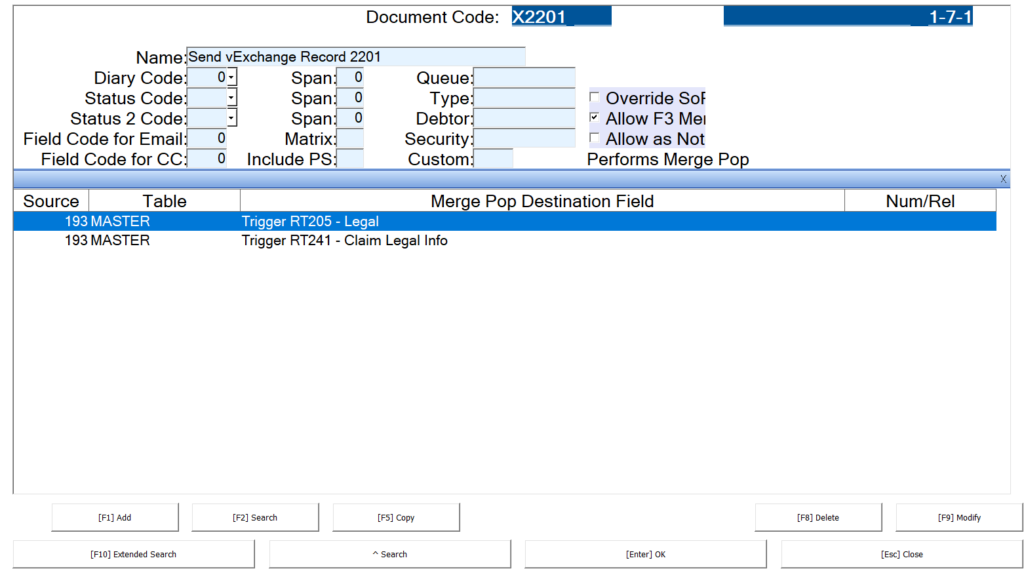
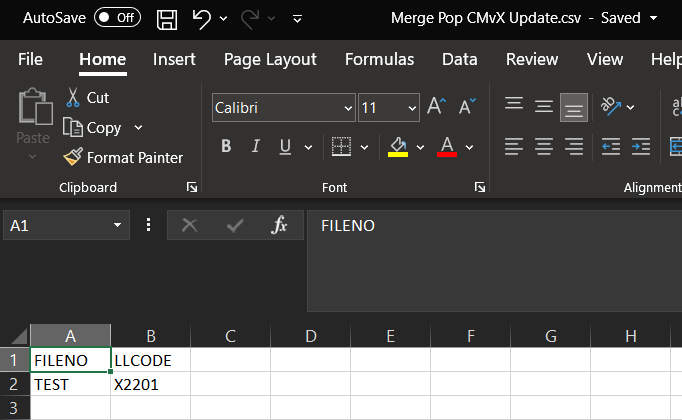
Request and merge X2201 on your desired claims. One way to do this is via Spreadsheet with [1-3-6-5-4]:
CM EDI Record 196 to resend vExchange Record 2201:
The easiest method to update records in mass is with CM EDI Record 196. To send vExchange Record 2201, you need to add dates to CMVX_R205_DATE and CMVX_R241_DATE.
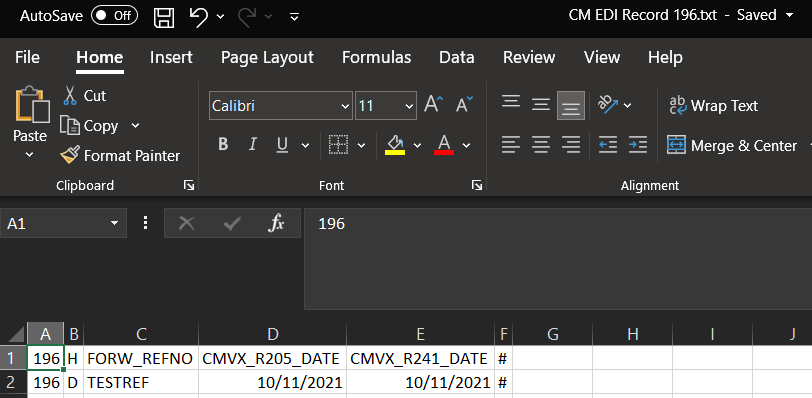
Import via CM EDI Import from [4-2-1-1].
For more information on vExchange Records, access via the vPortal by going to Help > Help Manuals > vExchange > vExchange Record Layouts or using this link: https://vportal.vertican.com/Help/vExchangeRecords.aspx?r=0
View individual vExchange Records at once. While viewing the record, the user can add columns to see if the data comes from within Collection-Master or YGC. Columns can be adjusted to what the user wants to see. The layouts can also be exported to Excel.
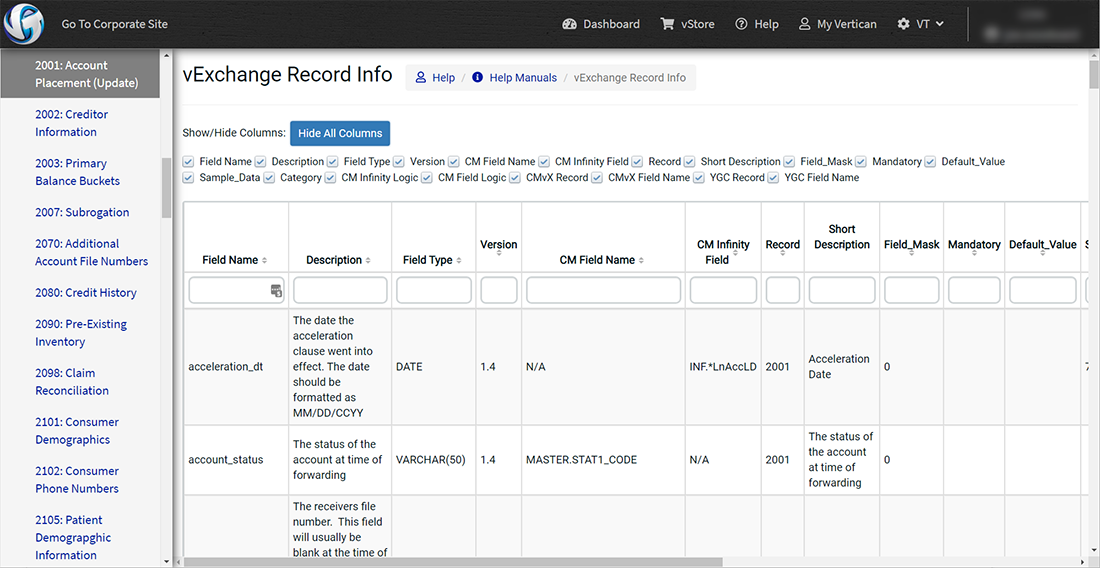
Resend PCODE / Paperless File Information
A common problem with DTPs in Collection-Master is that Paperless File notes only have one date. If the user back dates the note, then it won’t be included with the DTP. If Today’s date is used, then the note will have the wrong date.
Let’s say the business problem is that I (the user) want to create a new note (Today) that is sent using a date from the past (e.g., last week).
CMvX has been enhanced to recognize two special “PS Comment” fields: PCODE & PDATE.
In [1-7-1] Letters, a PS Comment (F1) can be set up. In the PS-Comment, PCODE and/or PDATE can be added.
When using PCODE as a PS comment type the specific desired *vX: Pcode. (It must be a *vX:Pcode.) CMvX will change the normal Matrix code for the value entered in the PS Comment.
More commonly, PDATE can be used to change the date of the note. In the PDATE PS comment, type the date desired (for example, last week). When CMvX creates the export file, it will use the Date provided in PDATE.
If the document is merged (as opposed to using “F1” from the PaperlessFile), then the CMvX 223, 224, and 225 records will be created as well. NOTE: The “PS Records” will not include the PCODE & PDATE comments. Instead, these values will replace the values in the record.
Setup of XPCMT in [1-7-1]:
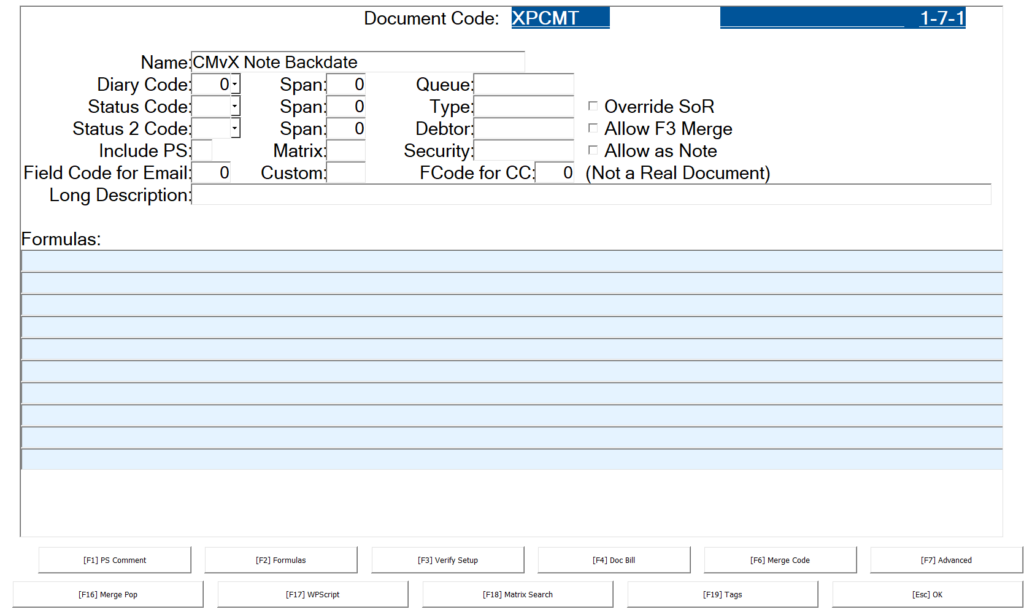
[F1] PS Comment of XPCMT:
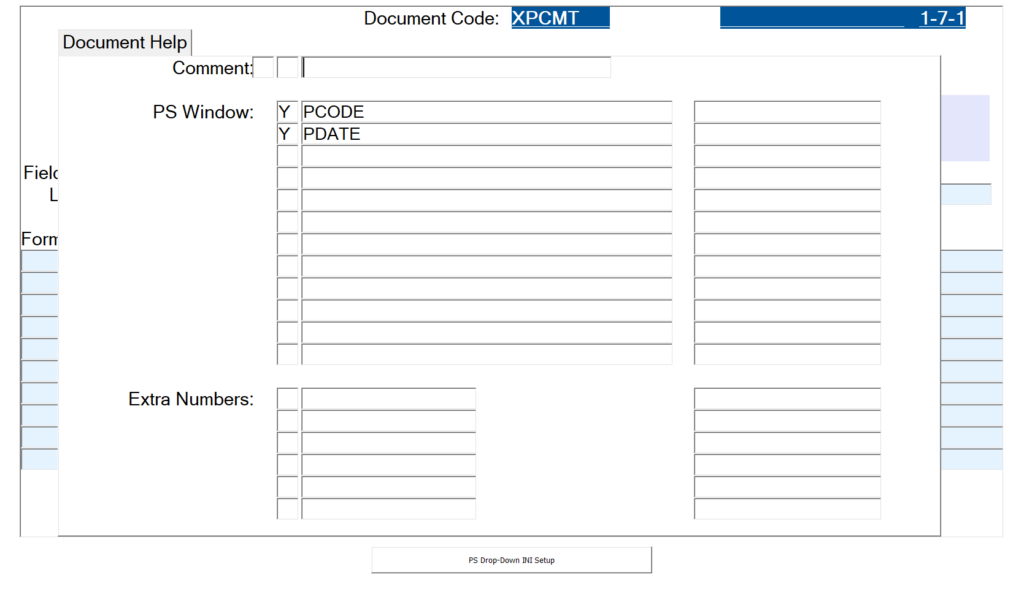
Sample: Adding PCODE *vX:S101 with a backdate of 5/1/2021:


Result in CMvX export file:
![]()
Re-Export CMvX Financial Information (CMvXUpdt) (210/250)
- [4-2-1-V-9-2]
This feature will allow a user to export Financial Information for a specific Date Range.
The report will re-send records on transactions between the date ranges. Depending on the goal, values from the export can be cut and pasted to re-submit values to vExchange.
- NOTE: Resending Financial transactions may cause transactions to be re-sent to your client.
The program will create the following records:
- 202 – Placement Balances
- 204 – Claim Dates
- 210 – Financial Transactions (FINAN)
- 250 – Historical Remittance File
- 271 – Interest / Balance Record
- 272 – Companionated File Interest / Balance Record
Re-Export CMvX Remittance Information (CMvXBack) (253)
- [4-2-1-V-9-3]
There are various reasons why the user may want to resend the remittance information. Using [4-2-1-V-9-3] will recreate the remittance files.
NOTE: The way that remittance creates CMvX 253 records, each remittance creates a different file on the system. It is very likely that all the files needed are already there, and need to be uploaded.
CMvX Special Records
These records are not user-serviceable. vExchange will send these records as appropriate.
- CMvX 196 – Trigger CMvX/vExchange Records – (Resend CMvX Record)
- CMvX 197 – Change Key – vExchange Request to Change the Key on a Claim
- CMvX 198 – Clear Cache – vExchange Request to “Clear the Cache” on a specific claim, and resend CMvX 500 records.
Note that the Clear Cache record CMvX 198 is triggered automatically when a CMvX update record is created on a claim that has not been onboarded to vExchange. This process is automatically processed when records from vExchange are imported. Do not confuse this with the “Clear Cache Feature” which should not be used.
CM EDI Special Records
- CMEDI 196 – Trigger CMvX/vExchange Records
CM EDI is a way to import data into Collection-Master. See “Trigger CMvX / vExchange Records: for more information.
Clear Cache
This feature was created to help to “Re-Onboard Claims.” Generally, this feature should NOT BE USED.
If the cache is cleared on a claim, all the information will be sent as record 500s. If this is done on the claim that is already onboarded, then all kinds of information will be resent. Clearing cache on many claims will make the export process very slow, and most likely Vertican will flag your file as “too large” and delay processing on the update.
CMvX Setup Files (Look, don’t Change!)
- EDI\CMVX-IChanges.EDI – Defines the fields from related parties that will trigger CMvX Records.
- EDI\CMVX.EDI – Defines the fields from Collection-Master that will trigger CMvX Records.
- EDI\CMVX_FILES.EDI – Defines the files that are used to process the CMvX Records.
- EDI\CMvX_vEX_Inf.ini – Defines the Infinity Fields associated with the various vExchange Records.
- EDI\vEx_CMvX_Records.ini – Defines CMvX Records associated with the various vExchange Records.
- COMMON\Call_Log.ini – Defines the logic for Call Screens.
- CUSTOM\PreClosedQueue.ini – Defines Queues in the system that define “Pre-Closed”
Re-Export CMvX Claim Information (CMvXUpdt) (Coming Soon)
- [4-2-1-V-9-4]
This feature will allow the user to pick a claim(s) and then re-send information about that claim (CMvX 200s) for a specific date range.
Typically this feature is used to to create a file with “many records” and then “pick and choose” specific information to re-use.
A use case for this would be to pick CMvX 209 (Notes/PCodes) after fixing a problem matrix.
vExchange FTP
Files are sent & received via https://vftp.vertican.com
The FTP uses the following folder structure for CMvX
- CMVX
- FromVertican
- Rejections
- ToVertican
- FromVertican
- Rejections
CMvX Processing Time: 06:00, 08:00, 10:00, 12:00, 14:00, 16:00, 18:00 EST
- Every two hours from 6:00 AM EST to 6:00 PM ETC.
Files may be included in a Zip file, but must be named as follows:
- UPD – Updates
- RMT – Remittance
- TMP – Separate records in a CMvX Update Zip File.
If a file is uploaded with an “Invalid File Extension,” the file will remain in the FTP folder.
- NOTE: It may be renamed to include “.” so sample.txt becomes sample..txt
Vertican does support Encryption. Encryption must be set up with Vertican in advance, and once the user chooses to encrypt files, all files must be encrypted.
Encrypted files should be named in the format “Normal Filename + .gpg”. As an example, CMvX.upd.gpg
Call Screen (F:\CLSINC\COMMON\CALL_LOG.ini)
The Call Screen CTRL-F12 has significantly standardized reporting for Calls providing a “Wizard” with check boxes and radio buttons to check off.
The Common\Call_Log.ini file should not be modified and is used by the various DTPs to define the codes used by each interface.
With CMvX, there are [vx.*] sections that define which vExchange PCodes will be sent as a result.
In theory, this is simple, but as it turns out, each client has very complicated rules about what must or must not be done when making a call. While CMVX will send a *VX: code to vExchange, each DTP has its own mappings. These mappings are performed by each DTP.
This does mean that if a DTP does not support a particular action from the call screen, then it will not be reported.
Vertican provides a “Cheat Sheet” that provides specific suggestions on how to properly log a call. With the translations and language confusion, it can be very difficult to understand what a client expects during user acceptance testing (UAT). There are literally thousands of possible combinations. Picking the specific combination that will help the firm pass the UAT can be tricky. In production, it is much easier: the user picks the desired options, and the results automatically translate. It is important that each client has its own work standards, so they may not accept every possible choice.
Gates
Some Forwarders are Vertican Clients, and enjoy a feature called “Gates.” Gates are a series of rules that either prevent delivery of the various records (Rejection) or flag a record for review (Exception).
It is important to understand that while Vertican manages the Gates, the rules are defined by the client. When a gate is triggered, the data was delivered to Vertican and added to the data warehouse, but in the case of a Rejection, the data is not delivered to the client. There is a log of the various records that have been rejected. The Analytics website may be used to help manage Gate Rejections.
There is a very real possibility that the client requirements conflict with the local requirements. In these cases, the firm should reach out to the client and let the Account Manager know about the conflict. The client can then request that the Gate Rules be enhanced to meet the firm’s specific needs.
Analytics
The vExchange Analytics website is a valuable tool to help identify common vExchange Problems:
The vExchange Analytics website provides several features and reports.
- Any claim that has been uploaded to vExchange is available for review in Analytics.
- Search For Account using Sender Internal File Number, Creditor File Number, or Agent File Number.
- Provides a way to find claims.
- From this search, the Show All page can be launched.
- Show All Page
- Provides a summary of information found on vExchange Analytics.
- Depending on the software used by the Receiver, there may be more information on these pages than in the user’s own system.
- Generally speaking, the results show information provided by the Receiver (2000 Record), but when the receiver has not sent the information, the Forwarder information is displayed (1000 Record).
- My Account
- Help – Documentation for Analytics or go directly to Analytics Help on the Help Center.
- Logs – a view into the vExchange system logs.
- Placements
- Itemized report of claims placed in a given date range.
- Follow the link to show the Show All page.
- SOL Aging Visual Report.
- This is a Power BI interactive report. It is a proof of concept (POC) demonstrating how analytics may be performed on the Analytics website.
Analytics Reports Interface
Each report will have a start/end date to filter the report.
In addition, the user can work with the columns:
- Group By – Drag a column to the “Group By”
- 3 Dots
- Sort – Choose to sort the report.
- Filter – Besides the obvious typing in the textbox under the column name, there are advanced filters.
- Columns – Choose which columns to display on the report.
Dashboard Logs
Under My Account > Logs, there is a report that shows activity. Individual firms will see entries that match their “Agent ID.” Vertican staff will be able to see all entries. Some tasks have “—” as the Agent ID; these tasks affect “All Firms” or a “Particular DTP”
Source – This field may be used to sort, group, or filter the results based on the process type.
Agent ID – This field will identify the individual firm, or will have “—” to show that the tasks affect multiple forms. (IE a DTP)
Agent Name – This field will translate the Agent ID to the Agent Name.
File Name – This field shows the file that is being processed. Sometimes, it’s the file actually provided to the FTP and other times it’s the file name provided to the process.
Path – When appropriate, will include the path to the File Name. At other times, include additional information about the step.
Start – The time the process started. Many times, a log entry will be for a point in time rather than a time range.
End – The time the process ended. Many times, a log entry will be for a point in time rather than a time range.
Forwarder – When appropriate, will identify the Forwarder ID.
Row Count – The total # of records processed by this step.
Client Notified – Provides insight into an e-mail to the client for the step.
Sources
- b3plogs – Returns results for the CAC INTERFACE
- CACS_ETL – Itemized list of firms processed forwarder identifies “I” for UAT or “P” for Production.
- CACS_Shakeout – Identifies the status of the CACS shakeout process.
- CMvX RT0 – Tracks the time that the CMvX file was “Picked up” by the ETL.
- GateLogs – Once the claims have been imported, the Gate Logs run and check each of the Gate Rules.
- GateTracking – Replaced daily. For each gate, it tracks the start and end time for the gate run.
- MCM ErrorLogs – Provides a summary of Reject Files.
- MCM Logs – Logs the delivery of MCM data to each firm.
- MCM Outbound – DTP Job level tracking of the logs.
- Reports – Logs DTP activity: Convoke Reports, CMvX Activity.
Version Date 5/10/2023
