VSA Installation & Setup Guide
This guide is for the Support Coordinator completing setup.
Initial Setup – Support Coordinator/Administrator
How to Resolve the Chilkat Error *
* Collection-Master only
Two Types of Users
Before you set up new users, you must understand the two types of users.
- Support Coordinator/Administrator:
- Must be listed as a Support Coordinator on the vPortal.
- Can create tickets, approve tickets that are created by users, and forward the tickets to Vertican.
- Can delete tickets that were created by users in error or that can be managed internally without Vertican assistance.
- However, once a ticket is forwarded to Vertican it cannot be deleted from the system.
- Firms should designate at least 2 Support Coordinators/Administrators, if possible. The maximum is 3.
- User:
- Can delete their own tickets only if the ticket status is “new issue”.
- Can modify their open tickets if they are not closed or have not been forwarded to Vertican.
- Can create tickets in the system, but cannot forward them to Vertican. Only a Support Coordinator/Administrator can communicate with Vertican.
Use Only Generic Usernames
Usernames cannot be edited or deleted from the ticketing system. There is also a limit of 3 Support Coordinator/Administrator users per firm.
Firms should set up users with generic usernames based on role rather than tie usernames to individuals. Examples:
- SUPCOOR1, SUPCOOR2, SUPCOOR3 for Support Coordinators/Administrators.
- USER1, USER2, USER3, etc. for users.
Before you set up users:
- Decide the generic usernames your firm will use.
- Track the individuals assigned to each username.
- Inform those individuals of their VSA username.
Only one Support Coordinator can do the initial setup for the other Support Coordinators and Users. Please follow the instructions for your product.
- Collection-Master
- Q-Law / Q-LawE
- vMedia (instructions to come)
Step 1: Enter a new Username and Password.
You will see the default username SETUP in the User Setup Screen.
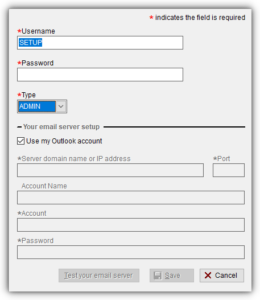
User Setup Screen
Change the default login from SETUP to a new Username and Password. Remember to use a generic username based on role. The asterisk * denotes a required field.
- *Username: Enter a new username e.g., Supcoor1 or SUPCOOR1.
- *Password: Enter a password of your choosing.
- *Type: This field defaults to ADMIN.
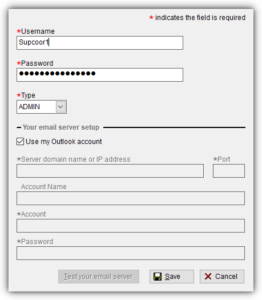
- When done, click the Save button. If the Save button is not active, use the tab or enter key to put your cursor thru the fields, or click your cursor outside the fields.
Step 2: Choose settings for Your email server setup.
Email setup is required in order for Support Coordinators/Administrators to forward tickets to Vertican.
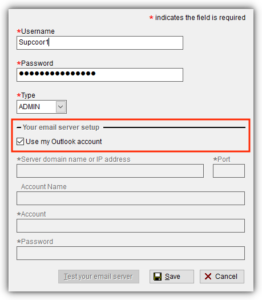
- In the screenshot below, in the red box, there is a section called Your email server setup.
- Under that section is a √ in the box next to Use my Outlook account. The box for Outlook is checked by default.
If your firm uses Outlook, keep the Outlook box checked as is and continue to Step 3.
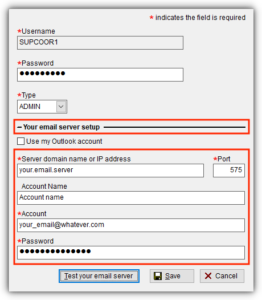
If your firm does not use Outlook, uncheck the box for Outlook box and complete the fields below before going to Step 3.
- *Server domain name or IP address: firm IT will need to provide this information.
- *Port: firm IT will need to provide this information.
- Account Name: firm IT will need to provide this information.
- *Account: This is your firm email address. Contact your firm IT if you have questions.
- *Password: This is your firm email password. Contact your firm IT if you have questions.
- When done, click the Save button.
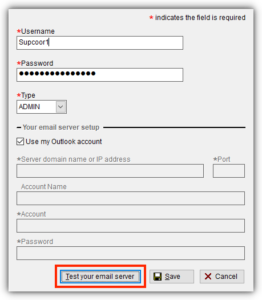
- Do not click the button to Test your email server until completing Step 3.
Step 3: Go to Ticket > Settings.
The Ticket screen below will now display. On the top left screen, click on Ticket > Settings.
Complete the email server setup fields below.
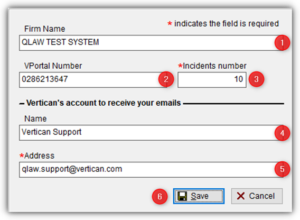
- Firm Name – enter the firm’s name.
- VPortal Number – enter the firm’s vPortal number.
- *Incidents number – enter the number of incidents that the firm’s current support program allows for in a monthly period. This field is used to help the firm know how many incidents have used. If the firm submits more incidents, than they have available for the month they will be charged. The number displayed is a counter to track the incidents for the month. This will give the firm an idea of about how many incidents they have remaining without being charged. It is the firm’s responsibility to enter the correct information. *Future programming will automate this process, pulling data directly from the vPortal.
- Name – enter the correct product name.
- *Address – enter the correct address for the product email address listed below to forward support emails to:
- Collection Master – [email protected]
- Collection Master Diamond – enter your Diamond support email address
- Qlaw and QlawE – [email protected]
- QlawE and Qlaw Diamond – enter your Diamond support email address
- QlawE Enterprise – enter your Enterprise email address
- Click [Save].
Step 4: Go to Ticket > Users.
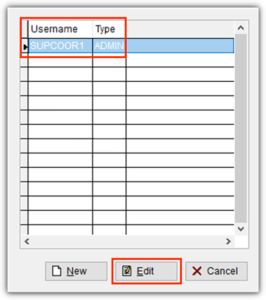
Go to the Ticket screen and select Users.
You will see the username that you just created selected in blue. Click the Edit button at the bottom.
Step 5: Test your email server.
The User Setup Screen will display again. Now click the Test your email server button. (The screenshot below shows the window with the box checked for Outlook. If you did not select Outlook, you will see a similar User Setup Screen with the same Test your email server button.)
Step 6: Verify the results of testing your email server.
Your actions depend on whether or not the email test was successful.
- Successful Test
- If the connection is set up correctly, you will get the message below, which means your system is ready to send emails to Vertican support.

-
- If you receive the above message, press the [Save] button in the User Setup Screen.
- Unsuccessful Test
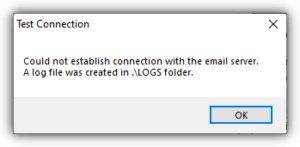
- If the system is unable to connect, you will get the message below saying “Could not establish connection with the email server”.
- This message indicates one or more of the entries is incorrect: the username, email address, password, domain, IP address for the email server, or the port number.
-
- If you receive the above message, press the [Cancel] button in the User Setup Screen and correct the information entered in the User Setup Screen for your email server. Reach out to your IT if necessary. Vertican is unable to assist you if your email test is unsuccessful.
Once you setup your VSA ADMIN access and test your email, you can add additional users, including other Support Coordinators, by again clicking Ticket > Users.
You will see the Username you setup on the screen. Now click the New button at the bottom.
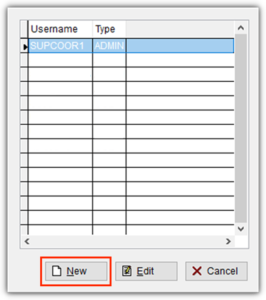
Now you can create either type of user: ADMIN or USER.
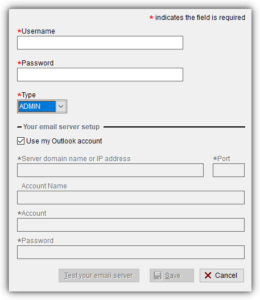
- If you choose ADMIN as the Type:
- Complete the User Setup Screen in a similar way as you did for yourself.
- Use a different generic username. If your username was SUPCOORD1, the next person would be SUPCOORD2.
- Remember to use generic usernames based on role.
- If you choose user Type of USER, enter the generic username for the USER (e.g. USER1).
- Assign a password and click the Save button.
- Notice that when you select USER as the Type, the Your email server setup section is grayed out. Users are not able to email Vertican. For users, you only need to enter *Username, *Password and *Type.
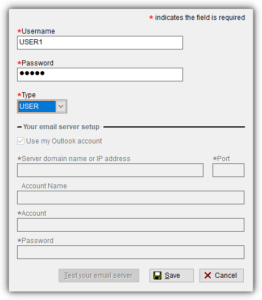
Repeat these steps for additional users (e.g. USER2, USER3) upon initial setup or at a later time. Remember to keep track of how you assign these generic usernames.
About the Chilkat Error
The instructions in this section are only for use after the initial VSA setup is completed. If you have not performed the initial VSA setup, follow the instructions at the top of this Installation & Setup Guide.
A CHILKAT error may occur on any workstation. Below is the Chilkat error message.
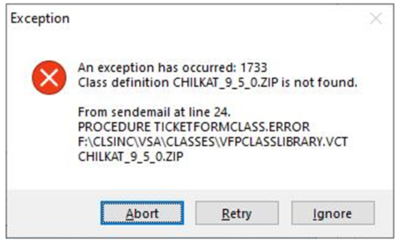
How to Resolve the Chilkat Error
The Chilkat error may be fixed by you (the Support Coordinator/Administrator) or by an IT resource. These same directions can be used to fix the error on any user’s machine.
- Close the VSA app.
- Run the Setup.Bat located in CLSINC > VSA. Running Setup.bat should create a folder on the C drive for the Chilkat library. It should copy and paste the DLL and register it during this process.
If the Setup.bat is not successful:
- Go to C:\program files (x86) and add a folder named CHILKAT.
- In the CLSINC > VSA folder, locate the ChilkatAx-9.5.0-win32.dll.
- Copy and paste the ChilkatAx-9.5.0-win32.dll into the CHILKAT folder you just created.
- Open a command prompt window.
- Select Run as administrator.
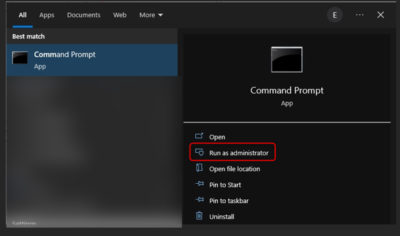
- When the window opens, you will see C:\Users\[your name]
- Type cd.. after your name and press [Enter].
- Type cd.. a second time to get to a C: prompt.
- Then type cd program files (x86).
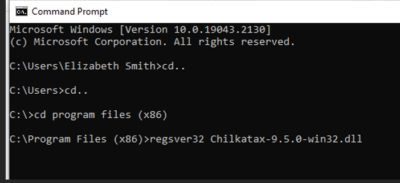
- Type regsvr32 Chilkatax-9.5.0-win32.dll on the screen and press [Enter].
- When a prompt appears stating the registration was successful, click [Okay].
Verify if the Chilkat Error has been fixed.
- Open up the VSA application via the Collection-Master dashboard > Help > Client Services > Vertican Support Access (login required). Or you may go to CLSINC > VSA > VSA.EXE.
- If the Chilkat error has been fixed, the error message will no longer be visible. You can then set up additional users with the VSA by following instructions in the Initial Setup – User section of this guide.
