Last Update: February 5, 2022
DOCKET CALENDAR USER GUIDE
Table of Contents
Assigning to attorney within Firm
Quick Docket Calendar Data Entry
Summary
The below functions were added to Q-LawE to assist with hearing management/calendaring. The new functions can be found in the Print Docket Calendar screen (Maintenance -> Print Docket/Court Calendar).
Attorney Absence
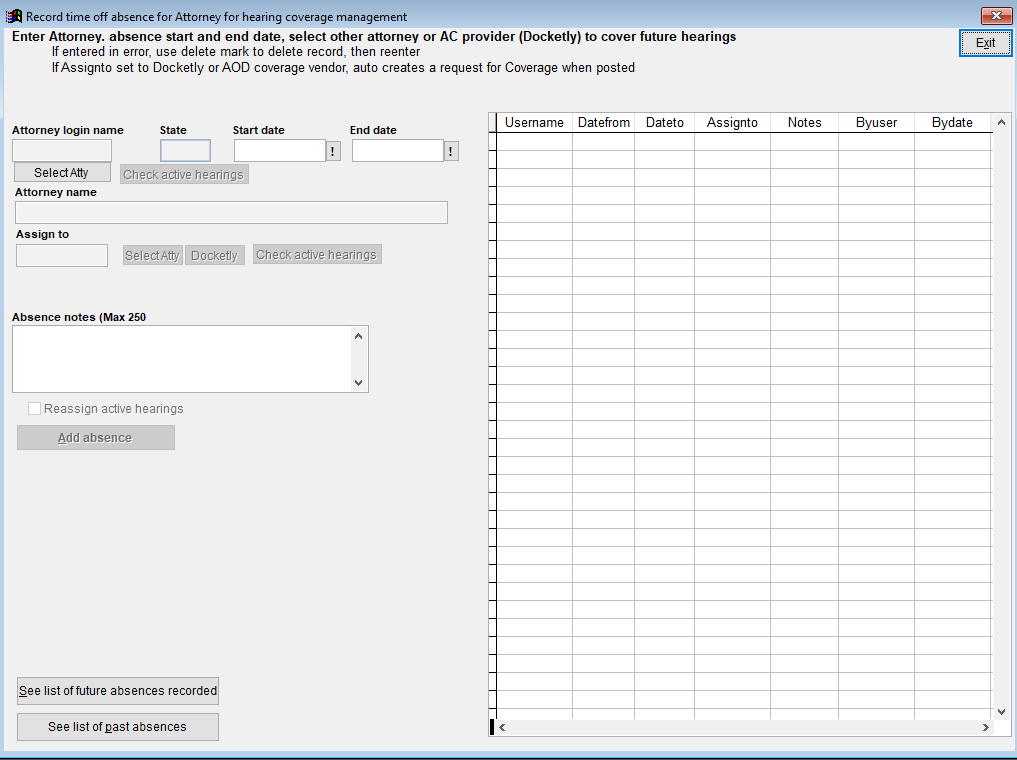
Schedule attorney time-off/absences and re-assign court calendars for the attorney for a given time period. Cases can easily be assigned to other attorneys within the firm or placed with attorney coverage all within one screen.
Maintenance -> Print Docket/Court Calendar -> Set absence by attorney and reassign

Set Attorney Absence
- Click the [Select Atty] button below the Attorney Login name field
- A grid will appear with all users who are setup as Attorneys. Find the appropriate attorney/record and then click [Select Record].
- When returned to the Record time off screen, the State field will populate with the first state setup for the user. The attorney name will also populate in the field below.
- Set the start and end date for the attorney absence.
- Select the [check active hearings] button to the right of the Select Atty button.
- A grid will appear with all scheduled hearings for that attorney during their set time of absence.
- To re-assign the court to a new attorney/Docketly, check the box for include. Only the selections where include is checked will be re-assigned.
- Once selected, click [SELECT RECORD] to proceed with re-assignment
- Clicking [EXIT] will abandon the selections above and return to the absence screen.
- A pop-up will appear asking to confirm to reassign. Select [Yes] to proceed/ [No] to Cancel.
Assigning to attorney within Firm
- Click the [Select Atty] button
- A grid of attorneys who can licensed in the state where the hearing is taking place will appear.
- If no attorneys are available, a pop-up will advise no attorneys are available.
- Select the attorney who will be covering the hearing and click [Select Record].
- A grid of attorneys who can licensed in the state where the hearing is taking place will appear.
- When returned to the absence screen, the assign to field will be populated with attorney’s Q-LawE username.
- Click the [Check active hearings] button.
- If there are any conflicts for the attorney, they will be displayed in a grid.
- If there are no conflicts, a pop-up will appear advising there are no active hearings in the time period for the attorney.
Assigning to Docketly
- Select the [Docketly] button
- A pop-up will appear “Confirm to assigning hearing to Docketly (There will be a cost). Select [Yes] to proceed/ [No] to Cancel.
- Enter any absence notes for the attorney.
- Click the [Add absence] button
- A pop-up will appear asking to confirm. Select [Yes] to proceed/ [No] to Cancel.
- A second pop-up asking to confirm the re-assignment. Select [Yes] to proceed/ [No] to Cancel.
- A pop-up will appear advising the re-assignment is completed. Select [OK]
- The re-assignment will then appear in the grid on the right side of the absence screen. It will remain in the screen until the end date of the absence.
Deleting/Editing an absence
- An attorney absence will remain in the grid on the right side of the screen until the end of the scheduled absence.
- An existing entry cannot be edited. If there is an error, it must be deleted and then re-entered.
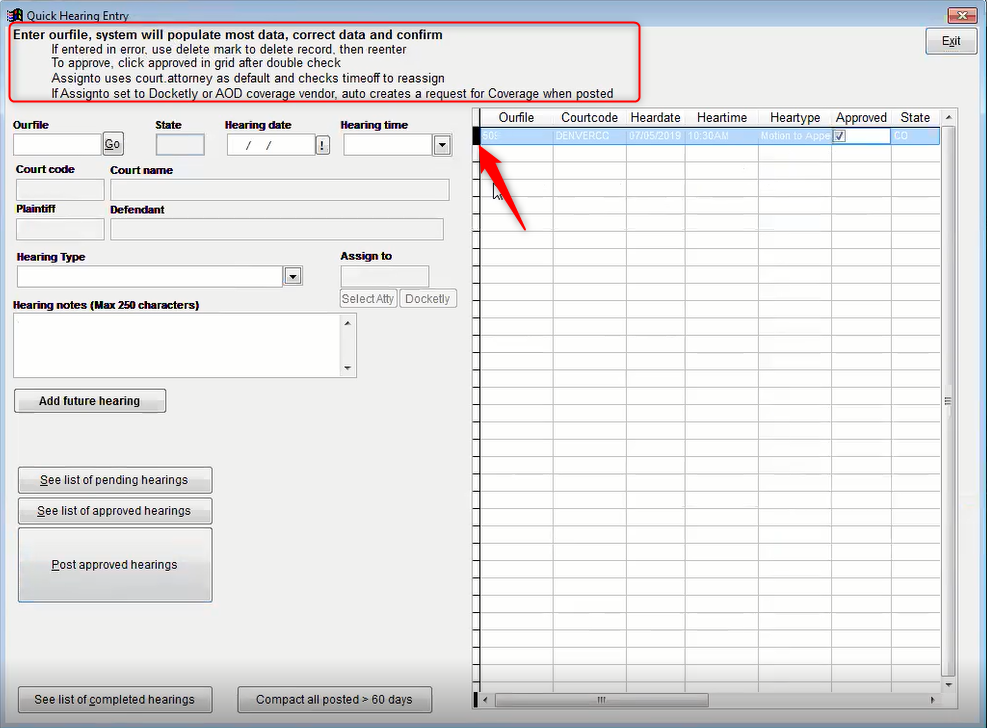
- To delete the absence, click in the small box to the right of the username. The box will turn black to indicate it will be deleted.
- Once deleted, the absence will not disappear from the grid until the user exits and re-enters the absence screen.

- IMPORTANT NOTE: If a case has already been assigned to a new attorney, deleting the absence will not re-assign the case back to the original attorney. The hearing information needs to be updated in the ourfile.
Quick Docket Calendar Data Entry
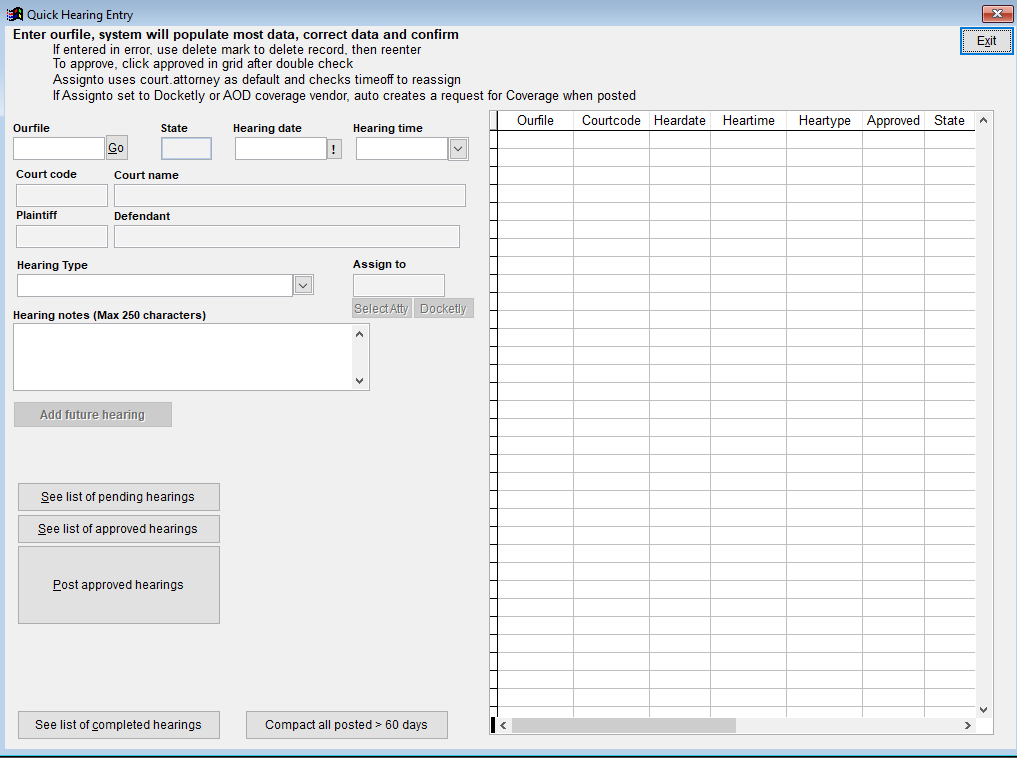
Add calendar events to multiple accounts from within a single screen.
Maintenance -> Print Docket/Court Calendar -> Quick docket calendar data entry

NOTE: Previous hearings that have been entered but not processed will be listed in the grid to the right of the screen.
Entering new calendar event
- Enter the ourfile in the ourfile field. Click [Go]
- The system will populate the Court code, Court name, Plaintiff, Hearing Type and Assign to with all the information for the ourfile.
- If any the fields are not populated on the account, they will not populate on the Quick Hearing entry screen.
- Enter the hearing date or select the date using the [!] button.
- Select the hearing time using the drop down
- Select the hearing type from the drop down
- The assign to field will populate with the default attorney setup for the court.
- To change attorneys, click the [Select Atty] button.
- A list of attorneys who are licensed in the state for that ourfile will appear in a grid
- Click the attorney’s name to select. Click [Select Record]
- To assign to Docketly, select the [Docketly] button
- A pop-up will appear “Confirm to assigning hearing to Docketly (There will be a cost). Select YES to proceed.
- To change attorneys, click the [Select Atty] button.
- Enter a hearing note (optional)
- Click [Add future hearing]
- Click [Yes] to confirm
- The data for this account will then appear on the grid to the right of the screen
- Once you’ve confirmed the information is correct, Click the Approved checkbox
- Click [Post Approved Hearings]
- Once the button is clicked, select [Yes] to confirm your entry
- A Done pop-up will appear. Click [Ok]. The hearing will now be posted to the account and will disappear from the grid. The hearing will also appear in the Hearing Calendar for Q-LawE and will be managed in the software.
Data Validation
When entering a calendar event using the Quick Docket Calendar Entry, the system performs several validation checks when information is entered in the screen.
| Validation Error | Resolution |
| Dlegal record not found error | Confirm dlegal.code set on ourfile and that a dlegal record has been added to the account. |
| Hearing request made with a Courtcode: which is not a valid court, hearing was NOT added | The court code for court or garn court on the account needs to be update to a valid code. |
| Hearing request made with a hearing type: which is not a valid code, default used: HEARING | The hearing type selected is not valid. The system has defaulted to “HEARING” |
| Hearing request made with an Attorney AID of: which is not a user in userlist, defaulted to court.attorney default of | The user selected is not correct. They system has defaulted to the default attorney for the court (if setup). If not setup, the system will not add. |
| Duplicate hearing request made – NOT Added | A hearing for the same date and time has already been processed through the Quick Docket Calendar screen. The account needs to be updated within from within the ourfile. |
Editing/ Deleting a record
- An existing entry cannot be edited. If there is an error, it must be deleted and then re-entered.
- To delete the absence, click in the small box to the right of the username. The box will turn black to indicate it will be deleted.

Historical Quick Records
- Click [See list of pending hearings] to view a list of hearings that have not been approved yet.
- Click [See list of approved hearings] to view the list of hearings that have been approved.
- Click [See list of completed hearings] to view the list of hearing that have been confirmed.
- Click [Compact all posted > 60 days] to remove records from the completed/ approved list that are over 60 days old.