Last Update: September 5, 2023
BARCODING
Table of Contents
Q-LawE IDAutomation HC39M Barcode & QR Code
Adding a Barcode to the Document Template
Importing Using Scan Case Documents-Barcode
Barcode Enhancements (September 2023 Release – QS-12689)
Barcoding
All applicable barcode installation files should already be located in your :\Q-LawE \install folder. Please follow the instructions below for installation and setup.
Q-LawE IDAutomation HC39M Barcode & QR Code
-
Navigate to: \qlawe\install\Misc\Barcode Scanning\Install Files\BarcodeReader. DTKBarcodeSetup.msi will install the reader. Drag and drop this file onto the desktop of each workstation that will need to utilize the reader for scanning. Right-click on this file, select Install and follow the prompts.
- Navigate to: \qlawe\install\Misc\Barcode Scanning\Install Files\BarcodeFont. INSTALL.exe will install the IDAutomationHC39M Barcode font and QR code font. Drag and drop this file onto the desktop of each workstation that will be creating the barcode on the document templates or generating barcode labels. Right-click on the file, select Run as Administrator and follow the prompts.
- For Q-LawE QR Codes, there is no reader to install.
- If using our vMedia product, the reader is integrated with Q-LawE and will automatically read Q-LawE QR Codes. Learn more about vMedia Compatibility and Use, including how vMedia can utilize QR codes for scanning documents.
- If using third-party document management software, the reader should also work with Q-LawE. For any issues, please refer to instructions from your software provider.
Firm Preference
Navigate to firm preferences and search for the ID Barcode. When the firm preference is found, ensure the checkbox is ticked to enable the barcode software.

Adding a Barcode to the Document Template
A. Standard IDAutomationHC39M Barcode
It is important that the barcode be entered into the document template with the exact format as detailed below. All items in the barcode are required to be a specific length in itself and if there are less characters than what is required, you will need to pad that data with the appropriate number of dashes in order to fill those spaces to match the required length. Both the document code and the page number are document-specific and do not change from account to account, so these two items are hard coded into the barcode along with any dashes. The one variable in the barcode is the ourfile number. To ensure that the ourfile number is the correct length, you will use a custom field that will automatically add the dashes to the ourfile number to correctly report the number of characters. The custom field syntax is listed below and can be copied and pasted or typed as is into an available custom field box. Alternatively, create a BARCODE custom field in the custom field table that can easily be inserted in the correct custom field box on the Q-law(E) template screen for each of your documents needing a barcode.
- Characteristics of the standard barcode for Q-LawE and Q-Law Fox
- The barcode must be located anywhere on the template, preferably the first page.
- Do not put the barcode in a continuous header or footer. The barcode can only be on the document one time.
- The barcode must be a font size of 12
- The font used for the barcode is called “IDautomationHC39M”
- Character length requirements:
- In Q-Law Fox, the file number located in the barcode must be 6 characters in length. In order to ensure the length limit is met for ourfile numbers that are not 6 characters, you must utilize a formula in a custom field to insert dashes when needed so that the ourfile will be a total of 6 characters used. Example: 1234–. The custom field string should be: PADL(ALLTRIM(DEBT.OURFILE),6,”-“)
- In Q-Law Fox, the document code must be 4 characters – if the DocID being used is only 3 characters, insert a dash for the fourth character. Example: ABC-
- In Q-LawE, the file number located in the barcode must be 10 characters in length. In order to ensure the length limit is met for ourfile numbers that are not 10 characters, you must utilize a formula in a custom field to insert dashes when needed so that the ourfile will be a total of 10 characters. Example 1234——. The custom field string should be: PADL(ALLTRIM(DEBT.OURFILE),10,”-“)
- In Q-LawE, the document code must be 10 characters – if the DocID being used is only 3 characters, insert a dash for the remaining 7 characters. Example: ABC——-
- Number of pages/PDF files must be 2 characters and can be padded with dashes Example: 1-
- The printer cannot be a dot matrix printer
- When scanning, a photocopy cannot be used; it must be the original
- When scanning the documents, turn on the Greyscale setting on the scanner
- The recommended DPI should be set to 300 on the scanner; however, you can experiment with the DPI to see what works best with your scanner so that the reader is able to read the barcode
- The barcodes must be horizontal on the document
- Add the barcode to the template
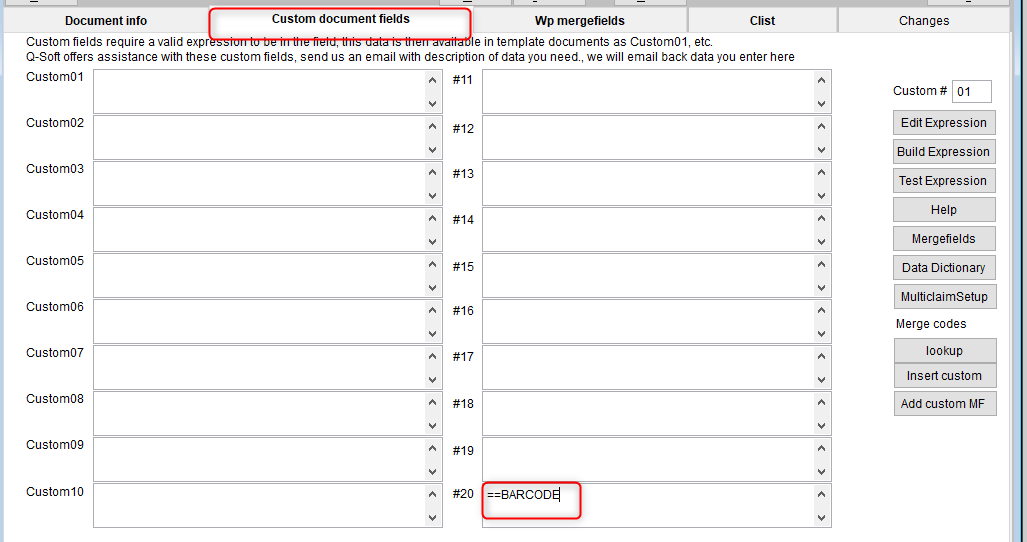
- Begin by inserting the custom field string/code for the barcode into the designated custom field box. In the example below we used a custom field code in the custom 20 box on the Custom document fields tab of the template setup.
-
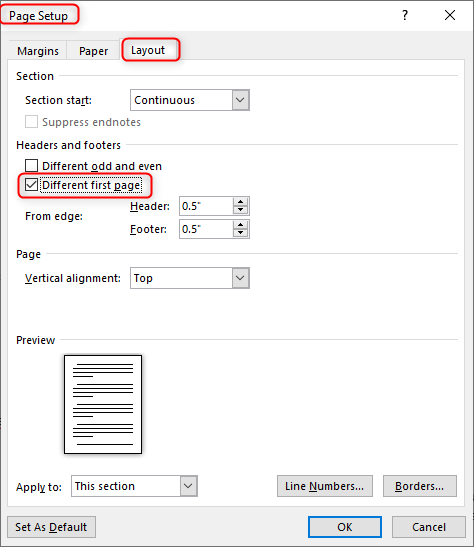
- In the merge document, put the cursor in the location where you want the barcode to be – it can be in a text box, directly in the document, or in a footer. If putting it in a footer, you MUST put it on the first page ONLY by customizing the layout format on the word document to show that headers/footers will be different on first page.
-
- You may change the font for now to something easy to read such as “Times New Roman” or “Arial”. This will be changed later.
- Enter the required barcode format (Q-Law Fox), for example *Q<>SAC-1-*
- *Q – The barcode must begin with an asterisk and a capital Q
- <> – Merge field from the data source that is programmed as follows: PADL(alltrim(debt.ourfile),6,’-‘)
- SAC- – The document code MUST be 4 characters
- 1- – Number of pages/pdfs (must be 2 characters)
* Just as every barcode must start with an asterisk, every barcode must also end with an asterisk.
- Now change the text into the correct barcode font by highlighting the barcode format and then changing the font to “IDAutomationHC39M”
- Enter the required barcode format (Q-LawE), for example *Q<>SAC——-1-*
- *Q – The barcode must begin with an asterisk and a capital Q
- <> – Mergefield from the data source that is programmed as follows: PADL(alltrim(debt.ourfile),10,’-‘)
- SAC- – The document code MUST be 10 characters
- 1- – Number of pages/pdfs (must be 2 characters)
* Just as every barcode must start with an asterisk, every barcode must also end with an asterisk.
- Now change the text into the correct barcode font by highlighting the barcode format and then changing the font to “IDAutomationHC39M”
*Q«custom20»SAC——-1-*
- f. Generate the document either as a one-off through an account or as a batch through the TAS Documents function. Q-LawE has incorporated an encoder to recognize the custom field to create the barcode.
B. QR IDAUTOMATION D MATRIX QR Code
Available in Q-LawE only, this QR code is used for integration between Q-LawE or a third-party document management system.
Characteristics of the QR code in Q-LawE:
- You MUST use custom20 if using standard data sources (merge1.csv)
- If you are using the extended merge data source (merge_ext.csv), then the custom string MUST be in a merge field named USERINIT
- The custom field string should be: ‘XDC=’+PADL(ALLTRIM(DEBT.OURFILE),10,’0’)+’|XDT=NOTICE0000’
- XDC- triggers the encoder
- PADL(alltrim(debt.ourfile),10,’0’) – is the string for the ourfile with the full length to be 10; if the ourfile is 1234, the string will make it 1234000000
- |XDT= triggers the DocID lookup
- NOTICE0000 is the DocID; since it must be 10 characters, use the actual DocID and add zeros to the end to make it a total of 10 characters
- The QR code must be located anywhere on the template
- Do not put the QR code in a continuous header or footer; the barcode can only be on the document one time
- The QR code must be a font size of 14
- The font used for the QR code is called “IDautomationDMatrix”
- Be sure to highlight the merge field and ensure you are using the IDautomation DMatrix font size 14

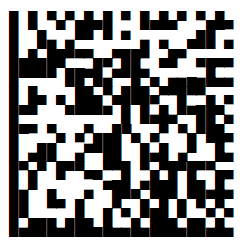
- This is how the final merged QR code will appear:
Scanning the Documents
Once the document(s) are returned to your office, the documents containing a barcode or not, they can be scanned into a folder on your network. Q-LawE can be set to use a default scan folder by setting the firm preference id SCANFOLD.

Importing Using Scan Case Documents-Barcode
Once you have scanned all the documents to your system, you can begin using [Scan Case Documents-Barcode].
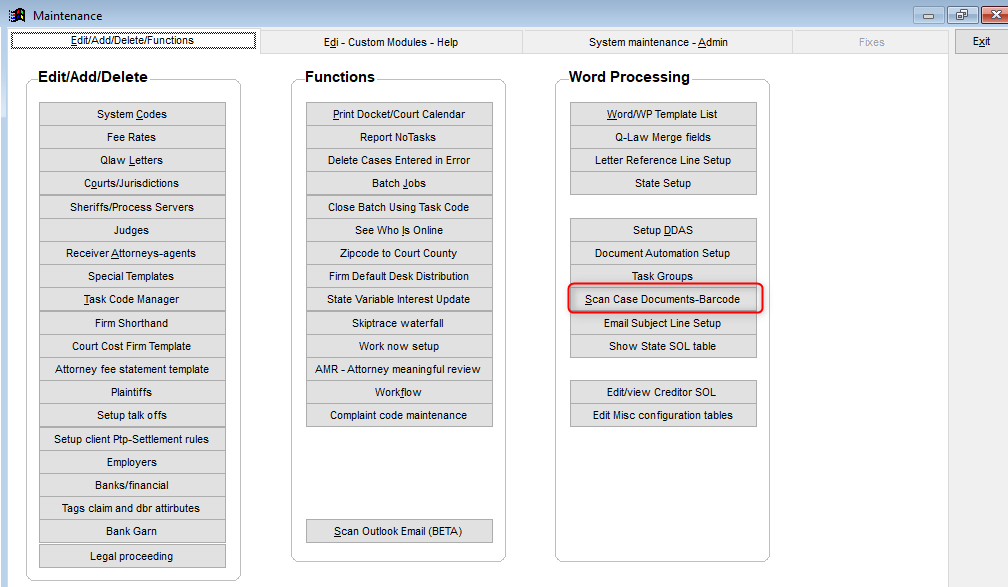
- From the Maintenance menu, select the Edit/Add/Delete/Functions tab and click [Scan Case Documents-Barcode].
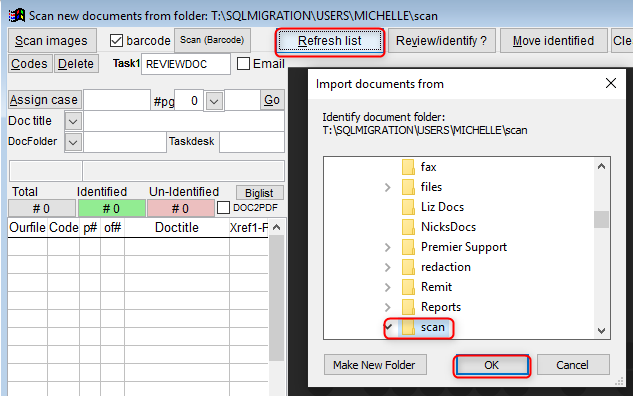
- Click [Clear for next scan]
- Then click [Refresh list]. At this point you can use the default folder you set in the firm preference, or you could browse to a new folder location.
- Click [OK] once you have located the file in which your scanned documents are located.
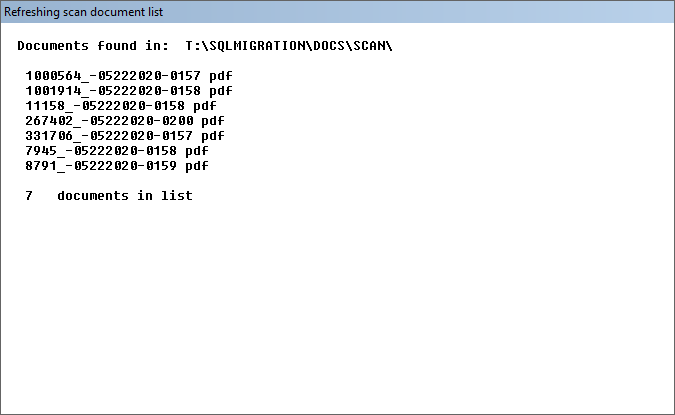
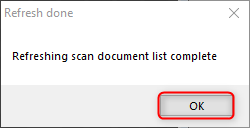
- The system will read the folder you selected. It will tell you how many files it found and advise the Refresh has completed.
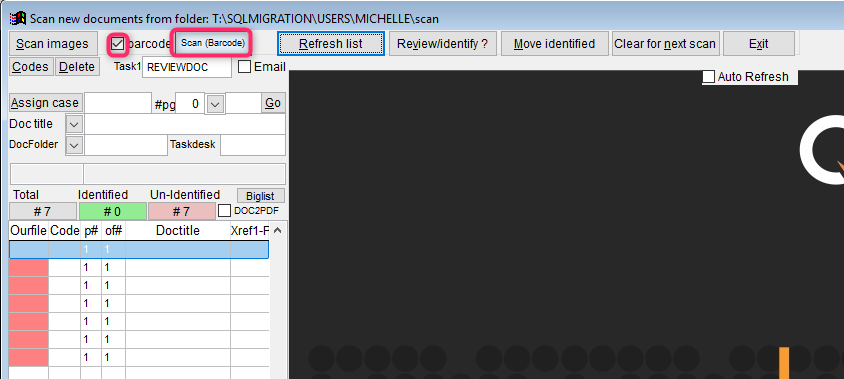
- Finally, make sure the barcode checkbox is checked and click [Scan (Barcode)]. Q-LawE will read the barcode electronically and assign the correct ourfile, DocID, and number of pages/pdfs.
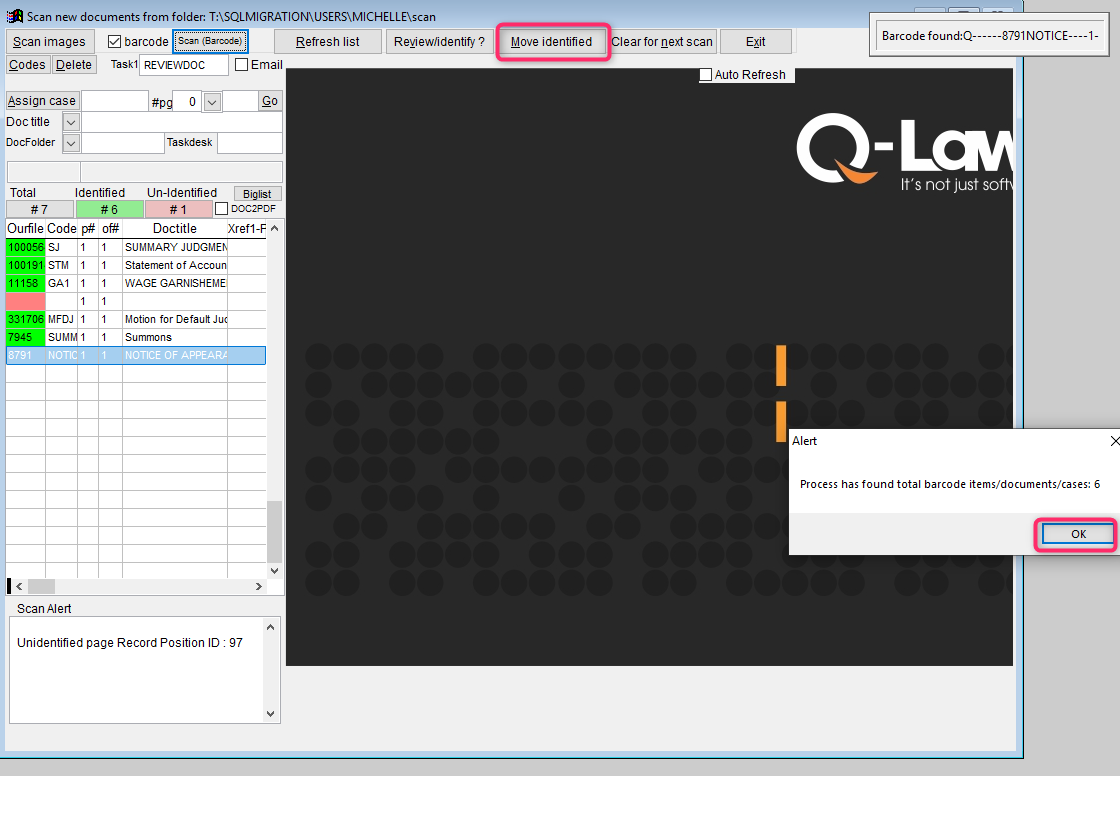
- When the process has identified the barcodes and assigned the ourfiles/DocIDs, you will receive a prompt indicating how many were identified. Click [OK].
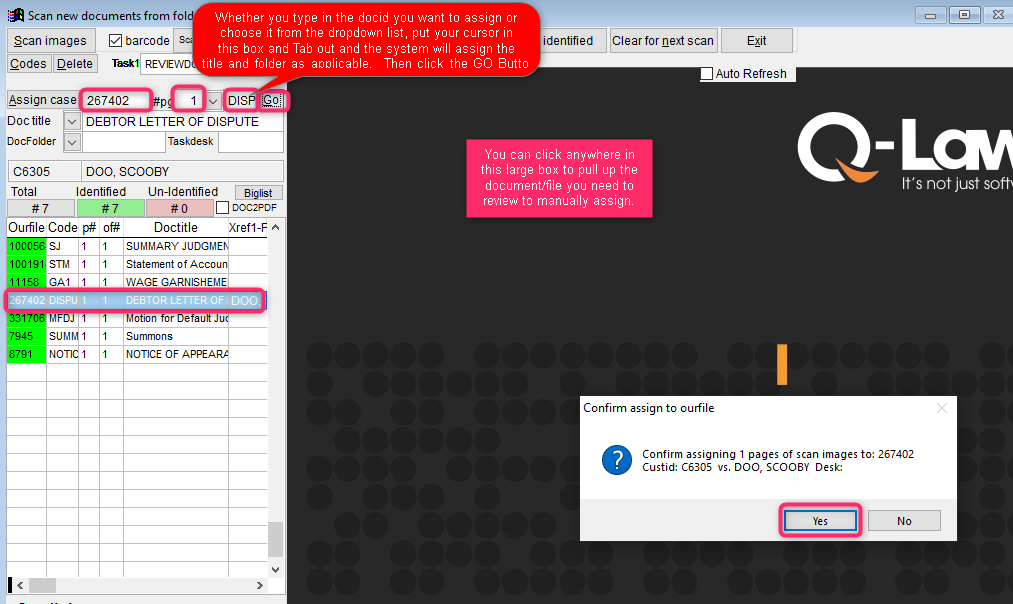
- If there are any documents without barcodes or unidentified, you can now manually assign them. Click on the item in the grid on the left, then double-click on the large Q-LawE box on the right. This will open the file to view the document. Then you can fill in the ourfile, choose the DocID, and tab out of the field and click [GO] to have the system fill in the info in the grid on the bottom.
- Click [Move Identified].
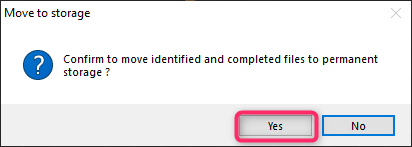
- Click [Yes] to confirm the moving of the files from your scan folder into the account files for storage.
- The documents will now be moved into their respective accounts, and each account will be notated with the document name that has just been imported. When the move of the files is complete, a prompt will appear; click [OK] to conclude the process.
s 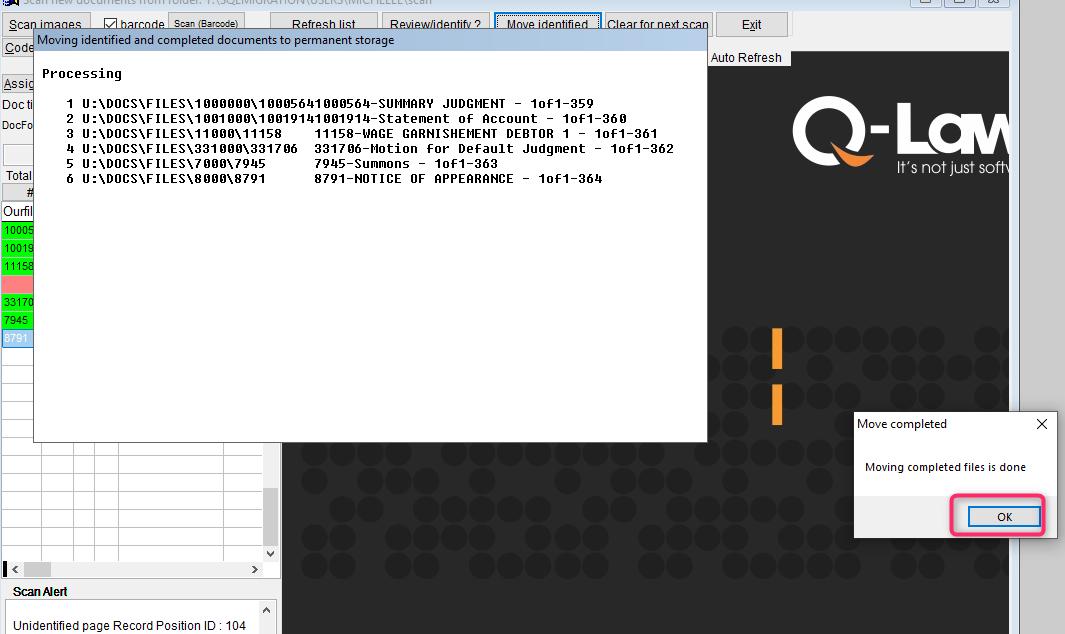
Document Batch Import
Document batch import is designed to import documents that are received as files from your client, vendors, or from other sources. This process can expedite moving documents from a folder into the individual account files.
- Requirements: There are only two requirements to be able to identify and move the file into the account files.
- The naming convention of the document file must contain one of the following: ourfile, custfile, ncustfile, fccustfile or preourfile, all of which are maintained in the debt table.
- You must be able to identify the account number you choose to use. For example, the ourfile begins in the first character position and ends at the dash (-).
Creating a new document batch import process:
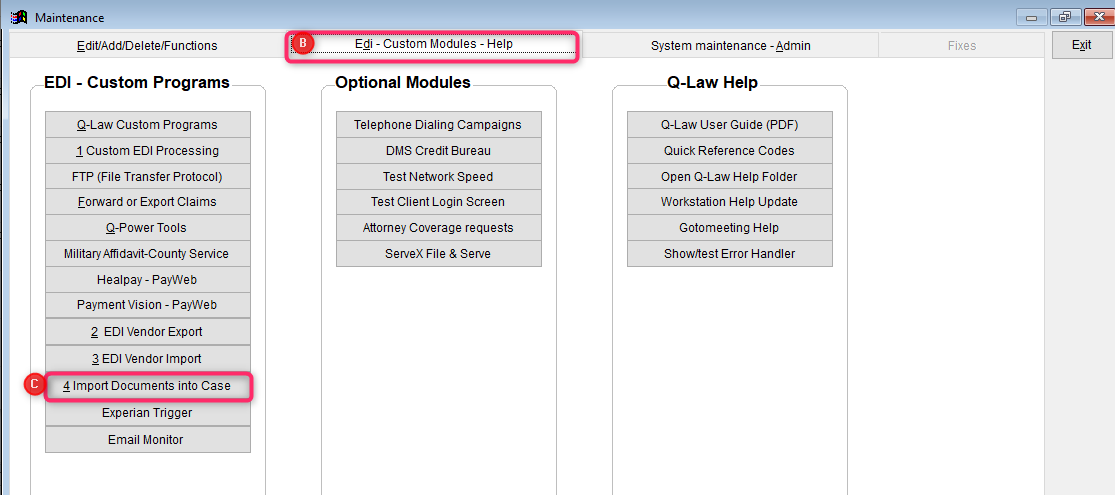
A. From the Main menu, click [Maintenance]
![]()
B. Then select the Edi – Custom Modules – Help tab
C. Click [Import Documents into Case]
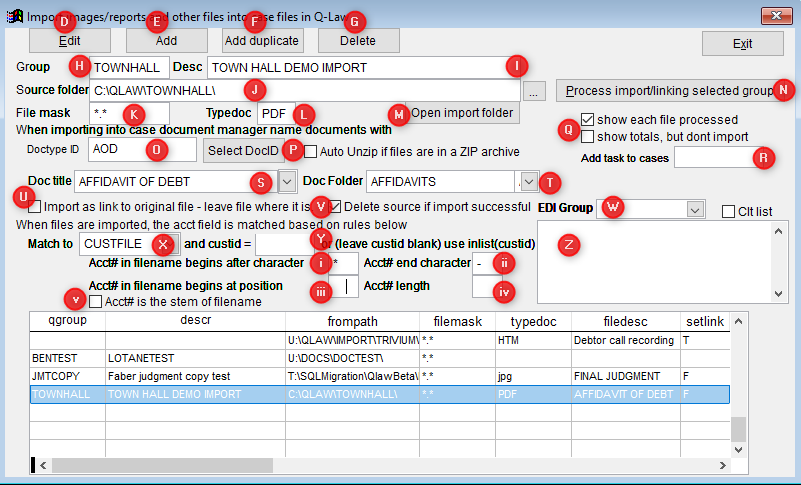
D. Edit – Click [Edit] to begin the process of editing/deleting an existing or creating a new import
E. Add – Click [Add] to create a fresh import screen to set up
F. Add Duplicate – You could also choose to duplicate from an existing document import and just make a couple of modifications; to duplicate, select an import to duplicate from the grid at the bottom, then click [Add duplicate]
G. Delete – After clicking [Edit], if you want to delete a document import, locate the import to be deleted in the bottom grid, then click [Delete].
H. Group – Give the import process a group to help identify if it belongs to a specific vendor, client, etc.
I. Desc – Give the import process a brief description
J. Source folder – The location in which the files are currently located
K. File mask – Leave as *.* or use the extension; this could be used to help identify which documents to import if there is more than one type of document in the folder. Example: a vendor sends you military affidavits, and the naming convention will always have a mil.pdf at the end; you could then put*mil.pdf in that box
L. Typedoc – if importing a link to a document (you are not moving the document location), leave this field blank; otherwise this is the extension to give the document. Example: PDF, JPG, TIF
M. [Open import folder] – Enables you to open the source folder directly in a windows browser
N. [Process import/linking selected group] – After setting up the document batch import process, use this button to run the process
O. Doctype ID – The DocID to assign to the document link created on the documents tab of the account (scanfile); can be selected using [Select DocID]
P. Auto Unzip if files are in a ZIP archive – Check this box if you have a zip file of multiple pdfs, for example; but further setup MUST be done for the unzip process and import to work:
- A requirement to use the unzip function is that all documents within the zip file must be the same document type (same DocID will be assigned to all)
- You will not be able to use the File mask option above, just leave it as *.*
- Create a file inside the source file and call it ZIP. Example: Source file is U:\import\documents\AODs inside the documents folder, create a ZIP folder then you also have U:\import\documents\AODs\ZIP
- Create a DONE folder inside the ZIP folder
- Place the zip file of all the documents to be imported into the ZIP folder you created

- Then process the import using [Process import/linking selected group] or Job Scheduler. The system will unzip what you placed in the ZIP folder and extract the documents contained therein into the source folder.
- The system will move the original Zip file into the DONE folder and import the individual document files into the accounts.
Q. Show each file processed or show totals, but don’t import – These are processing options. Upon completion of the [Process import/linking selected group], you can choose to see a statement showing each file that was processed (normally checked) or, if you just want to test the process, you may select the option to show the same totals but not actually import them.
R. Add task to cases – You can input a task code to always add to the accounts upon a document being imported using this process
S. Doc title – Will automatically by assigned when you select the DocID, or you can select it from the dropdown list
T. Doc Folder – Will also be automatically be assigned when you select the DocID, or you can select it from the dropdown list
U. Import as link to the original file – If you select this option, the documents will not be moved into the individual account files, but instead a link will be created on the documents tab of the account file (SCANFILE) to the original source file
V. Delete source if import successful – Checking this option will move a copy of the document file into the individual account files and create the appropriate link on the documents tab (Scanfile); if that is successful, then the system will delete the original document from the source file
W. EDI Group – You can choose a specific EDI group from the dropdown if this document import process is related to the EDI
X. Match to – The account number field that would be in the document naming convention of the document files to be imported; this setting is how to tell this system which account number field you were matching to in order to complete a successful import (ourfile, custfile, ncustfile, fccustfile, preourfile)
Y. and custid = – Input the custid if the import process is directly related to one client
Z. inlist(custid) – Input an inlist of custids if the import process is client(s)-specific. Example inlist(custid,’HOA1’,’HOA2’,’HOA3’,’HOA4’)
i. Acct# in file name begins after character – If the account number you are matching to starts at the first character of the naming convention, put an asterisk; if the document name is BRI‑123456789_05132020. 123456789 is the custfile, so you would put – in this box
ii. Acct# end character – In the example BRI-123456789_05132020. 123456789, the account number, started right after the dash and ended just before the underscore, so put an underscore in this box
iii. Acct# in filename begins at position – The character number the account number begins. In this example, the account number begins at character “5”; therefore, put a 5 in this box. BRI‑123456789_05132020. 123456789. Note this option specifically means the account number you are using is always the same number of characters.
iv. Acct# length – The character number the account number ends. In this example, the account number ends at character “13”; therefore, put a 13 in this box. BRI-123456789_05132020. 123456789. Note this option specifically means the account number you are using is always the same number of characters (always 9 characters long in the example).
v. Acct# is the stem of filename – Define?
- Processing the document imports – you can manually process the import, or you can place it on the Job Scheduler to process.
- First place the document files to import inside the source folder. This can also be done with an FTP process if you are downloading them from a vendor or client. If they are emailed, it is a simple copy and paste into the source folder.
- Manual process:
- From the Main menu, click [Maintenance]
- Select the Edi – Custom Modules – Help tab
- Click [Import Documents into Case]
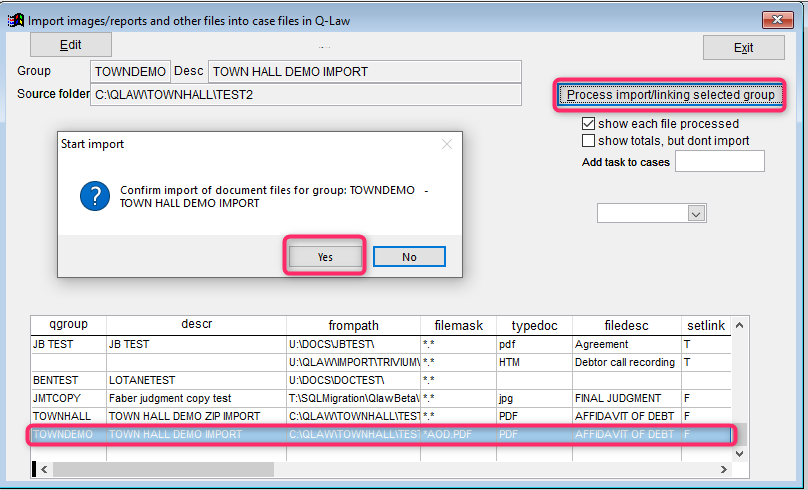
- Select which import you wish to process by clicking on it in the grid at the bottom of the screen
- Then click [Process import/linking selected group]
- Click [Yes] to confirm running the import process
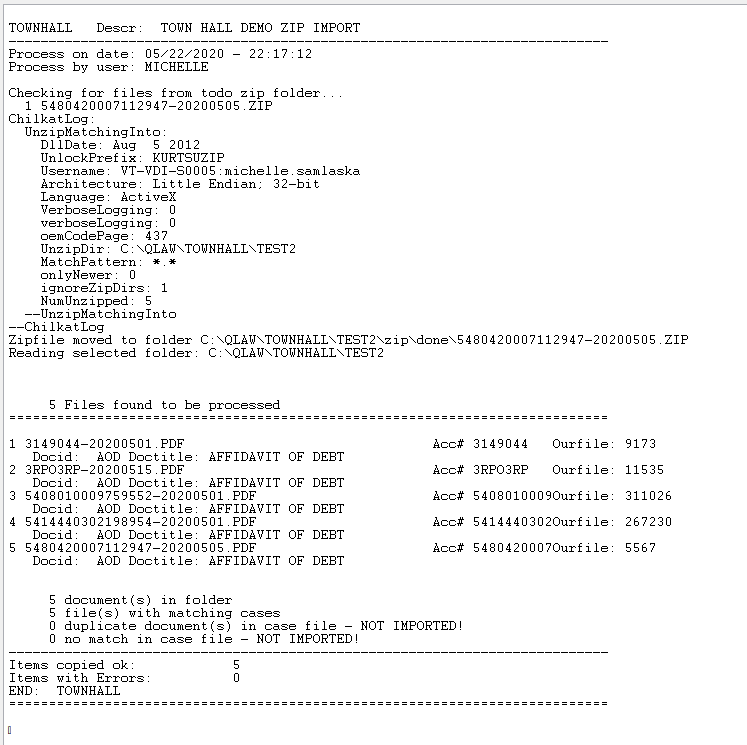
- When the process is complete, you will receive a logfile telling you what ran and how many files were processed
- Processing the document batch import via Job Scheduler:
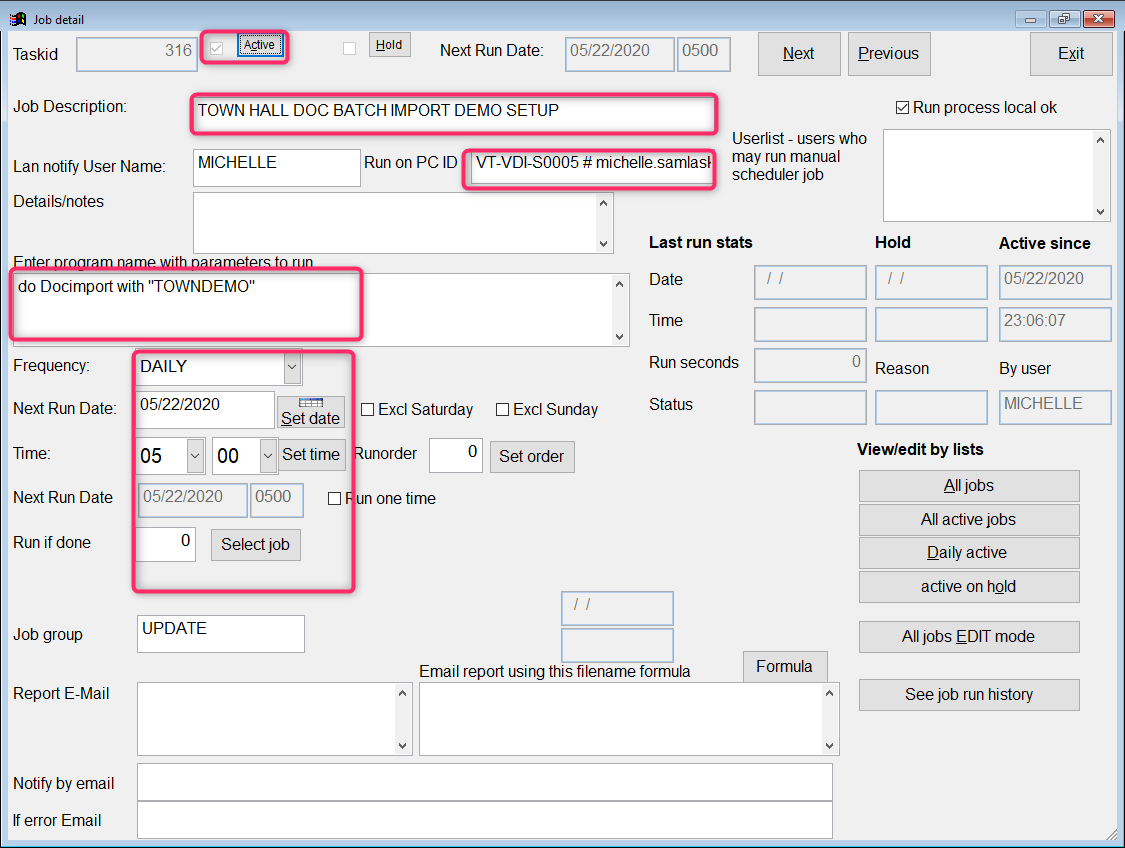
- Create a new Job Scheduler and have it run the following program: do Docimport with “GROUPNAME“. Below is an example screen; most of the settings will be unique to your firm/system. But the import process is triggered by the run program.
DDAS Tips
There are two system triggers related to this presentation. They are as follows:
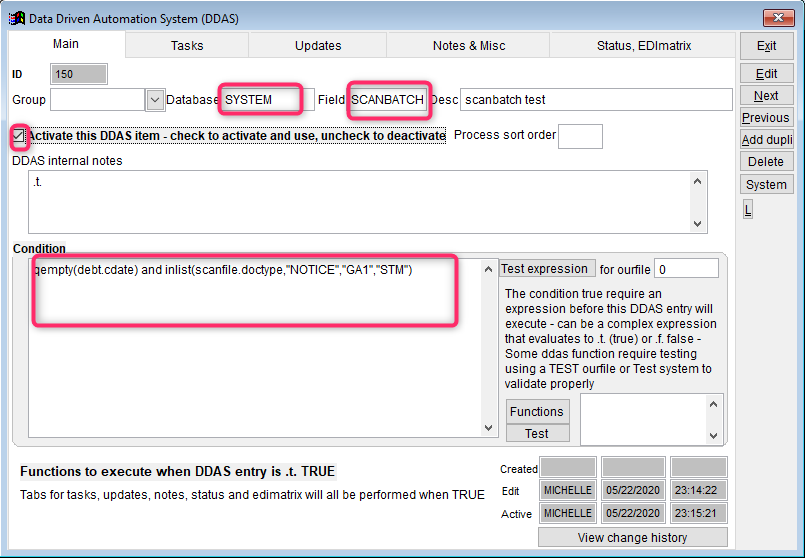
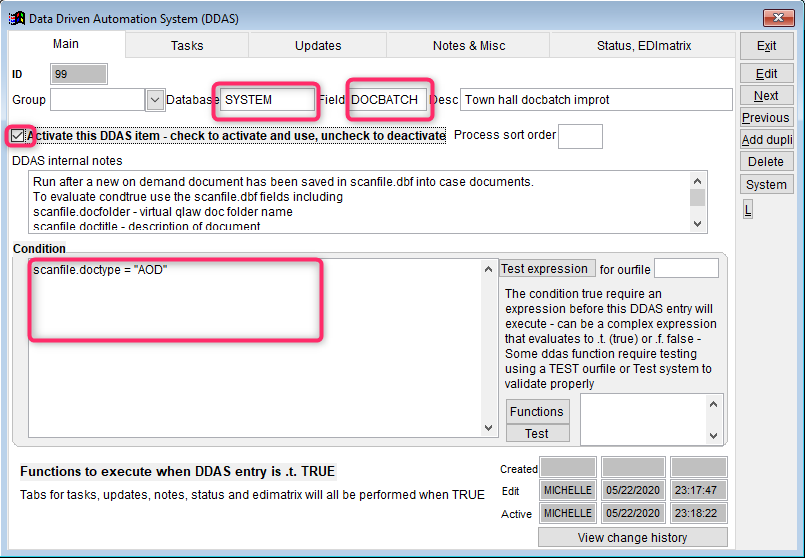
1. SYSTEM.SCANBATCH – This is used when the document is being moved into the account file via [Scan Case Documents-Barcode]. It works if you are manually assigning the documents or if the reader is identifying them using barcodes. You will usually identify the DocID in the condition statement so that the DDAS item will only run if a specific DocID or list of DocIDs is added to the file via [Scan Case Documents-Barcode].
2. SYSTEM.DOCBATCH – This is used when the document is being imported into the account files using the document batch import process. You will typically use the DocID in the condition statement again in this example.
vMedia Compatibility and Use
vMedia can utilize QR codes for scanning documents. To streamline the process, two new features were added to Q-LawE.
-
In the Word Merge document setup screen, when Custom20 field is populated with “VMEDIA_QR”, the system will add the QR code to the document and use the required format for vMedia processing. The text box in the Word Merge document must be set to a minimum of 1.7″ for the QR code to correctly format.
-
A new firm preference VM_QRFIRM was added to Q-LawE. In the value of the firm preference, clients can distinguish the firm ID used by vMedia and the barcode scanner. The firm ID has a max value of 6 characters. Note – this is not required for vMedia QR code scanning.
.
Barcode Enhancements (September 2023 Release – QS-12689)
Barcode Types
There are three types of barcodes that the Barcode Scanner has been enhanced to read when importing. Additional enhancements have also been made to Datamatrix and Code 39 barcodes when generating documents in Q-LawE. Below are the different barcode types, how to use them, and examples of how to complete set up in documents.
To use the new codes, the single quote marks around the command are required for the string to work as expected, as shown in the examples below.
QR Code
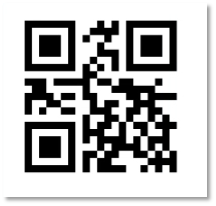
QR codes are now supported when importing documents using the Barcode Scanner. QR codes cannot be generated within Q-LawE at this time.
What a sample QR code looks like:
Datamatrix
Datamatrix barcodes can sometimes be confused with QR codes but are a different type of barcode that is supported in Q-LawE. There were several changes made for these barcode types:
- A new code to generate Datamatrix barcodes has been created for easier use in document generation. The previous string that generated these types of codes is still supported and will work but was slightly more cumbersome to use.
- The Barcode Scanner import has also been enhanced to read the Datamatrix codes when being imported.
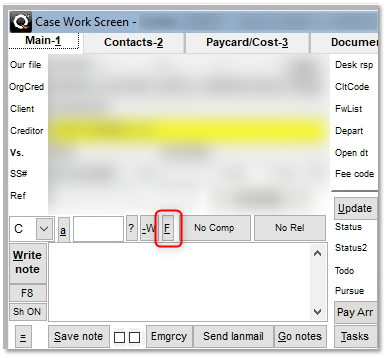
- The Datamatrix code has also been made available to use in the Workscreen Print Barcode menu. In the Workscreen of an account, this can be done using the [F] button next to the action box.
Use of the Datamatrix codes in document generation can be done in a couple of ways:
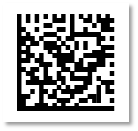
- Using ‘DM=’ in custom 20 will print a Datamatrix barcode using the docid of the template you are using in wpdocs.
- ‘DM=’ – Would generate a Datamatrix barcode using the DOCID of the Word document template it’s placed on in wpdocs.
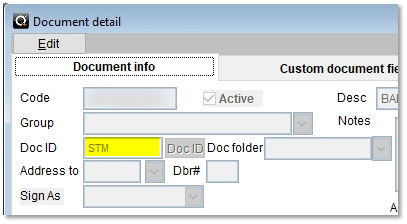

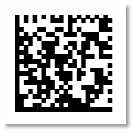
- Using ‘DM=DOCID’ in custom 20 will print a Datamatrix barcode assuming “DOCID” is replaced with a valid Docid from the doccode table.
- ‘DM=DLTR__’ – Would generate a Datamatrix barcode using the docid DLTR__ regardless of the Docid assigned to the template in wpdocs.
Code 39
Code 39 is the name of what would be seen as a more traditional barcode. This was always supported in Q-LawE, but a new code has been added to create Code 39 barcodes to make the string easier to use. Using the original barcode string in Custom20 on document templates is still supported and will not be affected.
To use the new Code 39 string in document templates:
- Using ‘39=’ in custom 20 will print a Code 39 barcode using the docid of the template you are using in wpdocs.
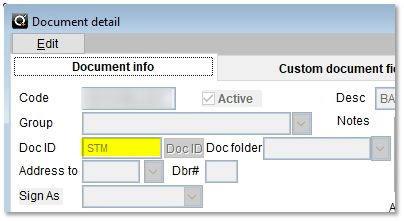


- Using ‘39=DOCID’ in custom 20 will print a Code 39 barcode with the specified docid, assuming “DOCID” is replaced with a valid Docid from the doccode table.
- ‘39=AFFR’ – Would generate a traditional Code 39 barcode using the docid AFFR regardless of the Docid assigned to the template in wpdocs.
