Last Update: February 8, 2022
CUSTOM FIELD DATABASE
Table of Contents
Custom Field Database
There will frequently be times where a custom-built string will be used in more than one template, like the debtor 1 address block. It would be tedious to type that string into each template and doing so leaves a lot of room for user error. Users can copy and paste strings from one template into another but as the number of templates in the system increases, it becomes harder and harder to remember which templates use which custom strings. For that reason, the Custom Field Database was created. The database stores custom strings with a unique code that is later entered into a one of the custom fields. Another perk of utilizing the database is that if changes need to be made to the string, the expression is edited in the Custom Field Database and then the changes are automatically pushed out to any templates that use that merge code.
Accessing the Database
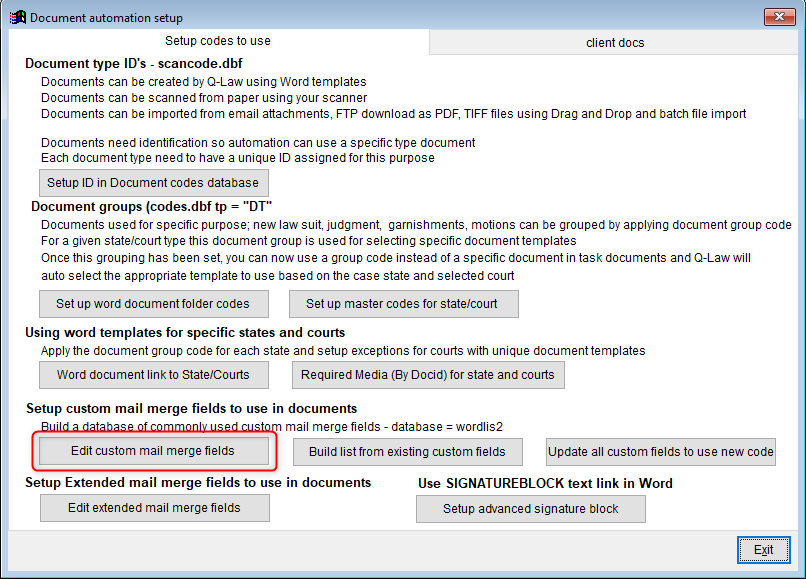
To access the Custom Field Database, open the Maintenance Menu and select [Document Automation Setup] then [Edit Custom Mail Merge Fields]. Records can be reviewed and added from this screen; edits and deletions should be done from the expanded view of the merge code. To expand a code, double-click or highlight and click [Select Record] on the line.

Adding a New Record
There are two ways of adding a new record to the Custom Field Database. The first method is by clicking [Edit Record] at the top of the database screen and then [Add New] and [OK]. The system will duplicate the highlighted record. Highlight the new record and click [Select Record] to being making changes.

Another option is to click [Add Custom MF] on the Custom Documents Fields tab of the Document Detail screen and then [Yes]. This will open a blank record.

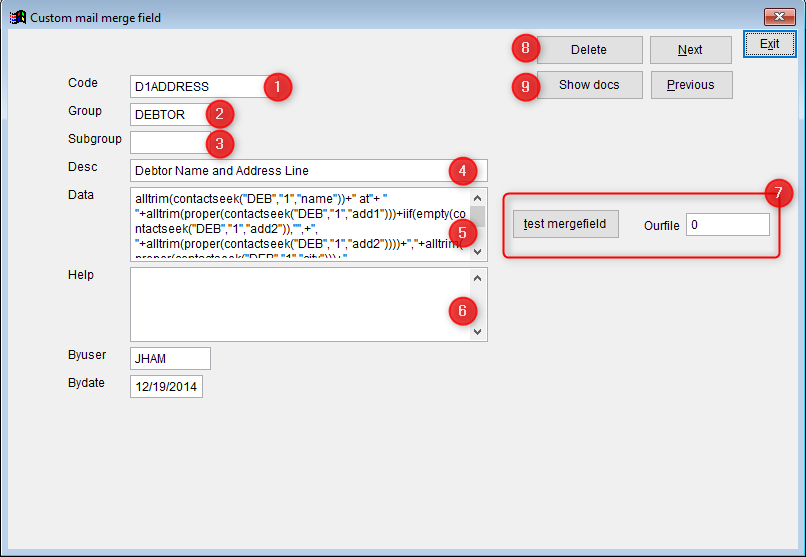
- Code – a unique identifier for this custom string. Up to 10 characters; valid characters include A-Z, 0-9, ‘.’, ‘_’, and ‘-‘
- Group – method of organizing the strings; like DEBTOR, CLIENT, FINANCE
- Subgroup – method of sub organizing the strings; like DEBTOR1, DEBTOR2, JUDGMENT, INTEREST
- Desc – a description for this code. This is visible from the Custom Field Database grid
- Data – this field will contain the actual string for this code
- Help – an optional field to provide additional details or instructions regarding the string
- Test Mergefield & Ourfile – clicking the button will test the string on the ourfile entered in the aptly marked field
- Delete – deletes the code from the database. This can only be used if the code is not being used in a custom field on a template already
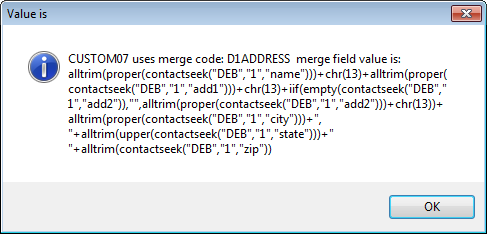
- Show docs – generates a prompt identifying what templates, if any, this code is currently being used in
Using a Custom Field
 Once a field has been added to the database, it can be added to a template. To do so, navigate to the Custom Document Fields tab of the Document Detail screen for the chosen template. Click [Insert Custom] to open the Custom Field Database. Double-click or highlight and click [Select Record] on the desired record. A prompt will appear advising that the merge code has been copied to the clipboard; click [OK] to continue. Click in the custom field box where the code should be stored and hit Ctrl+V on the keyboard to the paste it.
 Note the two equal signs before the code; that is how the system determines it is a custom merge code and not an improperly entered field name. The [Test Expression] button does not work when using a field from the Custom Field Database as the string should have been tested during setup. The [Lookup] button can be used to see the string behind the merge code without having to leave the screen and requires that the custom field number be entered in the Custom # box before selecting.