Last Update: March 23, 2022
LINKING DOCUMENTS
Table of Contents
Setting up a DDASDOCS on a Task
Document Linking
Document Linking is a tool designed to help you batch merge document packages where special forms or templates are required in certain jurisdictions. You can link a form/template at the state level but also at the court level. Within that setup, you can also specify certain forms based on the account balance and claim type.
Setup
System codes:
DS – State / Court Table Linked Documents
- These are the codes that will be available in Task Manager.
- When you first create a state, you can import this entire list by selecting Add doc set.
- To edit/add/delete Document Link Codes (DS Codes) on your system:
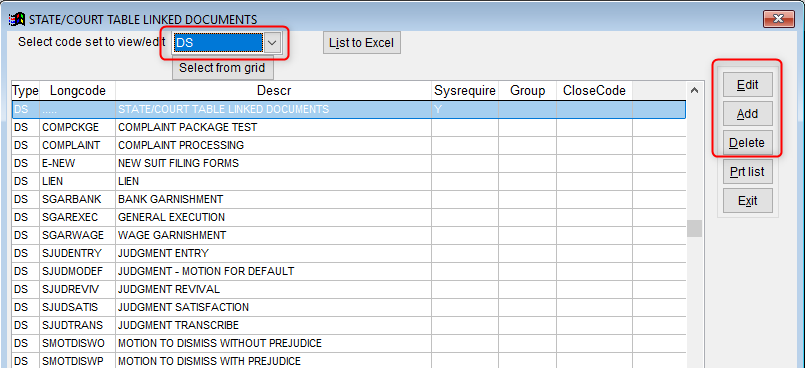
- In the Maintenance menu, click [System Codes] on the [Edit/Add/Delete/Functions] tab.

- Locate the Code DS from the dropdown list at the top.
- Then click [Edit], [Add] or [Delete] as applicable.
OR
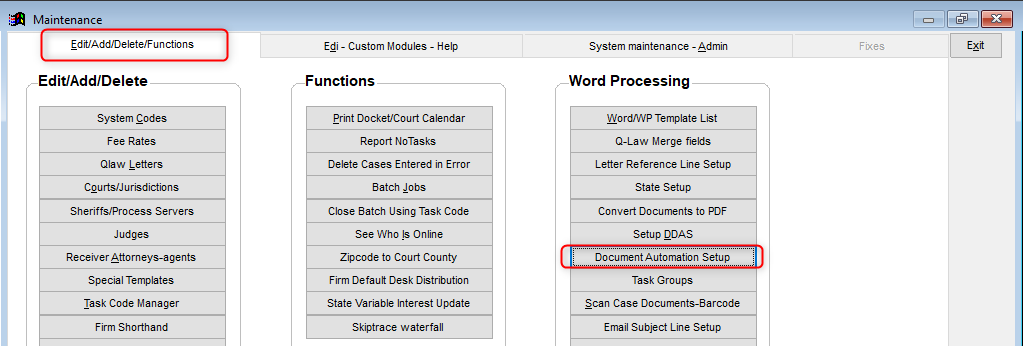
- In the Maintenance menu, click [Documents Automation Setup] on the [Edit/Add/Delete/Functions] tab.
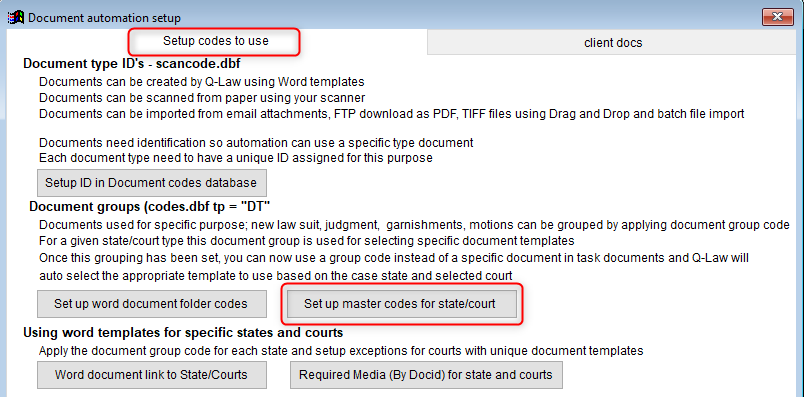
- Click [Setup Code for State/Court] on the [Setup Codes to Use] tab.
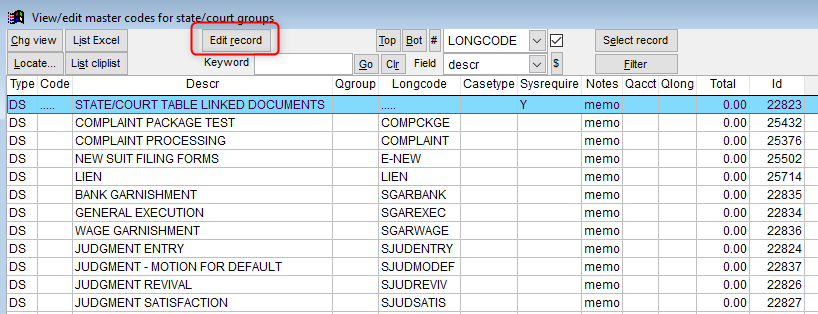
- Then click [Edit] to add/edit/delete Document Link (DS) Codes.
SU – Claim/Suit Type
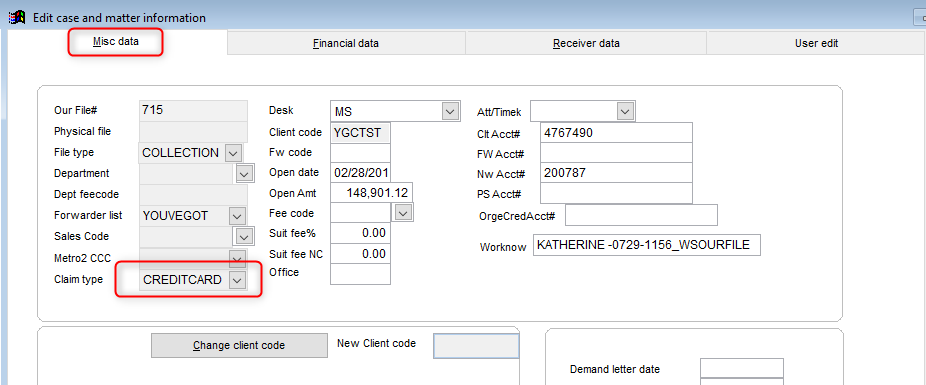
- These codes are assigned at the account level to identify the type of claim, not to be confused with file type. The claim type can be seen on the main work case screen of an account and can be seen and edited in the edit screen on the [Misc Data] tab.
- These codes are not required to be used in document linking but are necessary if you have different forms for different claim types used. For example: You have a specific complaint to use for credit card cases and a different complaint to use for medical claims. The claim types would be necessary.

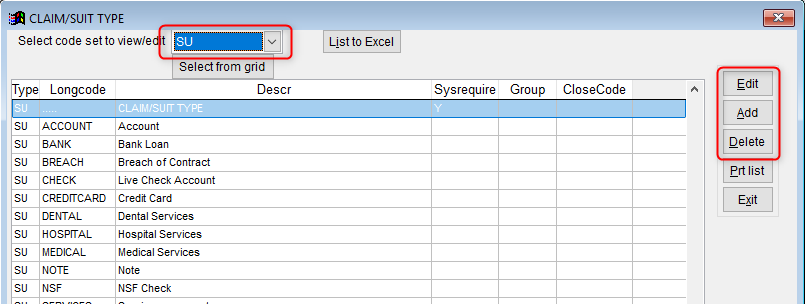
- To edit/add/delete Claim types (SU Codes) on your system, in the Maintenance menu, click [System Codes] on the Edit/Add/Delete/Functions tab.

- Locate the Code SU from the dropdown list at the top.
- Then click [Edit], [Add] or [Delete] as applicable.
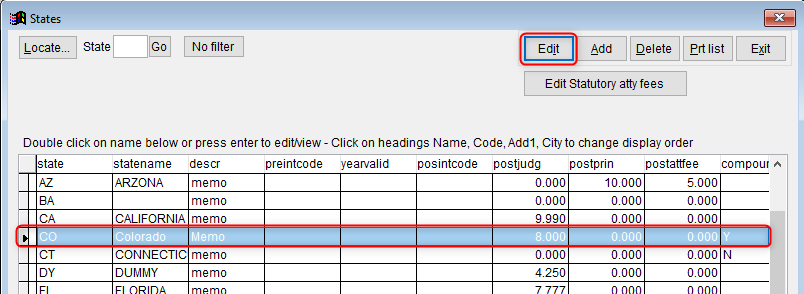
- State Setup Level settings are used to set up State-Specific form or Default form settings. In the Maintenance menu on the [Edit/Add/Delete/Functions] tab, click [State Setup] and choose the state code or client-specific state code. Then click on the [Documents Link] tab and click [Edit].
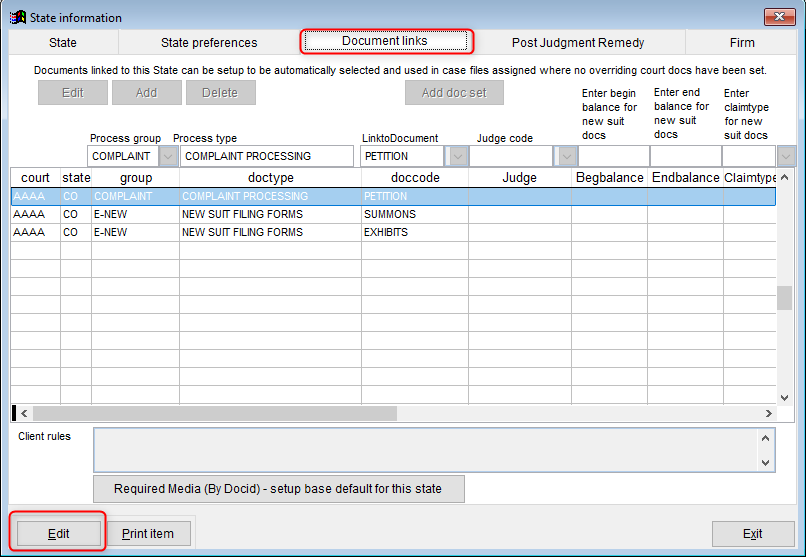
- Adding new items to the State Document Link screen:
- From the [Document Links] tab, you can choose to add all system Codes to the state by clicking [Add Doc Set]; then clicking [Yes] to confirm adding the whole list.
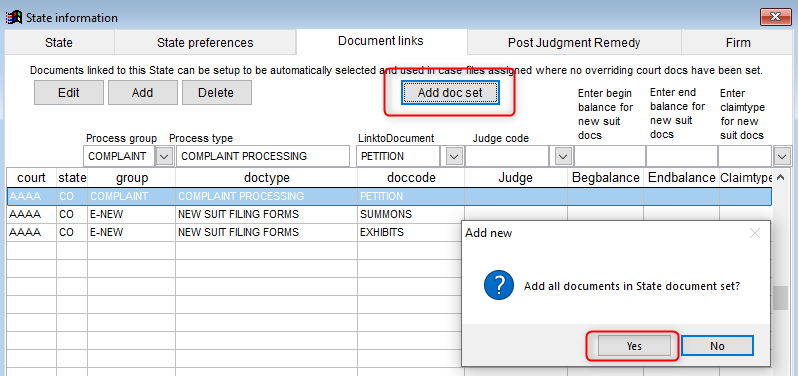
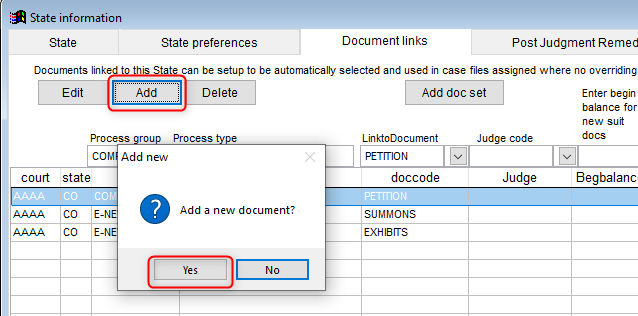
- You can also choose to add an individual DS Code by clicking [Add]. Then click [Yes] to confirm adding a new document.
Settings for the DS Codes
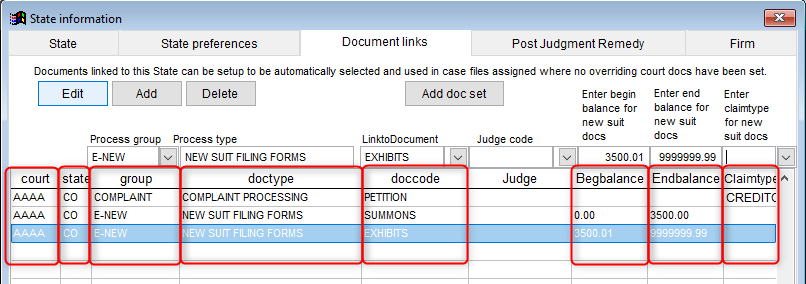
- AAAA is the default court. Do not change it. These are state exceptions and court exceptions that will be set up in a different location.
- State is automatically populated with the state you are working within.
- Group is the DS code you are setting for the exception.
- Doc Type is the description assigned to the DS code chosen.
- Doccode is the document the code is linked to for this state (as listed in the Word WP / Template list). This is the document that will be merged if it meets the filters settings.
- Judge is not to be used.
- Begbalance and Endbalance are optional but can be used to filter accounts with a principal balance of a certain amount range.
- Claim type is optional, but it enables further filtering if desired.
- In the above example:
-
- AAAA tells the system this is a State Rule – Do Not Change. We will get into court-specific forms later in this session.
- The state is CO.
- Using the Document Link Code (DS code) E-NEW.
- Scenario is that Small Claims court requires a Summons form; but, if the case is not a Small Claims case, I must submit Exhibits.
- Small Claims is any suit with a suit amount or principal that is between $0.00 – $3,500.00.
- Only merge the Exhibits form if it is NOT a Small Claims.
- Claim Type is not relevant for this form.
- For complaint processing it will be for CreditCard claim type specifically
-
Court Exception Document Linking is used for Courts that require their specific forms to be used instead of the default or standard state forms. In the Maintenance menu, click [Courts/ Jurisdictions] located on the [Edit/Add/Delete/Functions] tab. Locate the Court in the list and click [Edit] to open the court file, then click on the [Document links] tab.

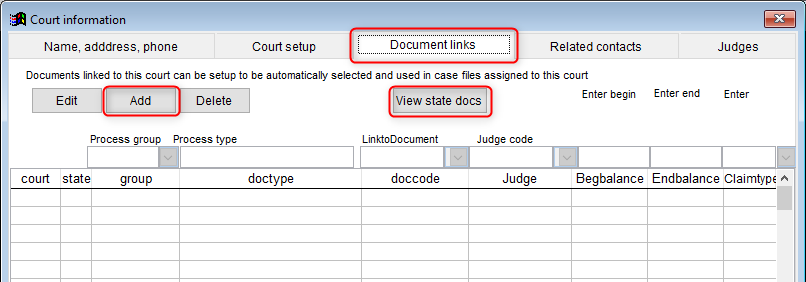
- Adding new items to the Court Document Links screen:
- Once you are on the [Document Links] tab, you can choose to [View state docs] to view what codes and forms are set up at the state level for this court’s state setting. Which was covered in the previous section
- You can add individual DS codes by clicking the [Add], then clicking [Yes] to confirm adding a new document.
- To then edit or add the applicable settings for new or existing DS Codes, click [Edit].
- The code in the court column is the Court Code for this court. Do not change it. When working in a court file, you are adding exception for this Court only.
- State is automatically populated with the State code assigned in the court address.
- Group is the DS code you are setting for the exception.
- Doc Type is the description assigned to the DS code chosen.
- Doccode is the document the code is linked to for this state (as listed in the Word WP / Template List). This is the document that will be merged if it meets the filters settings.
- Judge is not to be used.
- Begbalance and Endbalance are optional but can be used to filter accounts with a principal balance of a certain amount range.
- Claim type is optional, but it enables further filtering if desired.
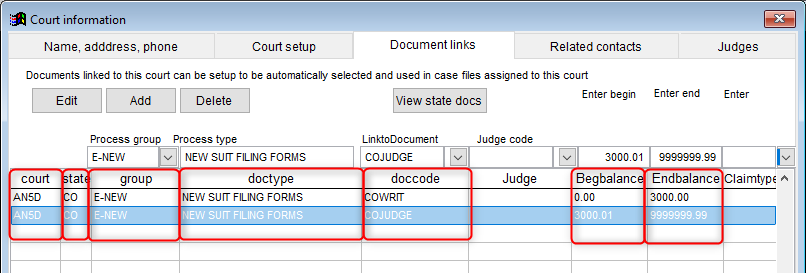
In the above example:
- AN5D tells the system this is a Rule assigned to court code AN5D. Do Not Change.
- The Court is in the state of CO.
- Using the Document Link Code (DS code) E-NEW.
- Scenario is that Small Claims cases in this court require a COWRIT form; but, if the case is not a Small Claims Case, I must submit a COJUDGE form.
- Small Claims is any suit with a suit amount or principal that is between $0.00 – $3,000.00.
- Claim Type is not relevant for this form.
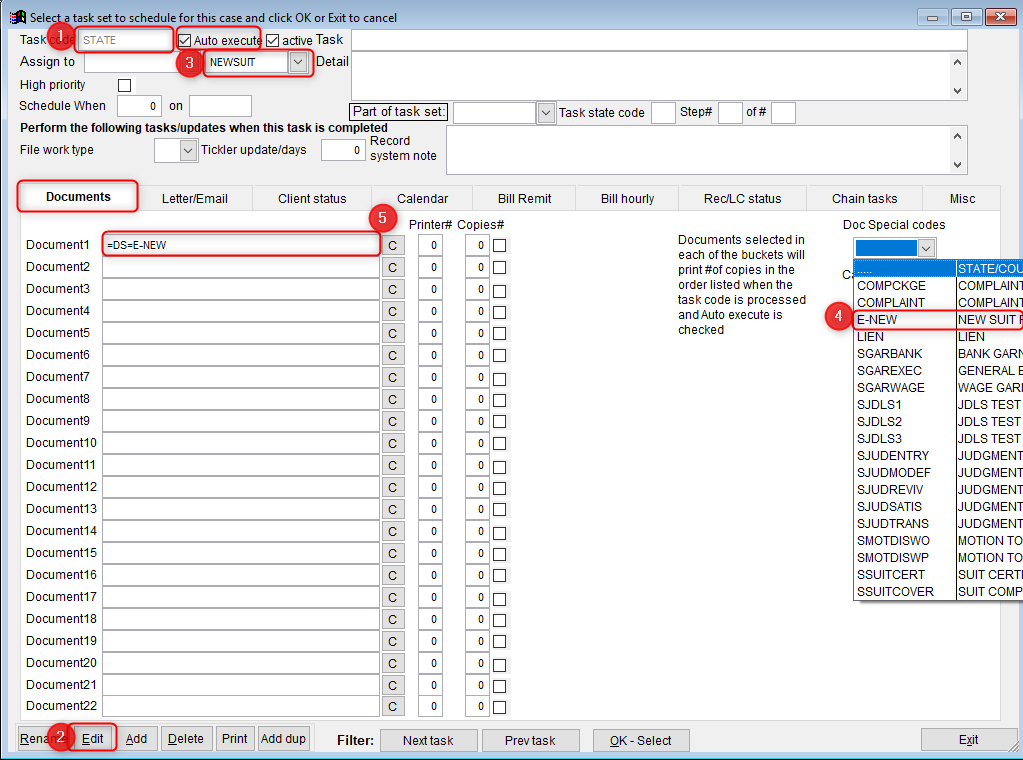
1. Task setup – Setting up the task code is easy. In the Maintenance menu click [Task Code Manager] on the [Edit/Add/Delete/Function] tab.
- Locate the task you want to use to merge the docs or to add a new task code.
2. Once you have the task code open, click [Edit].
3. Set the task code to be an auto-executed task code and assign it to any auto group you want.
4. Using the Doc Special codes dropdown list, click on the code you want, then put the cursor in one of the document boxes on the documents tab of the task code and paste the chosen code in the box.
- When the task is processed via TAS documents or Execute now, it will look first at the court that is assigned to the account in the Legal screen.
- Then it will search the [Document Links] setup for the DS code.
5. If it finds the DS code at the court level, it will merge the applicable document.
- If the system does not find the DS code at the Court level or for the requirements assigned (Balance range or claim type), It will move to the state level [Document Links] setup and look for the applicable document to merge at that level.
Things to consider and watch for when using Document Linking:
- If you are going to set up a DS code at a court level, there MUST be a DS code set up at the state level. Even if there is no document linked to it. If you use the DS code in a task and auto process the task, if the task processes on an account that has the state and it find the DS code, it will process fine. But if it processes on an account that has a different court and it does not have the DS code’ and it looks at the State setup and does not find the DS code for the settings, then you will see the following error
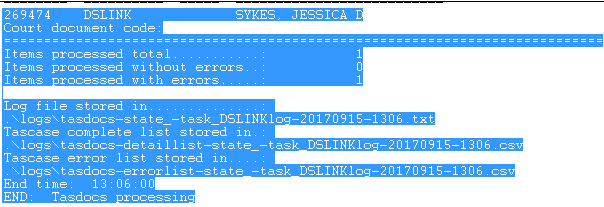
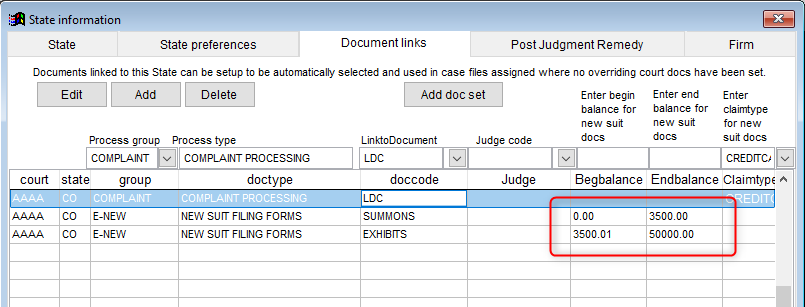
- If you use the balance range setting for a DS code, make sure all possible balances are accounted for when setting up the DS Codes. In the following example, if the task with the Doc Special Link for SSUITDATA were processed on an account with a principal balance of $75,000.00, then the process would error out, because there is not an option for $75,000.00.
- Same thing with claim types. If you set the DS code up using claim types, you MUST account for all claim types, even if several of them are linked to the same document template or no document template. All claim types used in your system must be accounted for in the [Document Linking] setup.
Using DDASDOCS
DDASDOCS is a tool used with the DDAS module that can enhance document automation. DDASDOCS allows you to completely change what document templates and/or existing media will be printed for an account by using a DDAS condition to determine what should print. Keep in mind that having the DDAS module is required for DDASDOCS (optional module in Q-LawE FOX but included in Q-LawE). This will essentially “replace” what is in the Document1 – Document12 boxes in the Task Code setup with whatever the DDAS condition returns.
DDASDOCS Setup and use
Setting up a DDAS item using DDASDOCS:
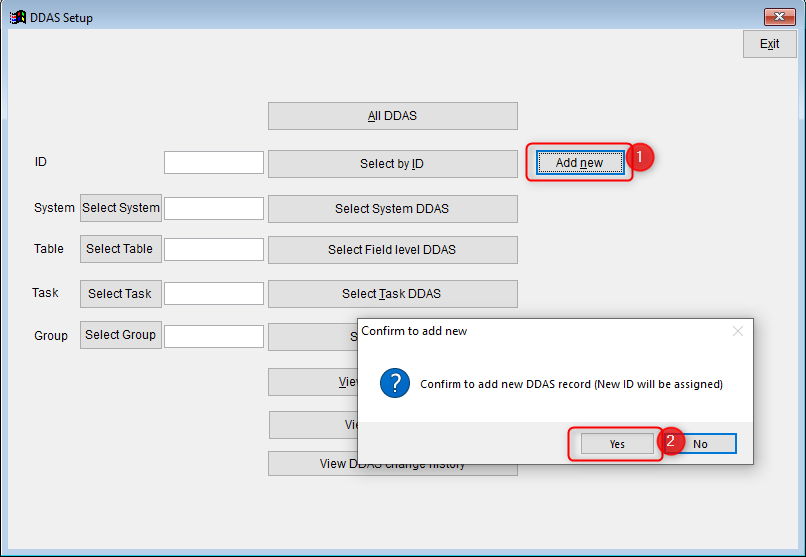
- From the Maintenance menu click [Setup DDAS] on the Edit/Add/Delete/Functions tab.

- Once in the DDAS setup screen, click [Add New].
- Then click [Yes] to confirm adding a new DDAS item.
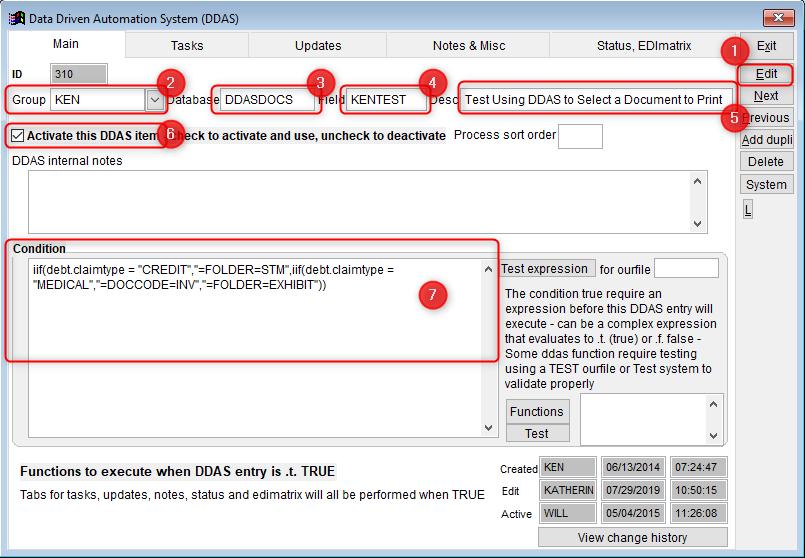
- Click [Edit].
- You can assign the DDAS item to a Group to help group DDAS items.
- The Database field will always be DDASDOCS.
- The Field will be what you want to call this DDASDOCS item and can be up to 10 characters.
- Then give the DDAS item a description.
- Check the box next to [Active].
- The condition statement is very important because you are telling the system what to put on the Document fields in the task setup.
In the example above, we are evaluating claim type. If the claimtype = CREDIT, it will put =FOLDER=STM in the document1 box, if the claimtype = MEDICAL, it will put =DOCCODE=INV in the document1 box, and if the claimtype is anything else, it will put =FOLDER=EXHIBIT in the document1 box.
NOTE: One thing to keep in mind when using DDASDOCS, is that the DDAS item itself cannot do anything else such as adding tasks, changing status codes, or other data fields. It is only used to tell the system what to put in one of the document boxes in task code setup.
Setting up a DDASDOCS on a Task
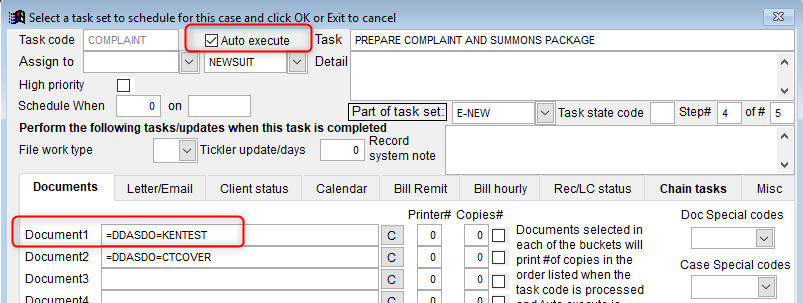
- Task setup for this DDASDOCS item must be an Auto task, then put =DDASDO=KENTEST in the document1 box.
- When the task code is processed using TAS documents or Execute now, it will trigger the DDAS with DDASDOCS in the database box and KENTEST in the field box.